Optimizing Itho HRU 350 control via MQTT and Home Assistant
(Updated: )
I have an Itho HRU 350 in my home, which is CO₂ controlled, but unfortunately it’s a very crude & noisy control algorithm. Here I document my approach to improve this. I also include humidity and bypass state checks to ensure the house is cooled & dehumidified appropriately.
Update July 2025: I cannot recommend this unit. My Itho HRU 350 previously had a broken temperature sensor & is currently showing unexplained toggling behaviour with the bypass valve. On top of that the unit is difficult to control/diagnose without adding an ESP board. Granted these featuers are only needed for summer cooling, but it’s
Current situation & goal 
Out of the box, the Itho HRU 350 (and other ventilation boxes) run at low speed (~700 rpm in my case) until the CO₂ level gets too high (>1500 ppm in my case), when it spins up to a rather noisy ~3300 rpm. When CO₂ is below 1000 ppm it slows down again. This is a rather blunt scheme that we can improve.
Goal: get more gradual control on the ventilation box, for example:
- CO₂ <500ppm: run at idle speed
- CO₂ 500-800ppm: run at low speed
- CO₂ 800-1100ppm: run at medium speed
- CO₂ >1100ppm: run at high speed
Update: additionally I want the ventilation to not go below a certain level in case of cooling or dehumidifying the house:
- If Itho bypass valve is open (house is cooling down): stay at elevated ventilation
- If max humidity is > 60 (house is moist): stay at elevated ventilation
- If pm2.5/finedust level is high, vent maximum
- If ‘high speed’ is manually toggled: stay at elevated ventilation
The Itho box only has 4 speed settings (auto == low, medium, autonight, high), so gradual control is not possible. However there’s a few things we can optimize
Itho control optimization 
There’s some things you can optimize on the Itho box itself to make the ventilation control a bit better.
Ventilator speed range 
My ventilator box runs at the following speeds & power consumption levels before calibration:
- Auto: 750 rpm @ 5W
- Autonight: 2000rpm [= (max-min)*Night min vent optima 1/2 multi-floor 3+ persons (%) +min) = (3300-750)*48%+750] @ 40W
- Low: 750 rpm @ 5W
- Medium: 1500 rpm @ 20W
- High: 3300 rpm @ 167W
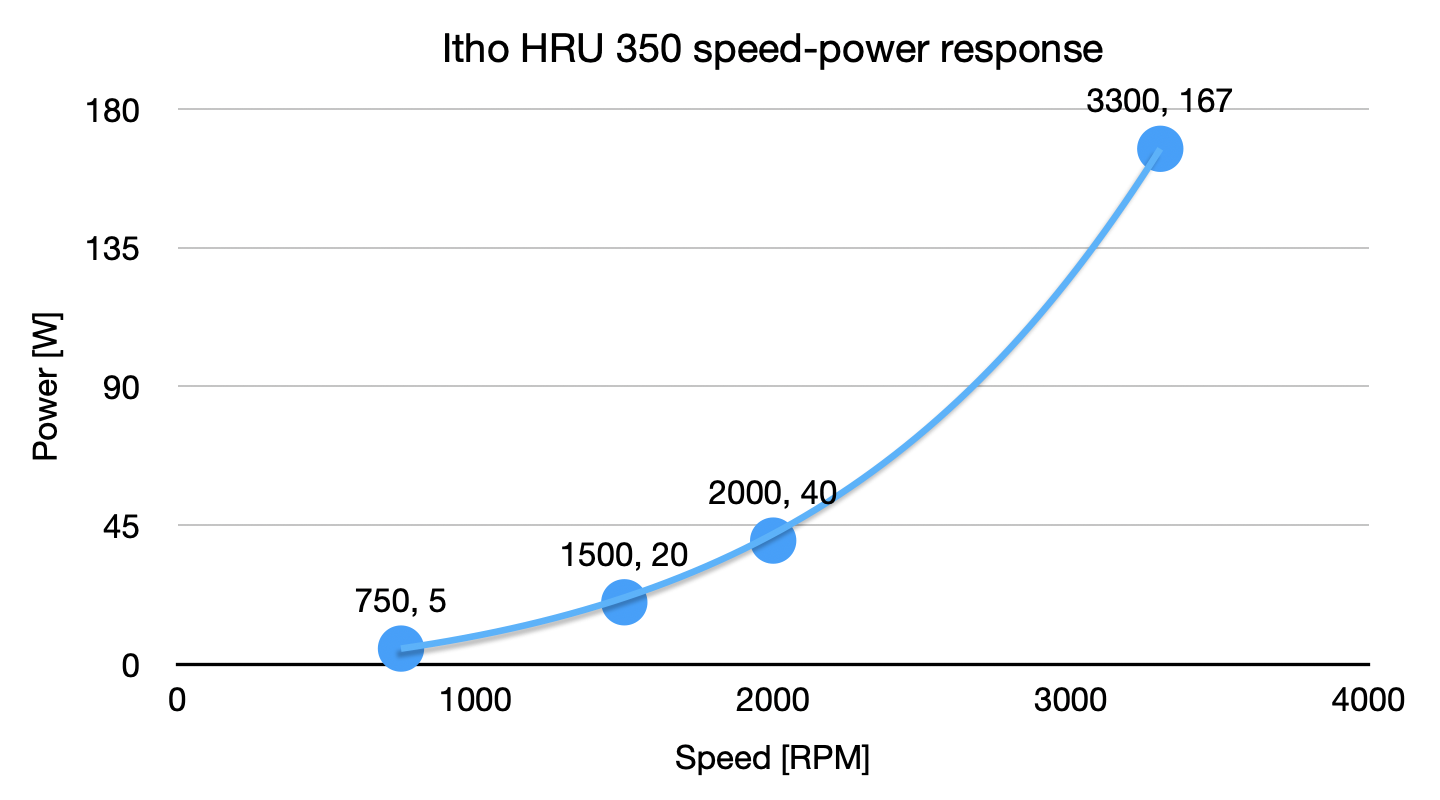
Because the power goes with the cube of speed (engineeringtoolbox.com), it can be worthwhile to see what maximum speed you need. In my case I reduced the highest setting using the potentio meter on the box.
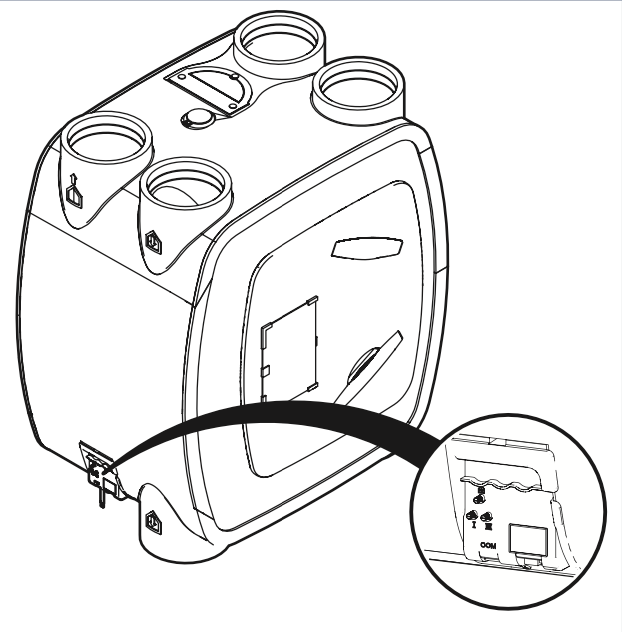
Itho HRU 350 controls are on the left lower side of the unit.
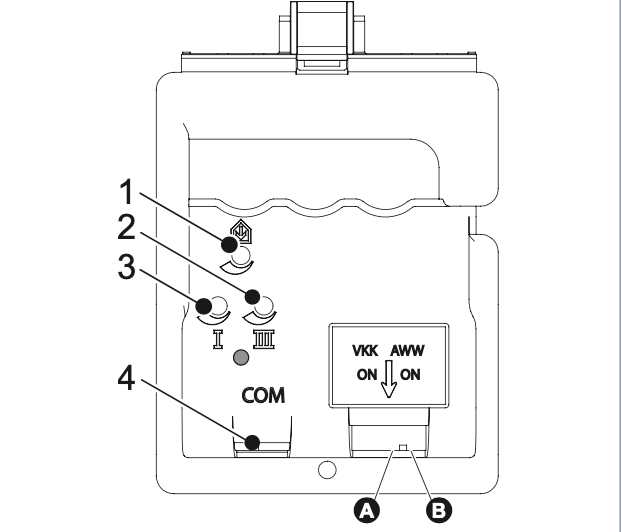
Itho HRU 350 controls have two potentiometers labeled I and II to set the low and high fan speeds respectively.
After calibration:
- Auto: 750 rpm @ 5W
- Autonight: 1750rpm [= (max-min)*Night min vent optima 1/2 multi-floor 3+ persons (%) +min) = (2850-750)*48%+750] @ 31W
- Low: 750 rpm @ 5W
- Medium: 1390 rpm @ 16W [=30% of min-max range]
- High: 2850 rpm @ 115W
Install NRG.watch esphome board 
To tweak some other settings of the Itho unit you need install custom hardware. I got a pre-built ESP8266 board from Arjen Hiemstra at NRG.watch (nrgwatch.nl). I tried to solder on the CC1101 myself and failed, so would recommend to save the frustration and spend 5 EUR to have it pre-soldered. Connecting the board to the Itho HRU was done with a 15cm straight 8p UTP cable. This module allows you to finetune settings of the box.
On the module’s config page:
- Set ‘Home Assistant MQTT Discovery’ to off
- Set ‘Normalize keys’ to on
- Set up virtual remote (unrelated to RF). It’s important to set this up in order for the module to send the right commands.
- Select the right remote type, I took one I already had at home. See details on remote types here (github.com).
- Power cycle the Itho unit, ensure to leave power off for a minute or two
- Power on the Itho unit and click ‘Join’ on the Virtual Remotes page within two minutes of power-on
- If this doesn’t work, monitor the syslog, RF log or I2C log (on debug page) and duplicate the ID of an existing remote.
Configure detailed Itho settings 
On the ‘Itho settings’ page of the NRG.watch unit you can query the >100 settings and try to optimize the unit yourself. I haven’t found any documentation, and setting names are quite cryptic, but I did find:
- Increase ‘autonight’ speed - this increases the autonight setting speed, and is useful because it still has the native CO₂-dependent control algorithm
- Set ‘80 - Number of floors (floor)’ to max of 2.
- Set ‘81 - Inhabitants (inhab)’ from 1 to max of 3.
- Tweak high/low CO₂ threshold –> this triggers the high ventilation speed more quickly, 1500ppm is already quite poor quality, so ideally I’d trigger at ~1000 ppm, but that’s not possible out of the box
- Set ‘78 - PoorCo2Quality (ppm)’ from 1600 to lowest value 1501
- Set ‘79 - GoodCo2Quality (ppm)’ from 1400 to mid value 1000
Optimize Itho bypass 
Understanding Itho bypass control 
The Itho HRU has a bypass valve which opens to disable the heat recovery. This can be useful in summer with cooler nights to cool down the house (or theoretically hot winter days to warm up the house, but this is not supported). The control algorithm is a bit opaque, and reverse-engineered here (tweakers.net), here (tweakers.net), and here (tweakers.net).
The Itho HRU has two temperature sensors:
- Supply temp (C) is the temperature of air supplied to the house, and is slightly lower than the indoor temperature (due to efficiency losses)
- Exhaust temp (C) is the temperature of air exhausted from the house, ans is slightly higher than the outdoor temperature (due to efficiency losses)
Bypass opens when:
- Summerday (K_min) == 1
- par 105. BypassTimer == 0
- [Supply temp (C) - Exhaust temp (C) ] > par.14, de “Offset bypass regulation (0.1*K)”.
Summerday is set to 1 when:
- par.104 SummerCounter (K_min) > par.12: “Summer day time (K*hr) (default “*60 = 5*60 = 300
- par.104 SummerCounter (K_min) is increased when Exhaust temperature > par.10: “Summer temp (°C)” [default 19C], and is evaluated every minute.
Bypass closes when:
- Supply temp (C) < par.13 “Wanted temp bypass regulation (°C)” [default 17C] OR
- Supply temp (C) > Exhaust temp (C) (i.e. when it’s too warm outside to cool)
It’s unclear how these parameters work:
- par.105 BypassTimer (min)
- par.15 Max bypass open time (hrs)
Optimize settings 
I’m using the following settings:
- par.10: “Summer temp (°C)”: 18 degrees: start counting summer when outdoor is >18 degrees
- par.12: “Summer day time (K*hr)”: 5: default integration time of degree minutes
- par.13: “Wanted temp bypass regulation (°C)”: 23 - stop cooling when indoor temp is <23 degrees. Update May 2025: now set at 17 deg, because somehow the exhaust temperature is much lower than the inside temperature.
- par.14: “Offset bypass regulation (K) “: 1 deg - only start using bypass if delta T is >1 degree (to prevent toggling)
20250700 
Itho unit temp sensors were replaced and the unit was reset by support mechanic.
- Offset bypass regulation (K). Set from 0.5 to 1
Other settings:
- Set ‘80 - Number of floors (floor)’ to max of 2.
- Set ‘81 - Inhabitants (inhab)’ from 1 to max of 3.
- Set ‘78 - PoorCo2Quality (ppm)’ from 1600 to lowest value 1501
- Set ‘79 - GoodCo2Quality (ppm)’ from 1400 to mid value 1000
Optimal control via Home Asssitant 
Through Home Assistant (or other software that can control the esphome device) you can finetune the control further.
I got the software from Arjen Hiemstra’s IthoWifi (github.com) and combining it with Home Assistant as documented on the Non-CVE units (github.com), MQTT integration (github.com), and Home Assistant (github.com) wiki pages.
Configure Home Assistant 
Add config to Home Assistant. Ensure you merge this config with existing mqtt/sensor configuration (e.g. you should only have one ‘mqtt’ key, Home Assistant will give an error if you don’t.)
mqtt:
  sensor:
    - name: "itho_hru_co2"
      unique_id: "itho_hru_co2"
      state_topic: "itho/ithostatus"
      value_template: "{{ value_json['highest-received-co2-value_ppm'] }}"
      unit_of_measurement: "ppm"
      device_class: carbon_dioxide
      state_class: 'measurement'
      device: { identifiers: ["mqtt", "nrg-itho-28ac"] }
    - name: "itho_hru_exhaust_fan_actual"
      unique_id: "itho_hru_exhaust_fan_actual"
      state_topic: "itho/ithostatus"
      unit_of_measurement: "rpm"
      value_template: "{{ value_json['exhaust-fan-actual_rpm'] }}"
      device: { identifiers: ["mqtt", "nrg-itho-28ac"] }
    - name: "itho_hru_supply_fan_actual"
      unique_id: "itho_hru_supply_fan_actual"
      state_topic: "itho/ithostatus"
      unit_of_measurement: "rpm"
      value_template: "{{ value_json['supply-fan-actual_rpm'] }}"
      device: { identifiers: ["mqtt", "nrg-itho-28ac"] }
    - name: "itho_hru_exhaust_temp"
      unique_id: "itho_hru_exhaust_temp"
      state_topic: "itho/ithostatus"
      unit_of_measurement: "°C"
      device_class: temperature
      value_template: "{{ value_json['exhaust-temp_c'] }}"
      device: { identifiers: ["mqtt", "nrg-itho-28ac"] }
    - name: "itho_hru_supply_temp"
      unique_id: "itho_hru_supply_temp"
      state_topic: "itho/ithostatus"
      unit_of_measurement: "°C"
      device_class: temperature
      value_template: "{{ value_json['supply-temp_c'] }}"
      device: { identifiers: ["mqtt", "nrg-itho-28ac"] }
    - name: "itho_hru_summer_counter"
      unique_id: "itho_hru_summer_counter"
      state_topic: "itho/ithostatus"
      value_template: "{{ value_json['summercounter'] }}"
      unit_of_measurement: "h"
      device_class: duration
      state_class: 'measurement'
      device: { identifiers: ["mqtt", "nrg-itho-28ac"] }
    - name: "itho_hru_airfilter_counter"
      unique_id: "itho_hru_airfilter_counter"
      state_topic: "itho/ithostatus"
      value_template: "{{ value_json['airfilter-counter'] }}"
      unit_of_measurement: "h"
      device_class: duration
      state_class: 'measurement'
      device: { identifiers: ["mqtt", "nrg-itho-28ac"] }
  binary_sensor:
    - name: "itho_hru_bypass"
      unique_id: "itho_hru_bypass"
      state_topic: "itho/ithostatus"
      value_template: "{{ value_json['bypass-position'] }}"
      payload_off: 0
      payload_on: 1
      device_class: opening
      device: { identifiers: ["mqtt", "nrg-itho-28ac"] }
    - name: "itho_hru_summer"
      unique_id: "itho_hru_summer"
      state_topic: "itho/ithostatus"
      value_template: "{{ value_json['summerday_kmin'] }}"
      payload_off: 0
      payload_on: 1
      device_class: light
      device: { identifiers: ["mqtt", "nrg-itho-28ac"] }
  fan:
    - name: "itho_hru_fan"
      device:
        identifiers: ["mqtt", "nrg-itho-28ac"]
        model: ITHO Wifi Add-on
        name: itho_hru_fan_device
      #availability_topic: itho/state
      unique_id: itho_hru_fan
      state_topic: itho/lwt
      payload_on: "online"
      payload_off: "offline"
      #state_value_template: '{% if value == "online" %}ON{% else %}OFF{% endif %}'
      #      json_attributes_topic: itho/ithostatus
      command_topic: "itho/cmd"
      preset_mode_command_template: "{ vremote: '{{ value }}'}"
      preset_mode_command_topic: "itho/cmd"
      preset_mode_state_topic: "itho/ithostatus"
      preset_mode_value_template: >
       {% set am = value_json['actual-mode'] | int %}
         {% if am == 1 %}
           low
         {% elif am == 2 %}
           medium
         {% elif am == 3 %}
           high
         {% elif am == 13 %}
           timer
         {% elif am == 24 %}
           auto
         {% elif am == 25 %}
           autonight
         {% else %}
           {{ am }}
         {% endif %}
      preset_modes:
       - "low"
       - "medium"
       - "high"
       - "auto"
       - "autonight"
       - "timer1"
       - "timer2"
       - "timer3"
Test via Home Assistant Developer tools -> Services
fan.set_preset_mode‘high’ - worksfan.set_preset_mode‘medium’ - worksfan.set_preset_mode’low’ - worksfan.set_preset_mode‘autonight’ - works
Set evenly spaced ventilation speeds 
To automate control we can use the 4 speed settings, by default these are irregulary spaced (0%, ~28%, ~47%, 100%), we can tweak autonight to be higher (70%) to make these more evenly spaced. This is beneficial because the power (and noise?) goes with the cube of speed (engineeringtoolbox.com), while ventilation only goes linearly. Hence we want to run at as low a speed as possible, and ideally not
- Set Autonight speed to 70% (not sure what the difference between ‘optima 1’ and ‘optima 2’ is so I set both)
- Set ‘86 - Night min vent optima 1 multi-floor 3+ persons (%)’ to 70%
- Set ‘92 - Night min vent optima 2 multi-floor 3+ persons (%)’ to 70%
Control proposal 
Now that we can control the Itho unit, it’s time to implement our improved control algorithm:
Goal:
- Ensure that time-average CO₂ stays as close to outdoor level as possible at comfortable ventilation (CO₂ is generated by human activity hence it’s a gradual process)
- Ensure that CO₂ never exceeds 1000 ppm for long
- Ensure quiet operation of ventilator –> max rpm ~2500, set by hardware (see above)
- Ensure ventilation is triggered by high humidity
- Ensure ventilation is triggered by high finedust (this happens more irregularly from primarily frying food)
- Ensure ventilation stays higher when bypass is open to cool the house
- Allow for manual speed override (e.g. to keep it at elevated or reduced levels)
Boundary conditions:
- Don’t change speed unnecessarily –> only trigger when level changed for more than 5 minutes
- Don’t override timer functions used for e.g. getting rid of humidity –> use
states.fan.itho_hru_350.attributes.preset_mode != timer1/timer2/timer3
Home Assistant implementation 
I used platform: numeric_state to check persistant changes, using a 5min trigger time. The automation triggers on a few sources:
sensor.max_co2- a helper sensor that takes the maximum of all CO₂ sensors I want to trigger on.binary_sensor.itho_hru_bypass- the Itho bypass valve, to set a minimum speed to help summer night time coolingsensor.aqara_d8f1_bathroom_humidity- humidity sensors to trigger onsensor.esp_mobile_sds011_pm2_5_2- PM2.5 sensor to trigger oninput_select.maximum_vent_speed&input_select.minimum_vent_speed- two input fields that set the range of min/max speeds to run at (partially implemented)
alias: Itho control override+
description: Control Itho manually based on CO2, humidity, and bypass
triggers:
  - id: auto
    entity_id: sensor.max_co2
    for:
      hours: 0
      minutes: 5
      seconds: 0
    below: 500
    trigger: numeric_state
  - id: medium
    entity_id: sensor.max_co2
    for:
      hours: 0
      minutes: 5
      seconds: 0
    above: 500
    below: 800
    trigger: numeric_state
  - id: autonight
    entity_id:
      - sensor.max_co2
    for:
      hours: 0
      minutes: 5
      seconds: 0
    above: 800
    below: 1000
    trigger: numeric_state
  - id: high
    entity_id:
      - sensor.max_co2
    for:
      hours: 0
      minutes: 5
      seconds: 0
    above: 1000
    trigger: numeric_state
  - entity_id:
      - binary_sensor.itho_hru_bypass
    trigger: state
  - id: humidity_high
    entity_id:
      - sensor.aqara_d8f1_bathroom_humidity
    for:
      hours: 0
      minutes: 5
      seconds: 0
    above: 60
    trigger: numeric_state
  - id: humidity_normal
    entity_id:
      - sensor.aqara_d8f1_bathroom_humidity
    for:
      hours: 0
      minutes: 5
      seconds: 0
    below: 60
    trigger: numeric_state
  - entity_id:
      - sensor.esp_mobile_sds011_pm2_5_2
    for:
      hours: 0
      minutes: 2
      seconds: 0
    above: 50
    trigger: numeric_state
  - entity_id:
      - sensor.esp_mobile_sds011_pm2_5_2
    for:
      hours: 0
      minutes: 2
      seconds: 0
    below: 50
    trigger: numeric_state
  - trigger: state
    entity_id:
      - input_select.maximum_vent_speed
      - input_select.minimum_vent_speed
conditions:
  - condition: not
    conditions:
      - condition: state
        entity_id: fan.itho_hru_350
        attribute: preset_mode
        state:
          - timer1
          - timer2
          - timer3
actions:
  - choose:
      - conditions:
          - condition: and
            conditions:
              - condition: or
                conditions:
                  - condition: numeric_state
                    entity_id: sensor.max_co2
                    above: 1000
                  - condition: numeric_state
                    entity_id: sensor.esp_mobile_sds011_pm2_5_2
                    above: 50
                  - condition: numeric_state
                    entity_id: input_select.minimum_vent_speed
                    above: 3
              - condition: numeric_state
                entity_id: input_select.maximum_vent_speed
                above: 3
        sequence:
          - action: fan.set_preset_mode
            metadata: {}
            data:
              preset_mode: high
            target:
              entity_id: fan.itho_hru_350
      - conditions:
          - condition: and
            conditions:
              - condition: or
                conditions:
                  - condition: numeric_state
                    entity_id: sensor.max_co2
                    above: 800
                  - condition: numeric_state
                    entity_id: sensor.esp_mobile_sds011_pm2_5_2
                    above: 50
                  - condition: state
                    entity_id: binary_sensor.itho_hru_bypass
                    state: "on"
                  - condition: numeric_state
                    entity_id: sensor.aqara_d8f1_bathroom_humidity
                    above: 70
                  - condition: numeric_state
                    entity_id: input_select.minimum_vent_speed
                    above: 2
              - condition: numeric_state
                entity_id: input_select.maximum_vent_speed
                above: 2
        sequence:
          - action: fan.set_preset_mode
            metadata: {}
            data:
              preset_mode: autonight
            target:
              entity_id: fan.itho_hru_350
      - conditions:
          - condition: or
            conditions:
              - condition: numeric_state
                entity_id: sensor.max_co2
                above: 500
        sequence:
          - action: fan.set_preset_mode
            metadata: {}
            data:
              preset_mode: medium
            target:
              entity_id: fan.itho_hru_350
      - conditions:
          - condition: or
            conditions:
              - condition: numeric_state
                entity_id: sensor.max_co2
                below: 500
        sequence:
          - action: fan.set_preset_mode
            metadata: {}
            data:
              preset_mode: auto
            target:
              entity_id: fan.itho_hru_350
mode: single
Alternative considerations 
There’s a few approaches that could work:
- Set up timer job, check every 5 min and set mode according to CO₂ - Pro: easy Con: no ’low pass filter’ / could trigger at spiky value
- Run automation on CO₂ level and change when it crosses a boundary (i.e.
platform: numeric_state) - Pro: can use ‘for’ setting to prevent spurious triggers. - Use value_template to check
from_state&to_state. Pro: triggers only on threshold crossing. Con: does not have ’low pass filter’ / could trigger at spiky value - Use
wait_for_triggerto return to low speed when ventilation is done. Pro: works nicely for 2 levels. Con: only for 2 levels? - Use filter integration (home-assistant.io) to filter the underlying sensor value, combine with timer automation? Pro: easy, works, robust Con: sends commands more than necessary, overrides user setting
In the end I used option 2 from above, which has now been running well for a few monthd. I split the automation into 4 levels which gives me more fine-grained control (continuous control would still be better but somehow Itho decided against this for the HRU 350). To also trigger on humidity and bypass level, I added a numeric_state trigger for humidity, and a trigger on any change of bypass.