My photography & image processing workflow
I like taking pictures, but I like it even more to archive them such that I can easily find them back. I do this by applying keywords, having correct timestamps, embedding GPS locations, and compressing them such that they all fit on my phone. Budgetting 32GB for storage and ~30k photos & videos gives a reasonble ~1MB per photo or video, I’m currently at ~360 KB per photo or video.
Contents
Camera settings 
Canon EOS80D settings 
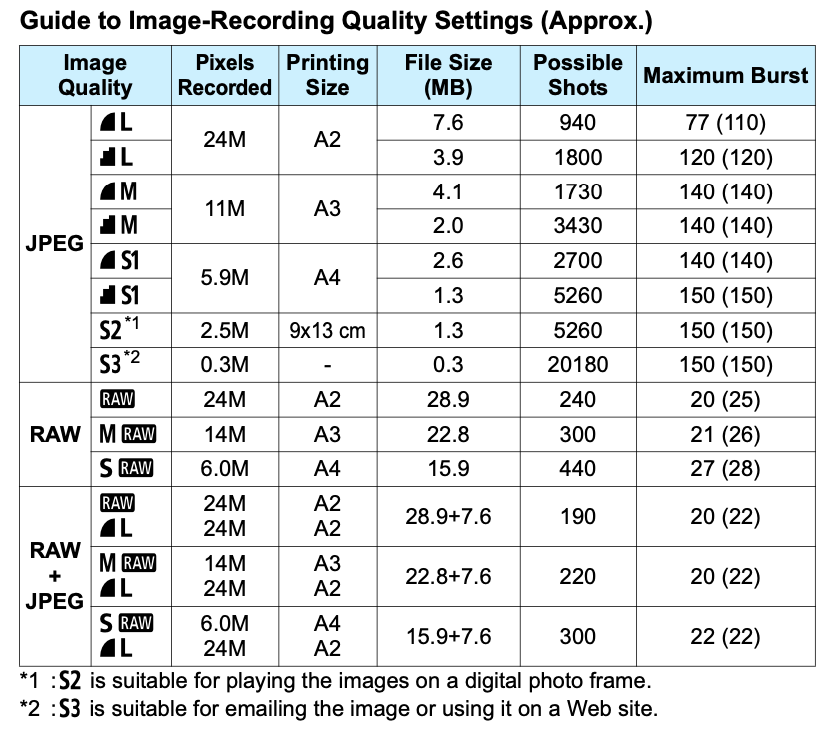
TL;DR: I’m lazy and set my camera image recording quality settings to JPEG at medium resolution at normal detail. If you’re a pixel peeper you want RAW at fine detail (photographylife.com).
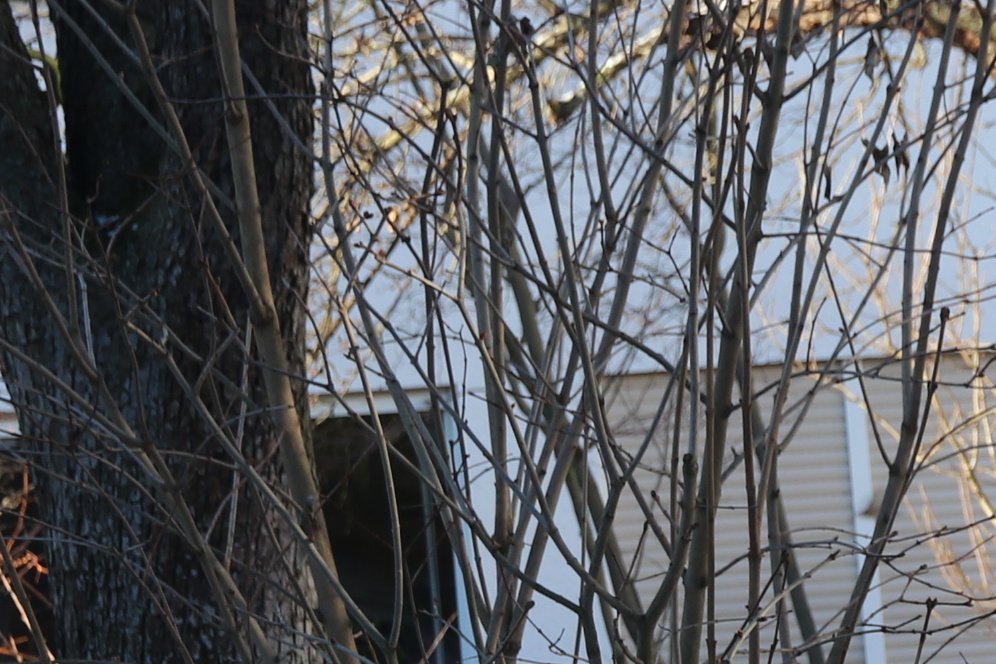
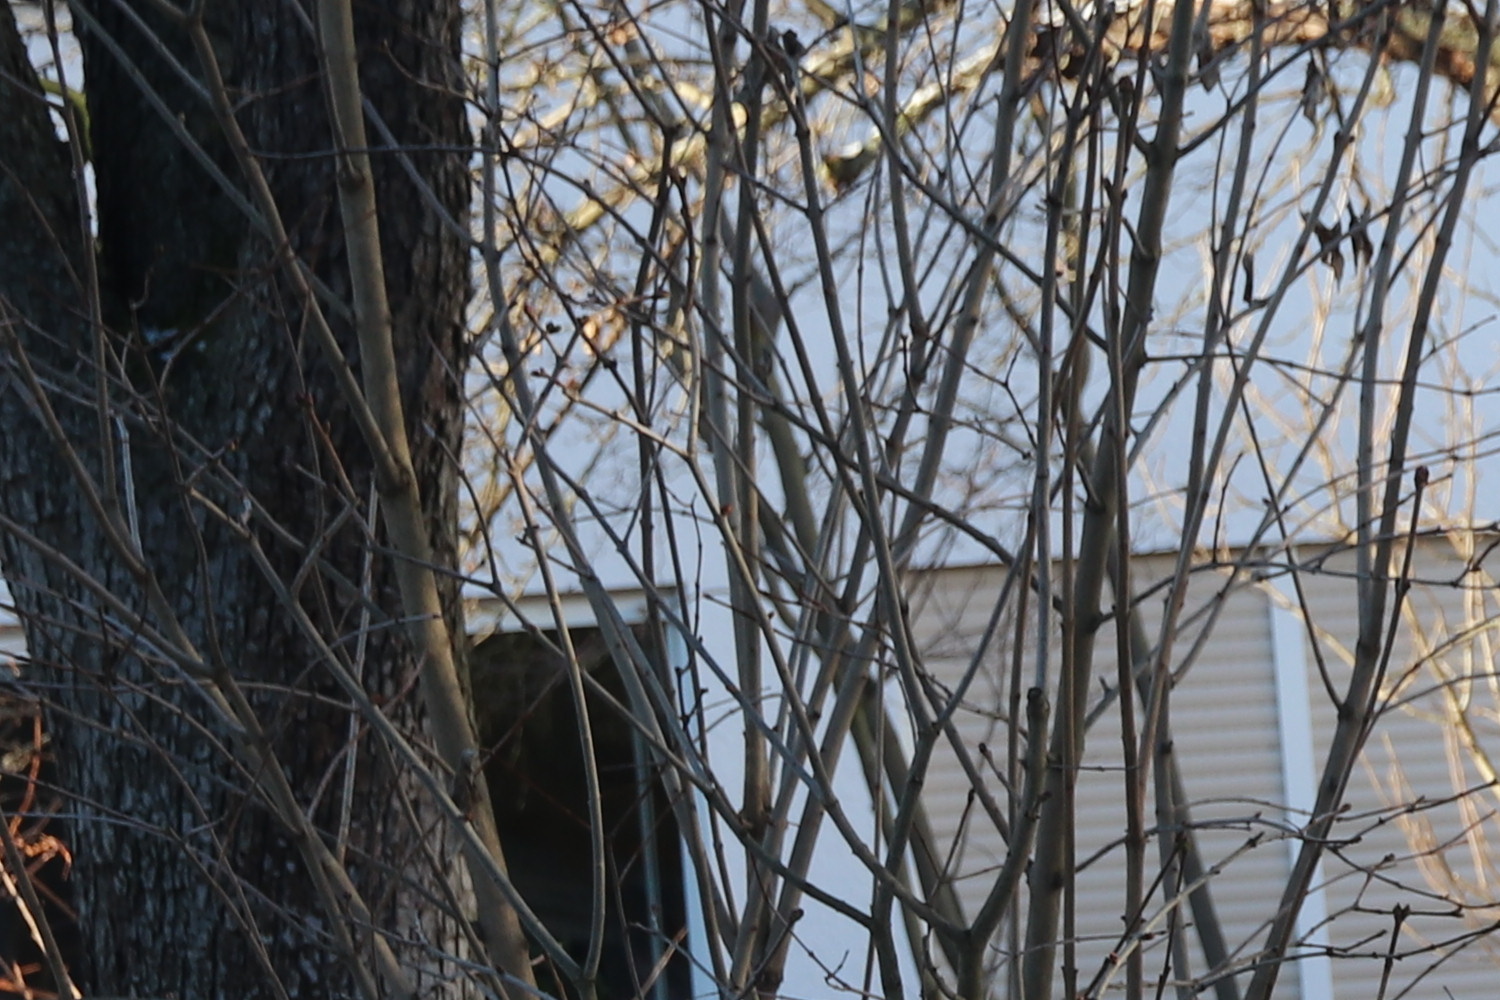
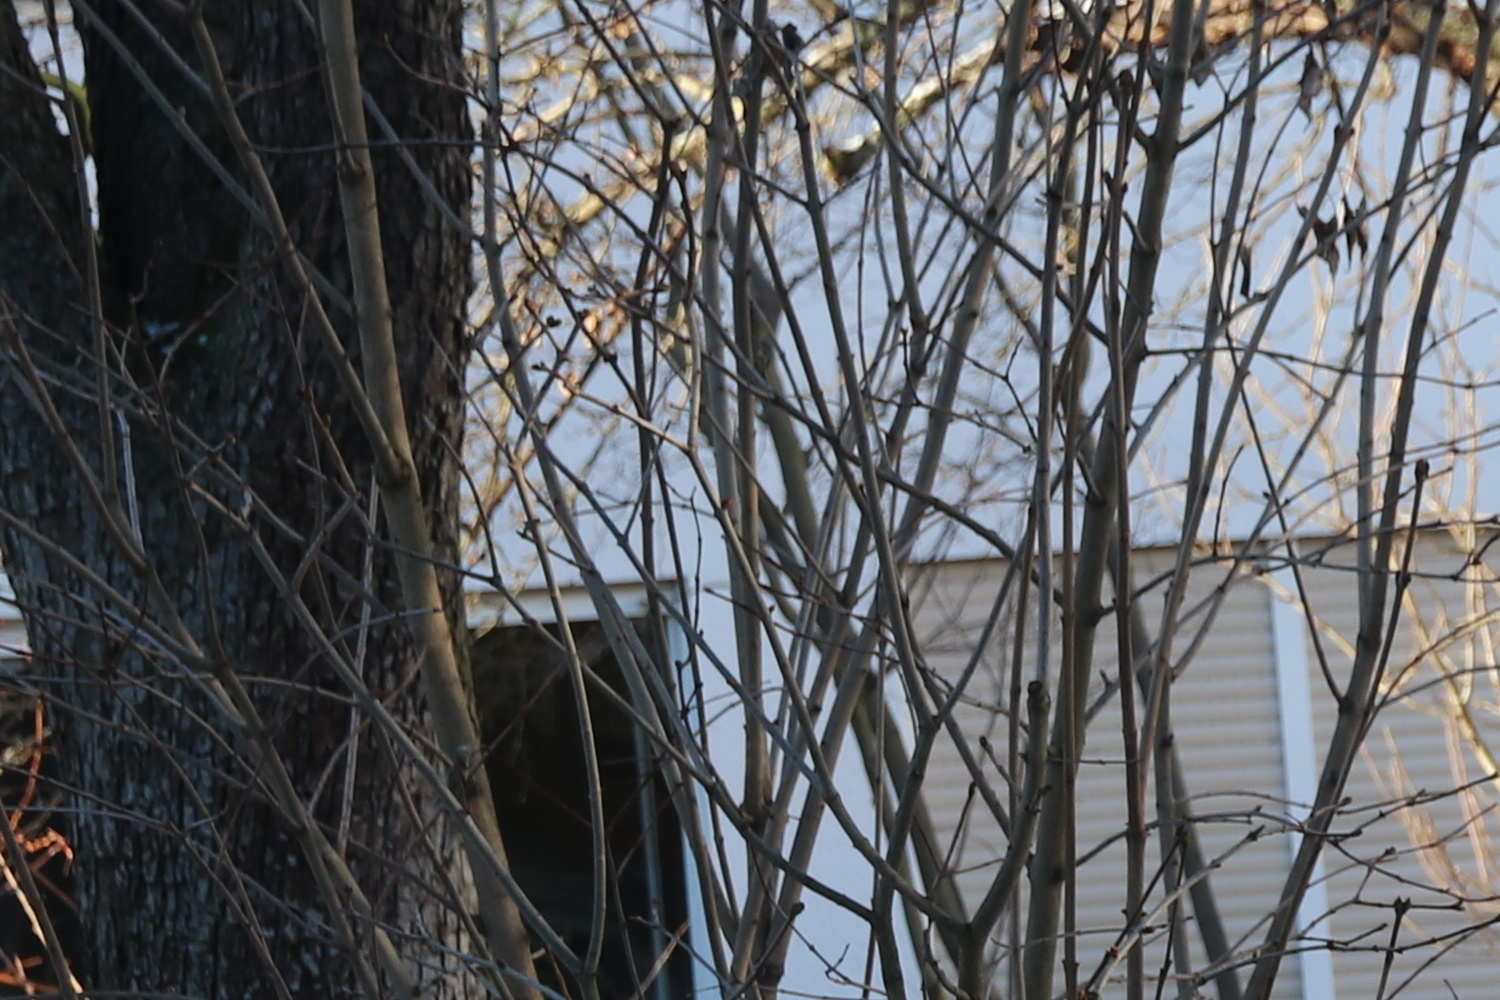
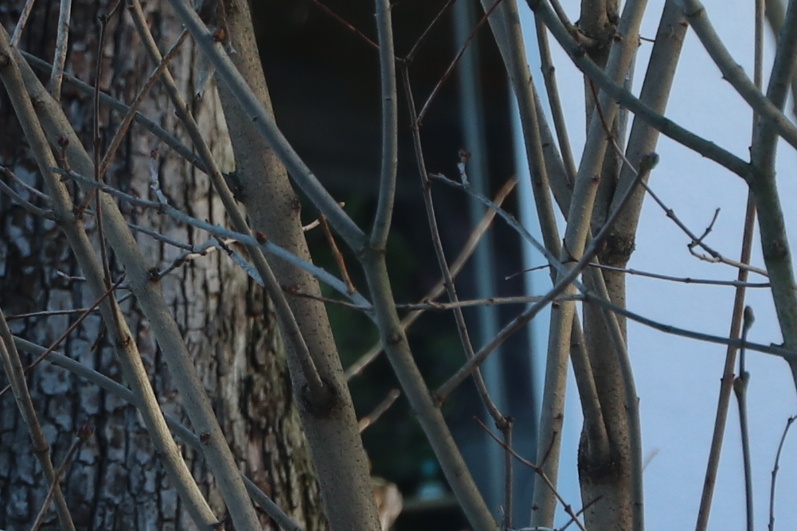
I don’t have time for RAW processing most of the time, so I use JPEG storage. After choosing that, I compared the options Fine-Large, Normal-Large, Fine-Medium, Normal-Medium on my 15-85mm f/3.5-5.6 IS USM lens (dxomark.com). I didn’t notice a difference so I settled for the smallest filesize (Normal-Medium) for simplicity. Note that DXomark rates my lens to have an 8 MPixel sharpness (dxomark.com), which means the medium resolution of 11 MPixel is more than sufficient to capture all lens details. Even cropping is not an argument here as the lens simply doesn’t generate more detail.
I used the following script to generate 100% crops, setting quality to 95 explicitly to ensure equal treatment:
find ./1a_camera_quality_corner/ -type f -iname "*JPG" | while read -r file; do
  OFFSETX=$(identify -format '%[fx:w*1/10]' ${file})
  OFFSETY=$(identify -format '%[fx:h*2/10]' ${file})

  convert -crop 25%x25%+$OFFSETX+$OFFSETY "${file}" -quality 95 $(basename "${file%.*}-crop.jpg")
done

find ./1b_camera_quality_center/ -type f -iname "*JPG" | while read -r file; do
  OFFSETX=$(identify -format '%[fx:w*5/10]' "${file}")
  OFFSETY=$(identify -format '%[fx:h*3/10]' "${file}")

  convert -crop 20%x20%+$OFFSETX+$OFFSETY "${file}" -quality 95 $(basename "${file%.*}-crop.jpg")
done
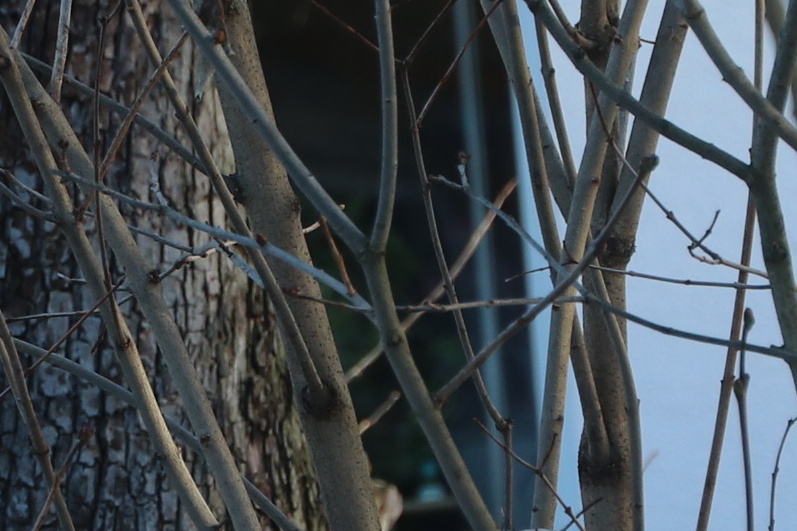
The results are shown below. No fancy hover comparison lightbox. If you can’t see the difference without help, it’s neglibable.
First set of images (in top-left lens FoV):

Second set (center FoV):


iPhone SE 2020 
TL;DR: I use the default camera settings, as iOS doesn’t really give you many options.
Archiving 
The above settings give me 2-3 MB JPEG pictures out of my EOS 80D camera, and similarly sized HEIC images from my iPhone SE 2020. Most of the time I view my pictures on my phone or on a table, where I need only ~2MP at medium quality. Since I prefer to have many images with me, I use below workflow to select, compress, and port back photos to my phone
Archiving & categorizing 
I store all pictures in folders per event, grouped per year, e.g. 2021/20211225_christmas_dinner. The folder name is important as it will be used as IPTC tag when exporting.
Selection 
Geotagging 
Apple-compatible MP4 video geotags 
iOS/macOS stores geotags in the moov/meta atom of mp4 metadata. This is not where ffmpeg or exiftool store video geotags normally. To mitigate this, I use the following approach:
- Geotag videos using exiftool (using XMP metadata). Alternatively do this via your favorite GUI. Using exiftool allows interpolating a gpx track so I don’t have to do it manually and can base my video geotags on existing other geotags.
- Harvest geotag metadata stored in the moov/meta atom from an existing iOS video using bento4 SDK mp4extract
- Update the moov/meta atom manually using the XMP geotag in the video file
- Transplant the updated moov/meta atom in the new video using mp4edit
This is somewhat hacky but it seems to work reliably. The moov/meta atom stores more data than just geotag, such as iPhone model and iOS version, so each transplanted video will have this wrong metadata.
Background info 
Same question, no answer: https://superuser.com/questions/1323368/exiftools-tagsfromfile-does-not-help-recover-all-metadata-iphone (superuser.com)
Not possible with exiftool: http://u88.n24.queensu.ca/exiftool/forum/index.php/topic,5977.0.html (queensu.ca) and http://u88.n24.queensu.ca/exiftool/forum/index.php?topic=5631.0 (queensu.ca)
ffmpeg geotag is not recognized by iOS: https://trac.ffmpeg.org/ticket/4209 (ffmpeg.org)
Workaround using mp4extract:
ffmpeg -i source.mov converted.mp4
mp4extract moov/meta source.mov source-metadata
mp4edit --insert moov:source-metadata converted.mp4 converted-withmeta.mp4
Source: https://trac.ffmpeg.org/ticket/6193 (ffmpeg.org)
Geotag files from other photos 
I have a non-GPS camera to take proper pictures in addition to my smartphone camera. One drawback is that this camera does not geotag my pictures. A solution to this is using the smartphone pictures as reference. exiftool can be used to automate this.
Method:
- Ideally: when taking non-geotaggedpictures, also take a few geotagged pictures to serve as waypoints
- Create GPX file from geotagged pictures
- Use GPX file to tag non-geotagged pictures, interpolating where necessary
N.B.
- Personal note: when using (Guru Maps) GPS tracks, do not use manually waypoints - time might be off (delete manually from GPX)
- EXIF does not store timezone, therefore set computer clock to country where pictures were taken OR apply
-geosyncoffset as (computer time zone) - (picture timezone), i.e. GMT+1 - GMT+2 =-geosync=-1:00:00 - If there was no movement in between geotracks (i.e. at home/hotel), use longer
GeoMaxIntSecsto allow broader interpolation.
Generate GPX:
exiftool -if '$gpsdatetime' -fileOrder gpsdatetime -p /Users/tim/Pictures/maintenance/gpx.fmt -d %Y-%m-%dT%H:%M:%SZ *JPG > output.gpx
Apply GPX, only where none applied yet, repair timestamp after update:
exiftool -if 'not $gpsdatetime' -api GeoMaxIntSecs=18000 -geotag output.gpx *JPG
jhead -ft *JPG
Source: https://www.sno.phy.queensu.ca/~phil/exiftool/geotag.html#Inverse (queensu.ca)
Compressing for sharing 
Pictures 
TL;DR: Compress to 2 Mpixel @ 60% quality for JPEG or 4 MPixel @ 40% quality for HEIC (giving 20% additional file reduction)
I compress pictures using ImageMagick’s convert, ensuring the biggest side is 1920 pixels (-geometry 1920x1920), we never upscale (imagemagick.org) (some rare source images have low res) (using \>), set quality to 60% (-quality 60).
convert -geometry 1920x1920\> -quality 60 "${src}" "${dst%.*}.jpg"
convert -geometry 2560x2560\> -quality 40 "${src}" "${dst%.*}.heic"
Alternatively, you can set the pixel area count limit (imagemagick.org). This will ensure output is always 2 Megapixel (good), but wide aspect-ratio (e.g. panorama) images could be difficult to see (bad).
convert -geometry 2073600@\> -quality 60 "${src}" "${dst%.*}.jpg"
convert -geometry 3686400@\> -quality 40 "${src}" "${dst%.*}.heic"
To assess which quality we need, I ran the following script on a series of test images. I used 2 MPixel JPEG @ 60% quality as benchmark, and looked at various HEIC qualities at both 2 Mpixel and 4 Mpixel. The hypothesis is that a higher pixel count at lower quality can give same result at lower filesize.
ARRQUALJPEG=( 90 60 )
ARRQUALHEIC=( 40 50 )

find ./3_conversion_quality/ -type f -iname "IMG*" | while read -r SRCFILE; do
  for quality in "${ARRQUALJPEG[@]}"; do
    outfile=$(basename "${SRCFILE%.*}-q${quality}.jpg")
    convert -geometry 1920x1920\> -quality "${quality}" "${SRCFILE}" "${outfile}"
    echo "$(basename ${SRCFILE}),jpg,${quality},$(du -k ${outfile} | cut -f 1)"
  done
  for quality in "${ARRQUALHEIC[@]}"; do
    outfile1=$(basename "${SRCFILE%.*}-2MP-q${quality}.heic")
    convert -geometry 2073600@\> -quality "${quality}" "${SRCFILE}" "${outfile1}"
    exiftool -tagsfromfile "${SRCFILE}" -exif:all --MakerNotes --IFD1 --ThumbnailImage -P -overwrite_original "${outfile1}"
    echo "$(basename ${SRCFILE}),heic,${quality},$(du -k ${outfile1} | cut -f 1)"

    outfile2=$(basename "${SRCFILE%.*}-4MP-q${quality}.heic")
    convert -geometry 3686400@\> -quality "${quality}" "${SRCFILE}" "${outfile2}"
    exiftool -tagsfromfile "${SRCFILE}" -exif:all --MakerNotes --IFD1 --ThumbnailImage -P -overwrite_original "${outfile2}"
    echo "$(basename ${SRCFILE}),heic,${quality},$(du -k ${outfile2} | cut -f 1)"

    infile3=$(basename "${SRCFILE%.*}-q90.jpg")
    outfile3=$(basename "${SRCFILE%.*}-heif-q${quality}.heic")
    heif-enc --quality ${quality} -o "${outfile3}" "${infile3}"
    echo "$(basename ${SRCFILE}),heic2,${quality},$(du -k ${outfile3} | cut -f 1)"
  done

  # Now calculate at what HEIC quality we get ~30% file size reduction vs original
  # i.e.
  # target filesize = 70% * reference filesize
  # target filesize = fsize40 + deltaQ * (fsize50 - fsize40 / 10)
  # deltaQ = (target filesize - fsize40)/(fsize50 - fsize40 / 10)
  # finalQ = deltaQ + 40
  reffile=$(basename "${SRCFILE%.*}-q60.jpg")
  refsize=$(gdu --bytes ${reffile} | cut -f 1)
  tgtsize=$(echo "$refsize * 0.70" | bc -l)

  ARRPREFIX=( "-4MP" "-2MP" "-heif" )
  for pref in "${ARRPREFIX[@]}"; do
    tgtfile40=$(basename "${SRCFILE%.*}${pref}-q40.heic")
    tgtfile40=$(basename "${SRCFILE%.*}${pref}-q50.heic")

    tgtsize40=$(gdu --bytes ${tgtfile40} | cut -f 1)
    tgtsize50=$(gdu --bytes ${tgtfile50} | cut -f 1)

    deltaq=
    finalq=
  done
done

# For each source image, search the HEIC image that is smaller for each setting: ImageMagick @ 2Mpixel & 4Mpixel, heif-enc @ 2Mpixel
find ./3_conversion_quality/ -type f -iname "IMG*" | while read -r SRCFILE; do
  # Show reference file & size
  reffile=$(basename "${SRCFILE%.*}-q60.jpg")
  refsize=$(gdu --bytes ${reffile} | cut -f 1)
  gfind . -name "${reffile}" -printf '%s, %p\t'

  # Show first smaller converted files & sizes
  ARRPREFIX=( "-4MP" "-2MP" "-heif" )
  for pref in "${ARRPREFIX[@]}"; do
    tgtprefix=$(basename "${SRCFILE%.*}${pref}")
    tgtfile=$(gfind . -name "${tgtprefix}*" -size "-${refsize}c" -printf '%s, %p\n' | sort -n | tail -n 1)
    echo -n "$tgtfile\t"
  done
  echo ""
done
| JPG quality | JPG filesize | HEIC quality @ equal filesize | HEIC filesize @ equal quality |
|---|---|---|---|
| 30 | 120K | ~52 | 54K (q40) |
| 40 | 137K | ~55 | 76K (q45) |
| 50 | 153K | ~57 | 95K (q50) |
| 60 | 170K | ~60 | 134K (q55) |
Next, I tried some additional optimizations (google.com):
SRCFILE="./2_center/IMG_8093.jpg"
OFFSETX=$(identify -format '%[fx:w*5/10]' "${SRCFILE}")
OFFSETY=$(identify -format '%[fx:h*3/10]' "${SRCFILE}")
quality=60
convert -sampling-factor 4:2:0 -crop 25%x25%+$OFFSETX+$OFFSETY -quality "${quality}" "${SRCFILE}" $(basename "${SRCFILE%.*}-crop-q${quality}-sampling.jpg")
convert -interlace JPEG -crop 25%x25%+$OFFSETX+$OFFSETY -quality "${quality}" "${SRCFILE}" $(basename "${SRCFILE%.*}-crop-q${quality}-interlace.jpg")
convert -colorspace sRGB -crop 25%x25%+$OFFSETX+$OFFSETY -quality "${quality}" "${SRCFILE}" $(basename "${SRCFILE%.*}-crop-q${quality}-colorspace.jpg")
| Optimization | Filesize |
|---|---|
| none | 170K |
| sampling | 160K (-6%) |
| interlace | 173K (+2%) |
| colorspace | 170K (+0%) |
On JPEG, we strip unnecessary tags (including thumbnails (exiftool.org)) to gain another ~30K. First inspect file:
file=IMG_8093-crop-q60.jpg
exiftool -G ${file}
exiftool -G -v ${file}
exiftool -G -makernotes:all ${file}
exiftool -G -exif:all ${file}
Then strip unnecessary tags, either by deleting specific tag groups (keep unless), or by copying specific groups (delete unless).
file=IMG_8093-crop-q60.jpg
cp ${file} "${file%.*}-test1.jpg"; exiftool -makernotes:all= -ifd1:all= "${file%.*}-test1.jpg"
cp ${file} "${file%.*}-test2.jpg"; exiftool -all:all= -tagsfromfile @ -exif:all --MakerNotes --IFD1 --ThumbnailImage "${file%.*}-test2.jpg"
| Optimization | Filesize |
|---|---|
| none | 170K |
| keep unless | 139K (-18%) |
| delete unless | 137K (-19%) |
Finally, copy back some EXIF tags to HEIC images.
filesrc=IMG_8093-crop-q60-sampling.jpg
file=IMG_8093-crop-q55.heic
cp ${file} "${file%.*}-exif.heic"; exiftool -tagsfromfile ${filesrc} -exif:all --MakerNotes --IFD1 --ThumbnailImage "${file%.*}-exif.heic"
Fixing rotation 
- JPG → HEIC:
-auto-orientrequired, copy tags (or not): OK - HEIC → HEIC:
-auto-orientrequired, copy tags (or not): OK - script: cannot get IMG_9401.heic, IMG_1034.JPG fixed at the same time
Videos 
Also see:
https://aaron.cc/ffmpeg-hevc-apple-devices/ (aaron.cc)
ARRQUALHVEC1080=( 28 30 32 )
ARRQUALHVEC720=( 26 28 30 )

find ./4_video_conversion_quality/ -type f -iname "IMG*" | while read -r SRCFILE; do
  for quality in "${ARRQUALHVEC720[@]}"; do
    outfile=$(basename "${SRCFILE%.*}-high4.0-HEVC-720p-slower-q${quality}.mp4")
    nice -n 15 ffmpeg -nostdin -i "${SRCFILE}" -c:v libx265 -preset medium -movflags use_metadata_tags -crf ${quality} -vf "scale='round(iw * min(0.5,sqrt(1280*720/ih/iw)/2))*2:-2" -c:a libfdk_aac -vbr 3 -threads 0 -tag:v hvc1 -y "${outfile}"
  done
  for quality in "${ARRQUALHVEC1080[@]}"; do
    outfile=$(basename "${SRCFILE%.*}-high4.0-HEVC-1080p-slower-q${quality}.mp4")
    nice -n 15 ffmpeg -nostdin -i "${SRCFILE}" -c:v libx265 -preset slower -movflags use_metadata_tags -crf ${quality} -vf "scale='round(iw * min(0.5,sqrt(1920*1080/ih/iw)/2))*2:-2" -c:a libfdk_aac -vbr 3 -threads 0 -tag:v hvc1 -y "${outfile}"
  done
done
Get Live Photo working 
I haven’t solved this one yet. I did find methods that don’t work:
mp4extract moov IMG_2983.MOV test
# does not work, movie not recognized, but geotag metadata shown in finder
mp4edit --replace moov:test IMG_2983.MOV.mp4 IMG_2983.MOV_edit.mp4

mp4extract 'moov/meta' IMG_2983.MOV test

# geotag recognized and shown in finder, but not contentidentifier
mp4edit --insert moov:test IMG_2983.MOV.mp4 IMG_2983.MOV_edit.mp4

# geotag not recognized
mp4edit --insert moov/meta:test IMG_2983.MOV.mp4 IMG_2983.MOV_edit.mp4
Adding keywords 
I tag my files with the words from the directory name such that I can find them back later. I want these to work on Apple (iOS and macOS) because those are my platforms for viewing photos.
Pictures 
For PNG, JPG, HEIC, this works: exiftool -XMP:Subject+=keyword1 /dir/containing/photos/*
For JPG only, this also works: exiftool -IPTC:Keywords+=keyword1 /dir/containing/photos/*
Optionally see here how to prevent double keywords (stackoverflow.com). Not applicable for my workflow.
Videos 
I’ve tried several methods and none of them work. Not sure how to solve, unfortunately.
- Add keywords via Photos.app, then AirDrop
- Add keywords via Photos.app, then export as original
- Add keywords via Photos.app, then export
- Add keywords via Photos.app, then sync with iPhone
- Add keywords via Bridge, then Rollit
- Add keywords via Exiftool, with IPTC:Keywords, then Rollit
- Add keywords via Exiftool, with quicktime:keywords, then Rollit
Sharing 
I transfer photos to iPhone/iOS using the Rollit app (apple.com) because Apple’s photo syncing has been notoriously unreliable for me (it sometimes gets into a corrupted(?) state that it doesn’t sync anymore). I view my photos on my iPhone or iPad.