Measuring CO2/Temp/RH/Pressure with ESP8266 version 2
(Updated: )
After experimenting a bit, I’ve made a new iteration of my ESP8266 CO2/temperature/RH sensor board (vanwerkhoven.org), which now sports a PCB (wikipedia.org) design (thanks all fellow Tweakers on GoT! (tweakers.net)). Some improvements:
- More compact & uncluttered thanks to PCB
- Added one (optionally more distant) temperature sensor to prevent self-heating
- Added deep-sleep cycle to alternatively mitigate self-heating
Update 20210207 : made voltage regulator for BME280 requirement more explicit (thanks @ManS-H!)
Introduction 
For this project, I had the same goals as before (vanwerkhoven.org), and wanted to optimise the design.
This guide assumes you’ve read the previous guide, so this article skips the basics such as installing esphome etc.
Bill of materials 
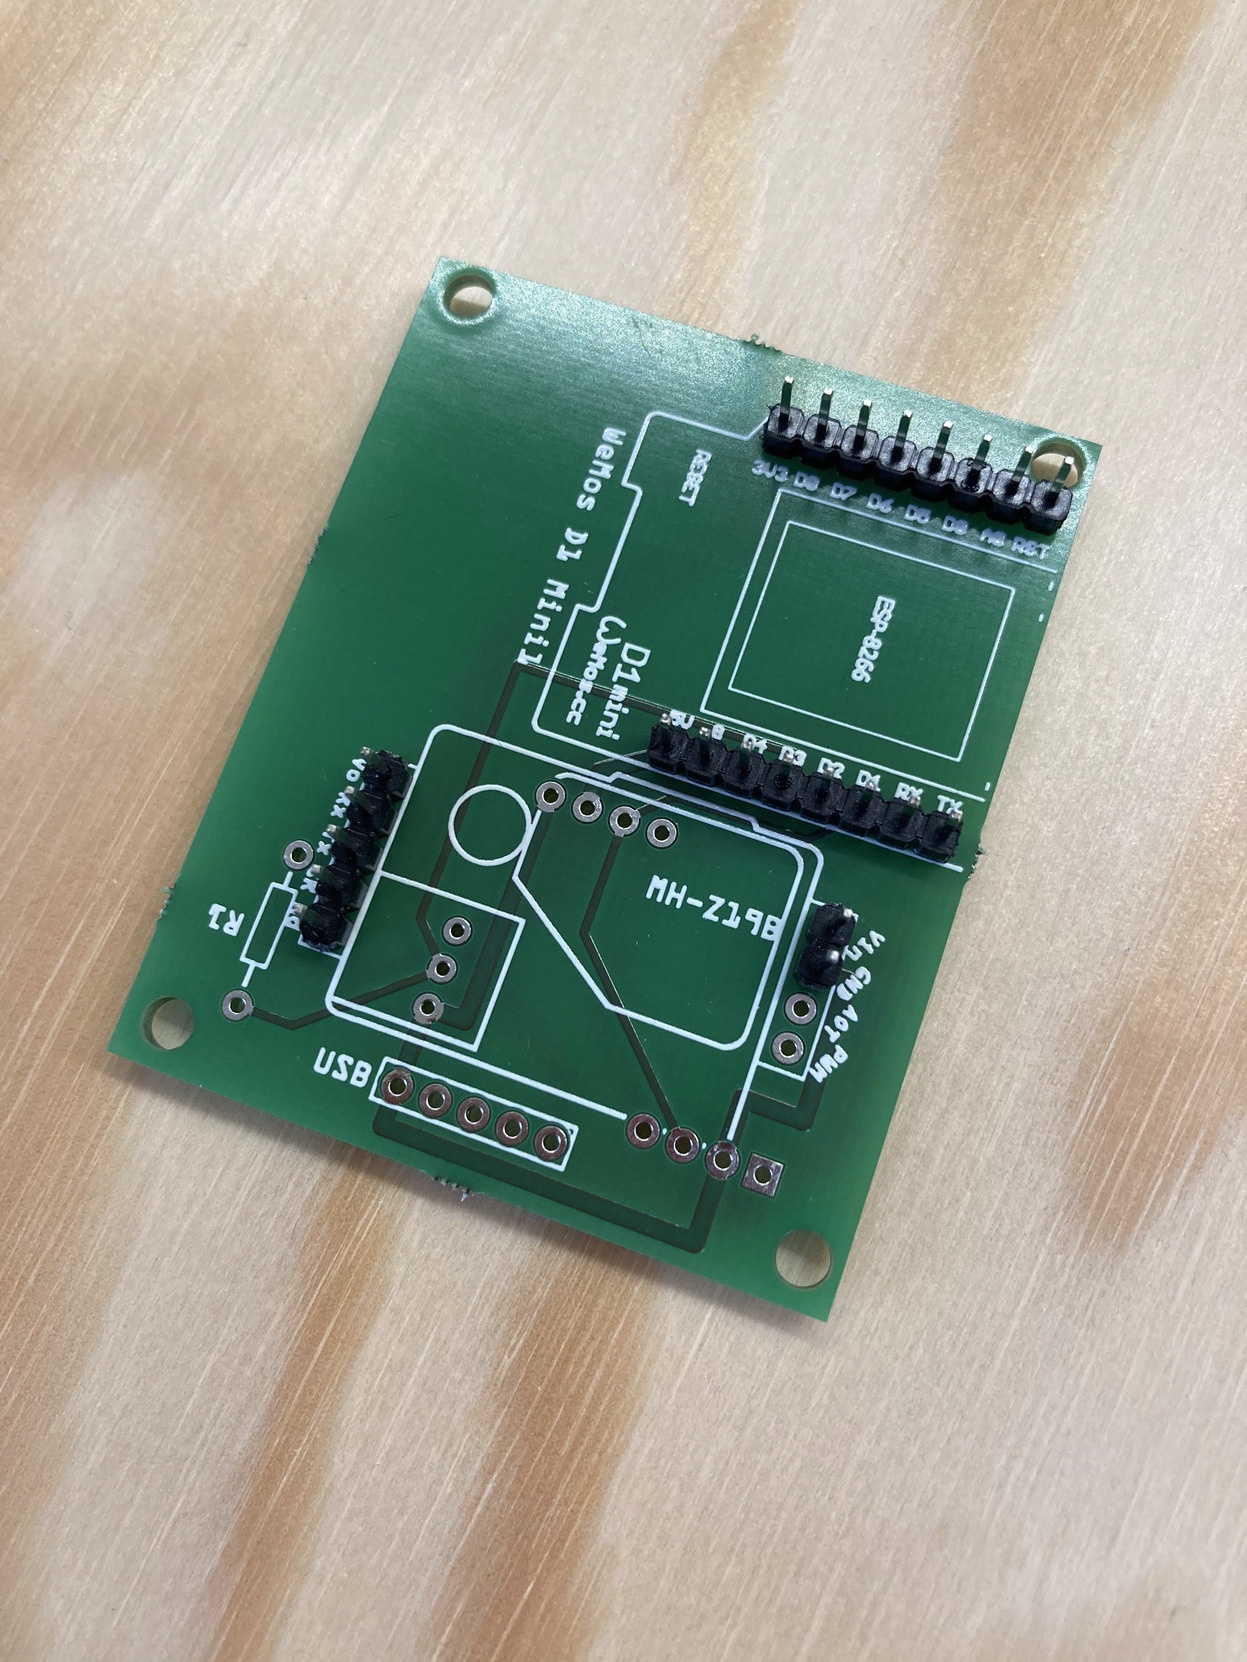
- Special-built SensorThing mk2 PCB (tweakers.net) -- 5 euros with same-day shipping!
- ESP8266 WeMos D1 mini (tinytronics.nl) (optionally pro)
- Winsen MH-Z19B CO2 sensor (tinytronics.nl)
- Optional: 1.3" I2C OLED screen (for displaying values live) (tinytronics.nl)
- BME280 module with level converter (tinytronics.nl) - N.B. ensure you have a BME280 module that accepts 5V to use my print!
- DS18B20 temperature sensor (tinytronics.nl)
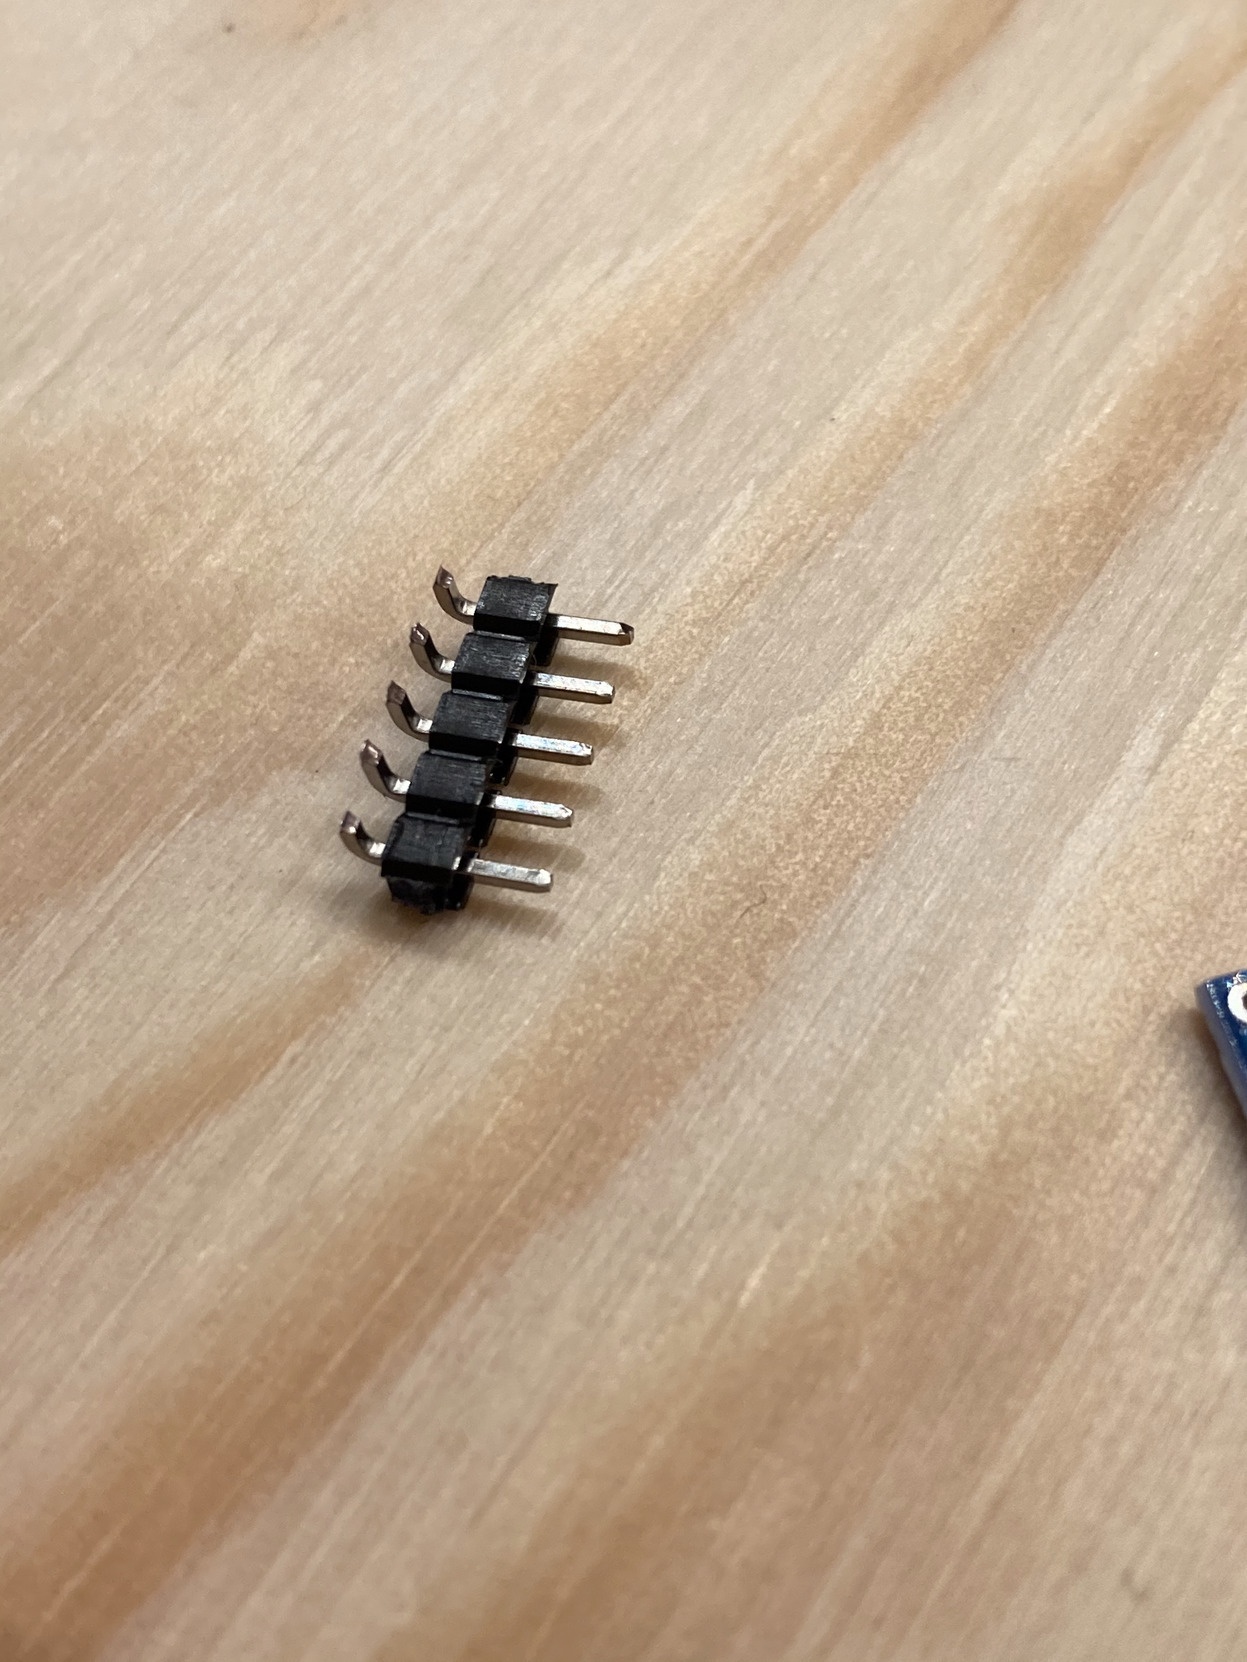
- Male pin headers straight (for modules) (tinytronics.nl)
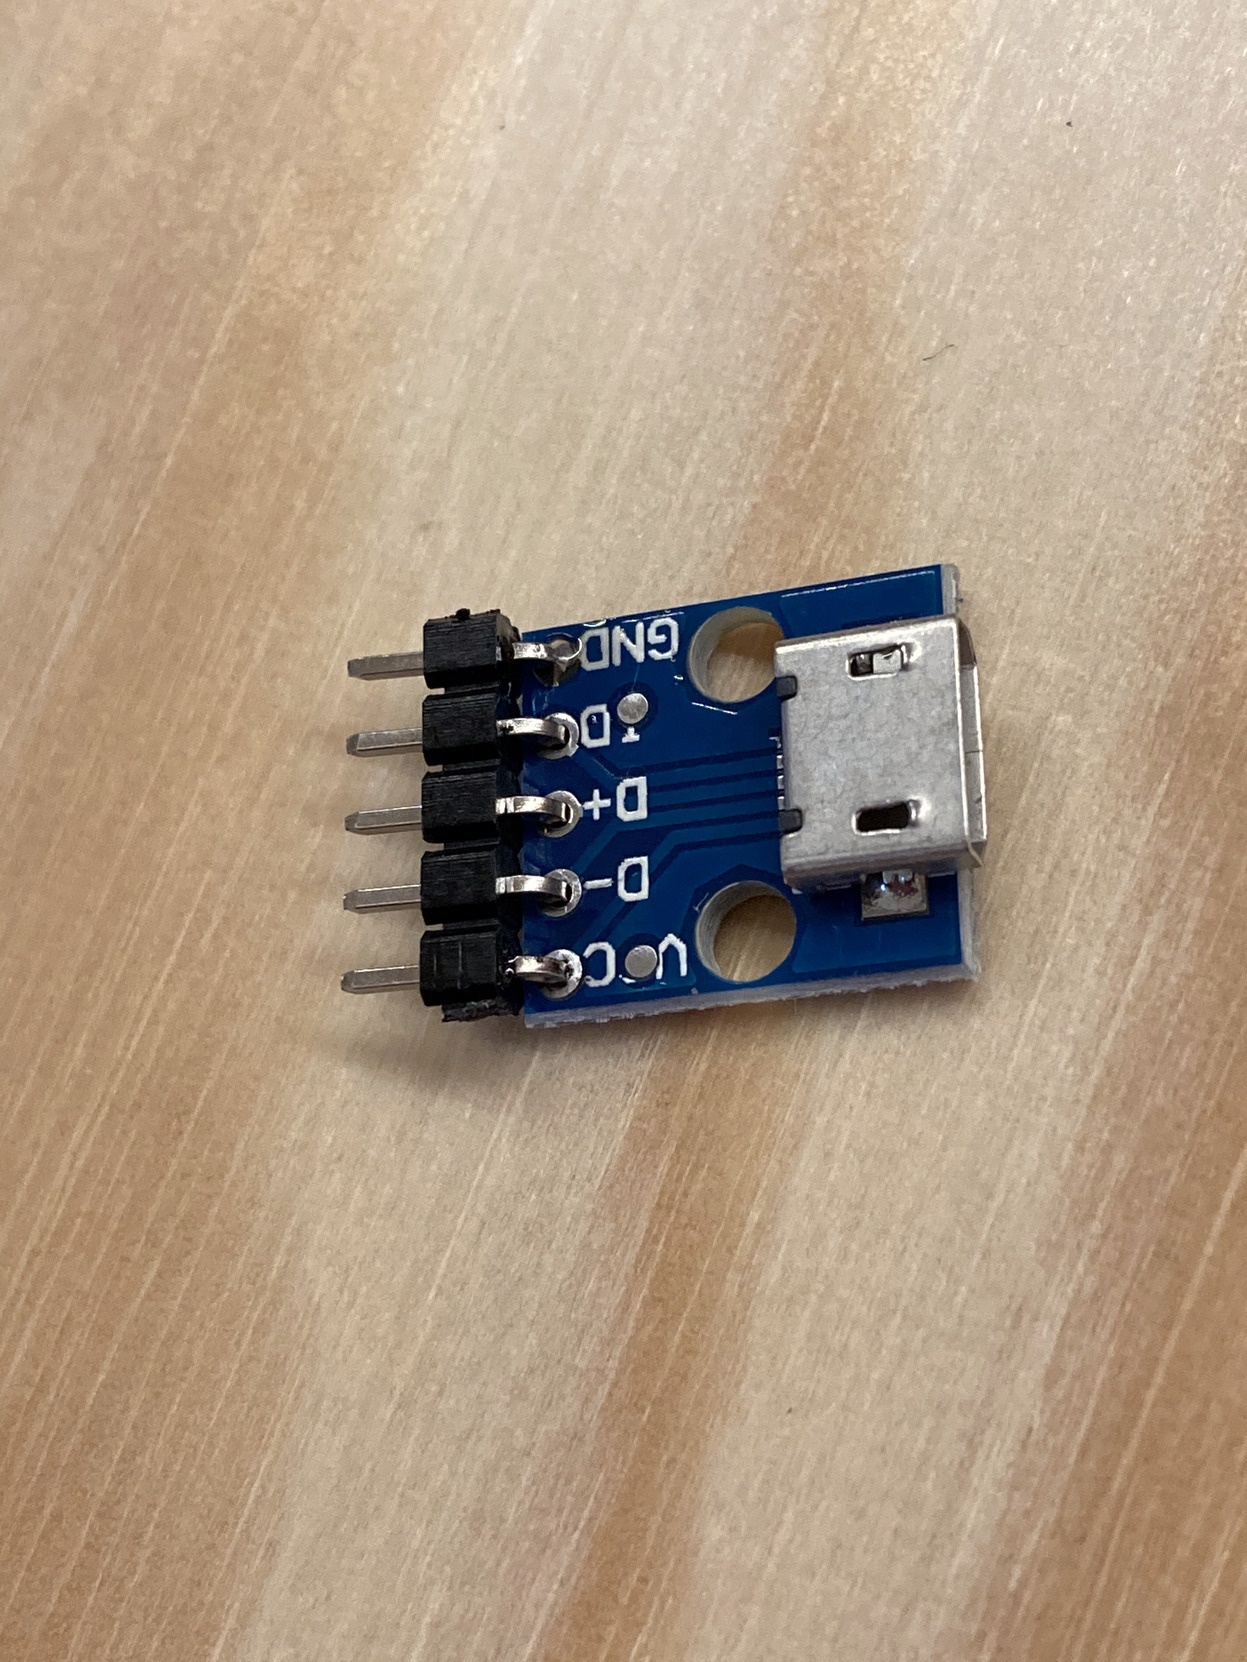
- Optional: Micro usb dip adapter/module (for bottom-side power supply, else use Wemos USB port directly) (tinytronics.nl)
- Optional: Male pin headers 90 degrees (for USB micro module) (tinytronics.nl)
- Optional: Dupont female-female jumper wires (to increase distance of DS18B20) (tinytronics.nl) Since I power everything on 5V and the BME280 only accepts 1.7-3.6V as input voltage (bosch-sensortec.com), ensure you get a BME280 module with voltage regulator, e.g. the one linked above. It should explicitly note that input voltage can be either 3.3V or 5V.
Bill of process 
Software integration 
Install esphome as documented here (vanwerkhoven.org).
Hardware integration 
Collect all parts
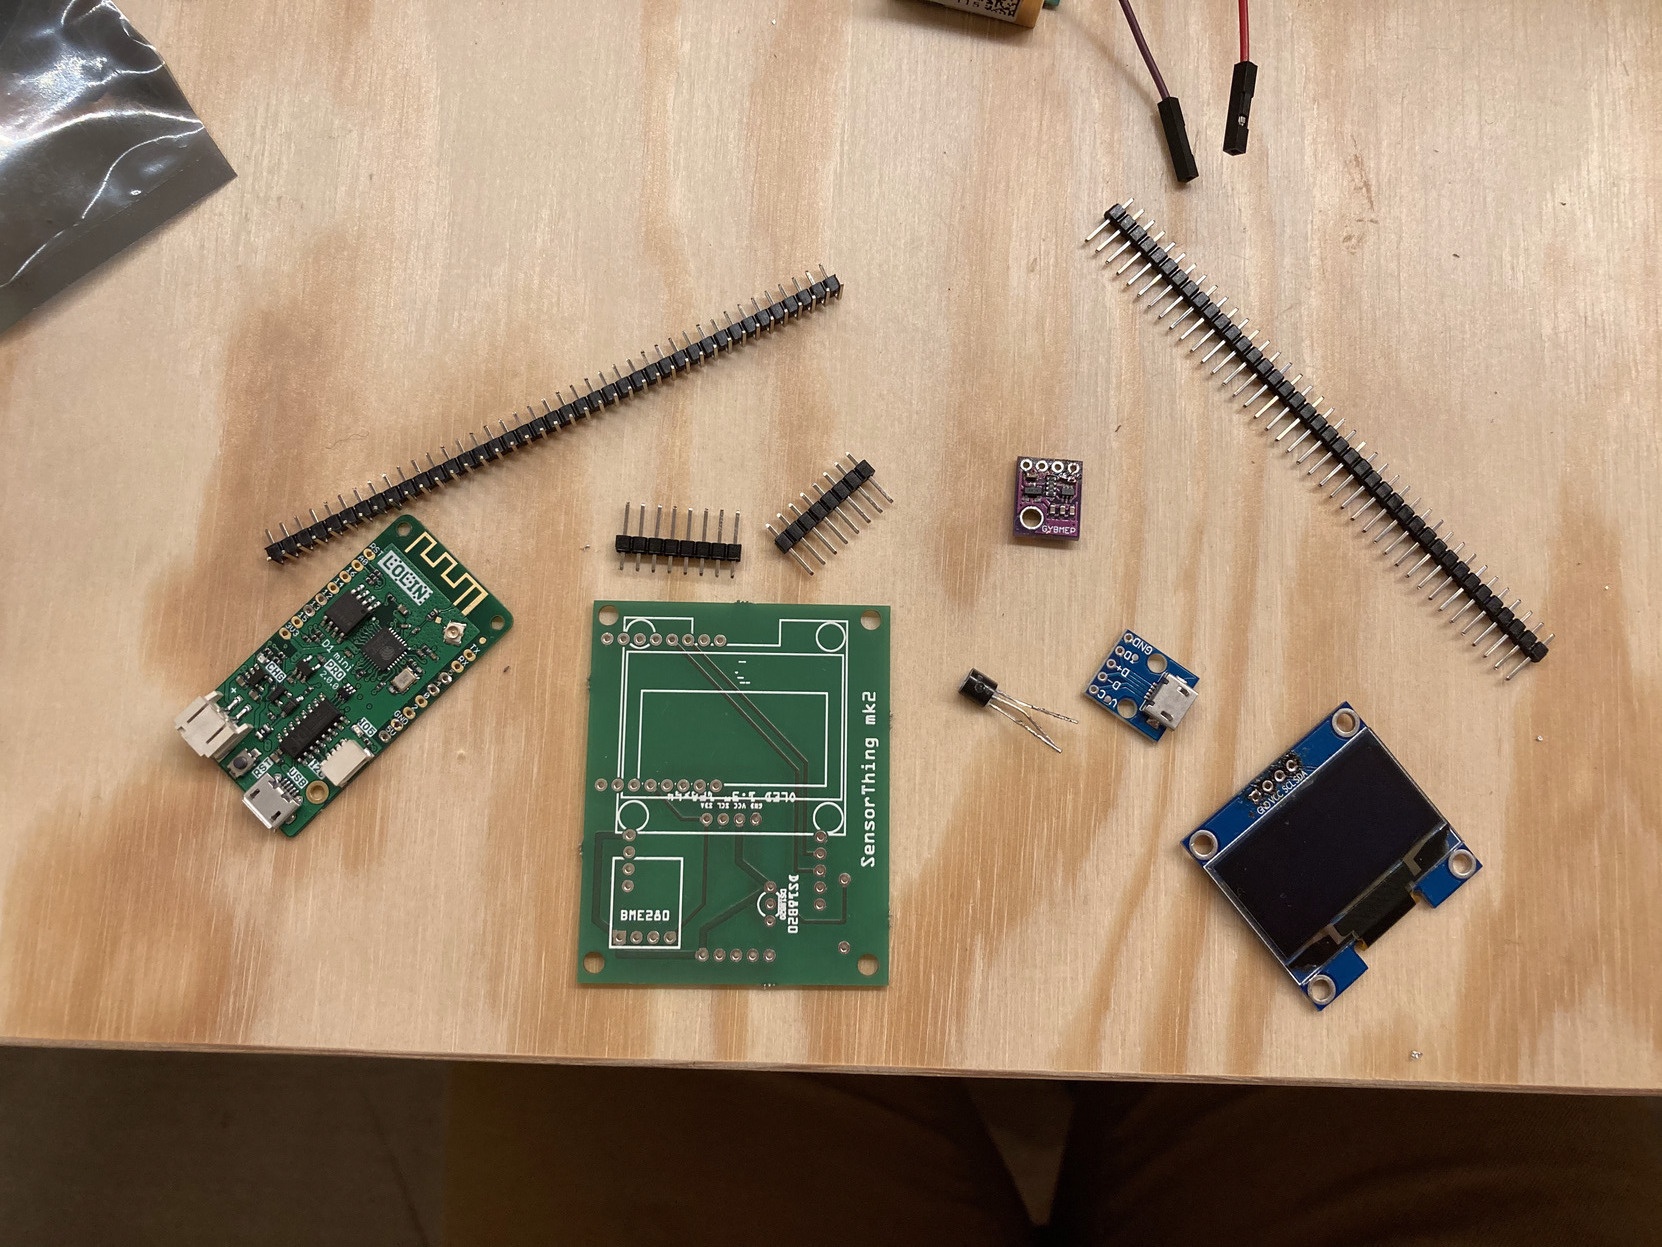
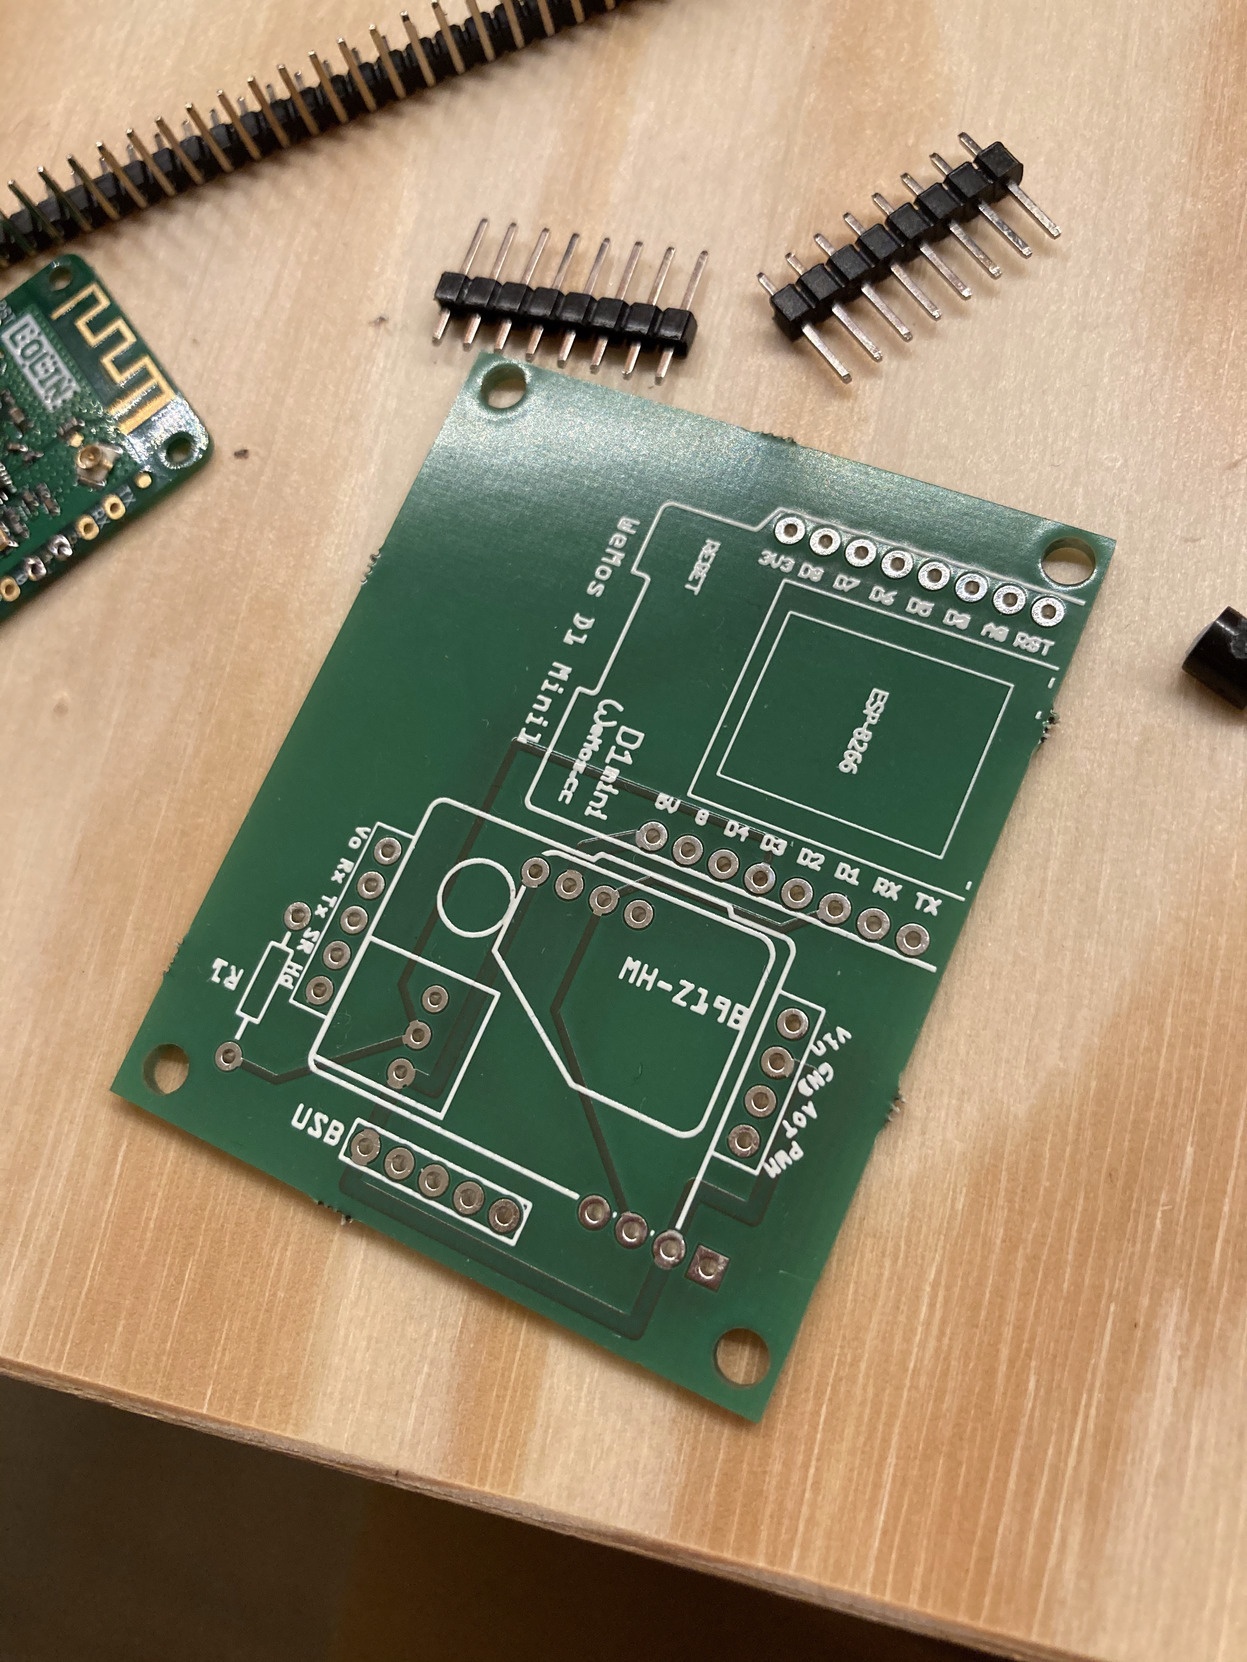
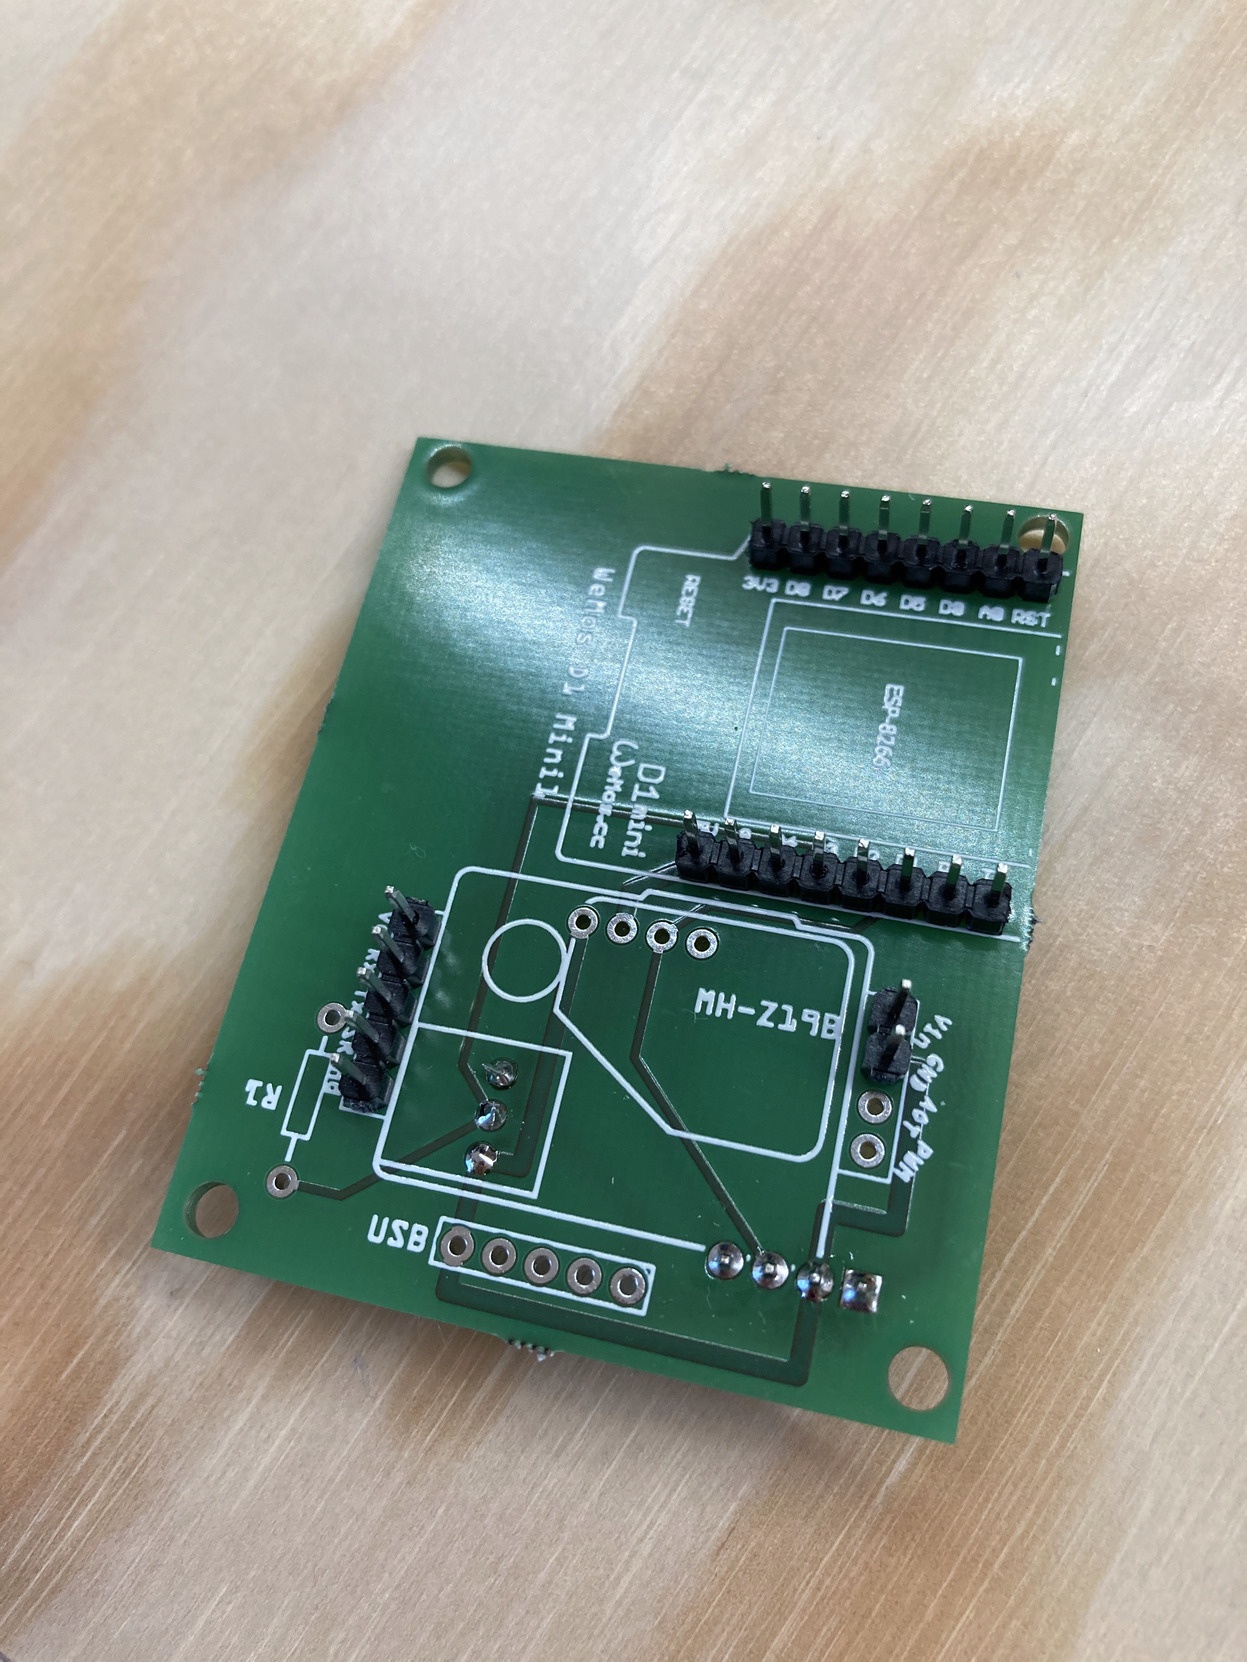
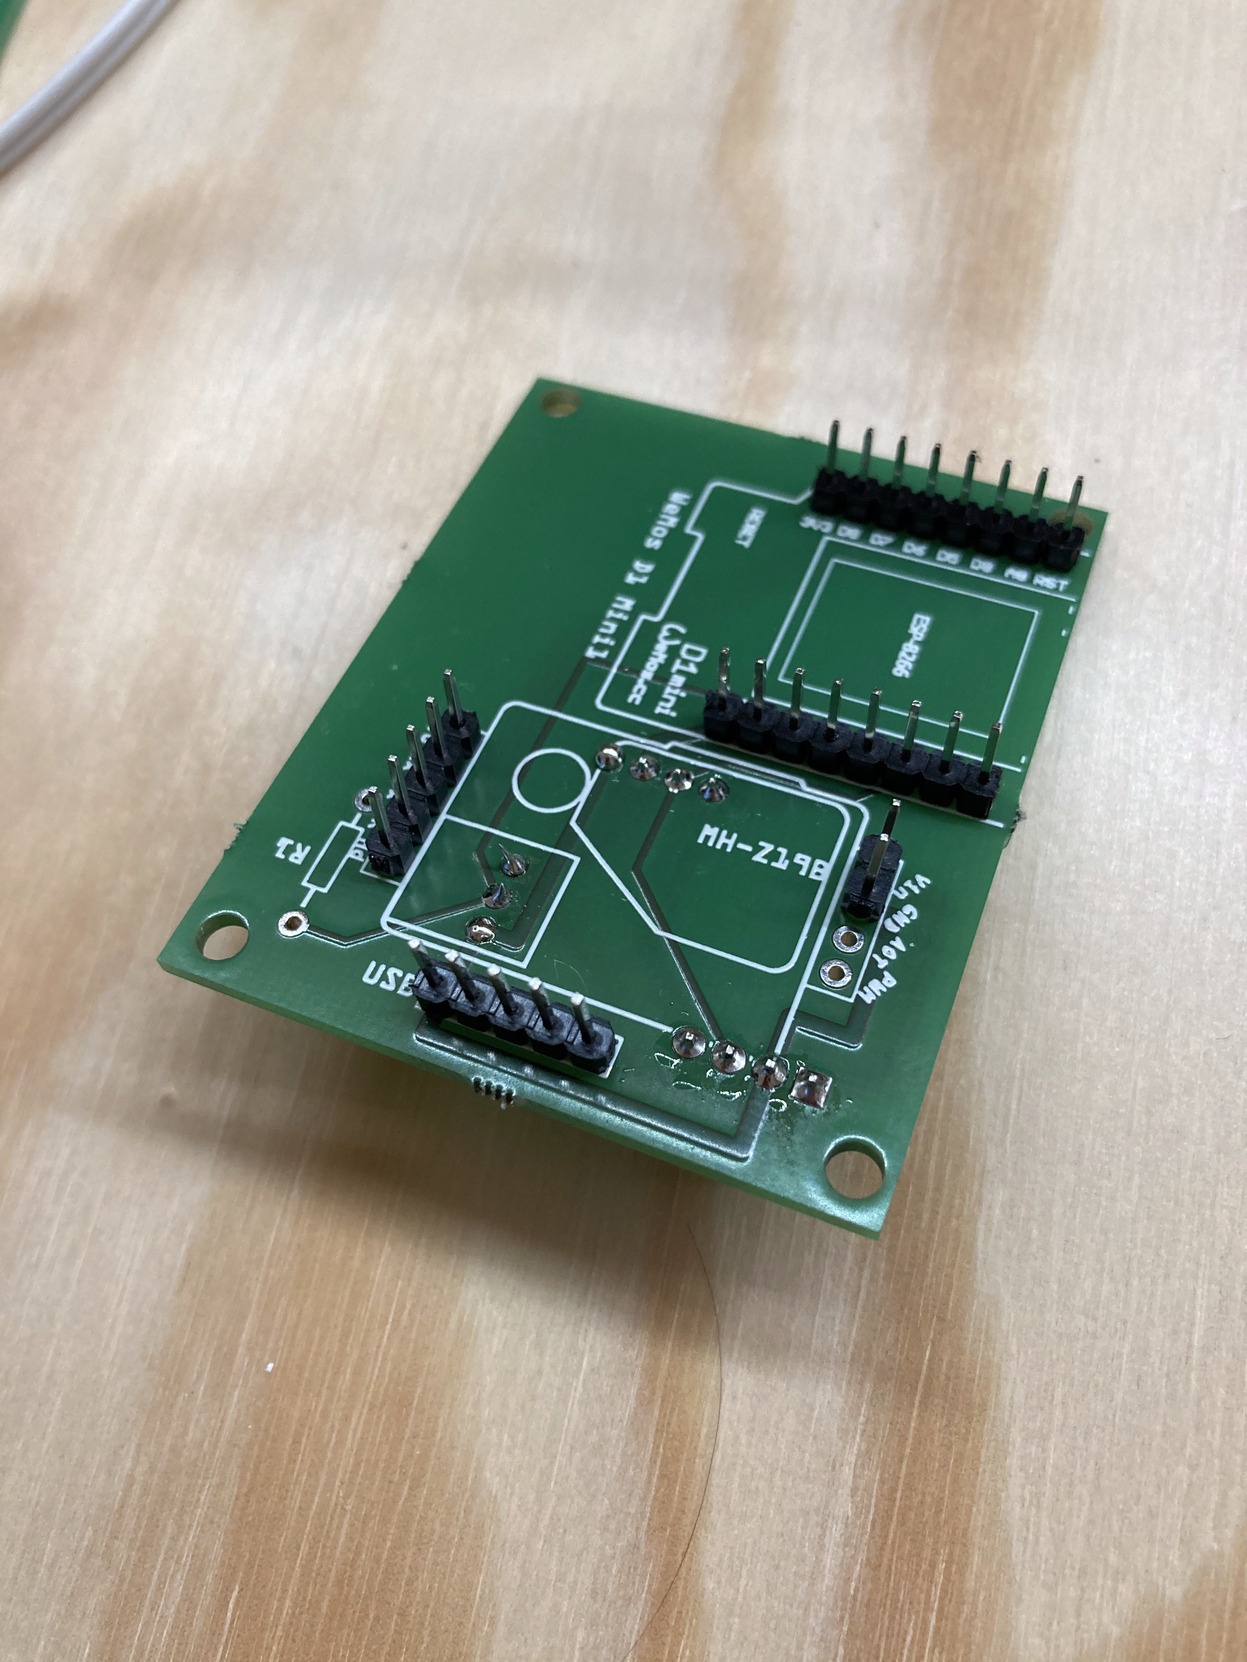
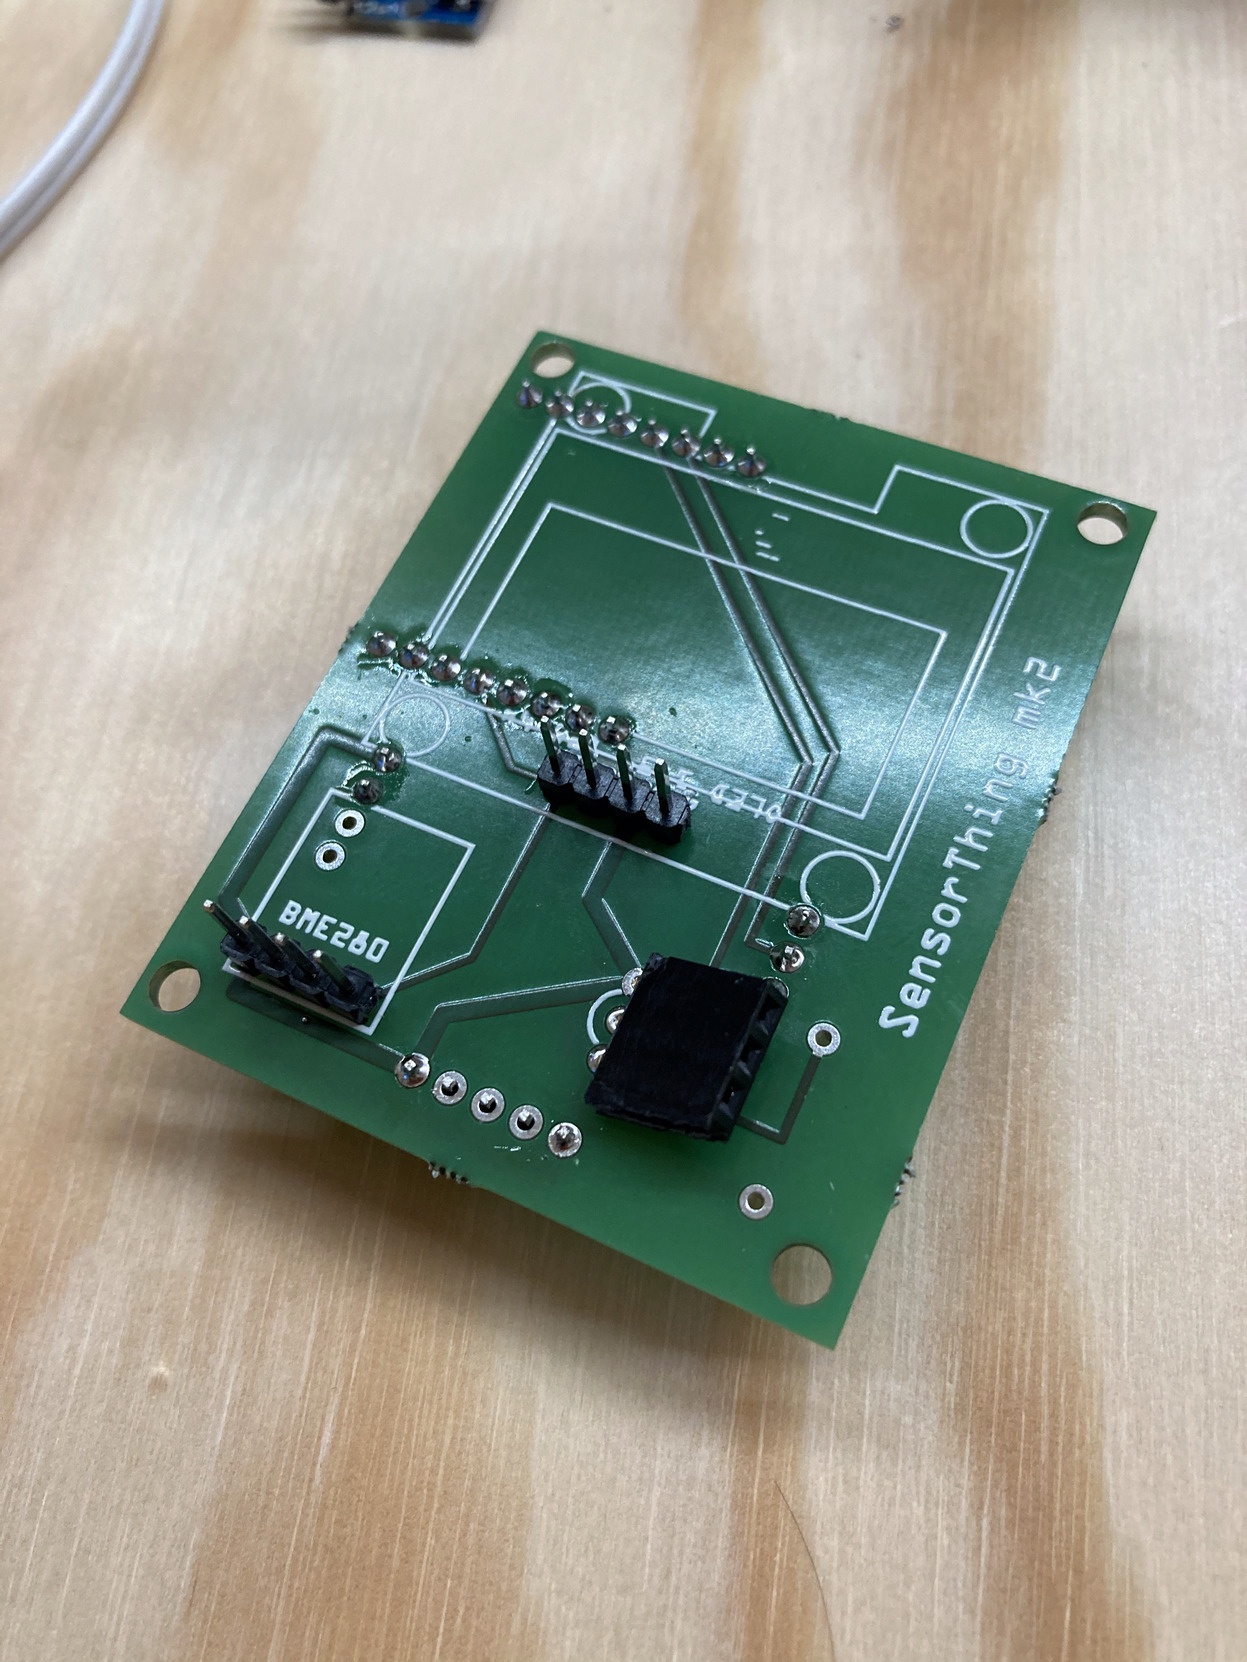
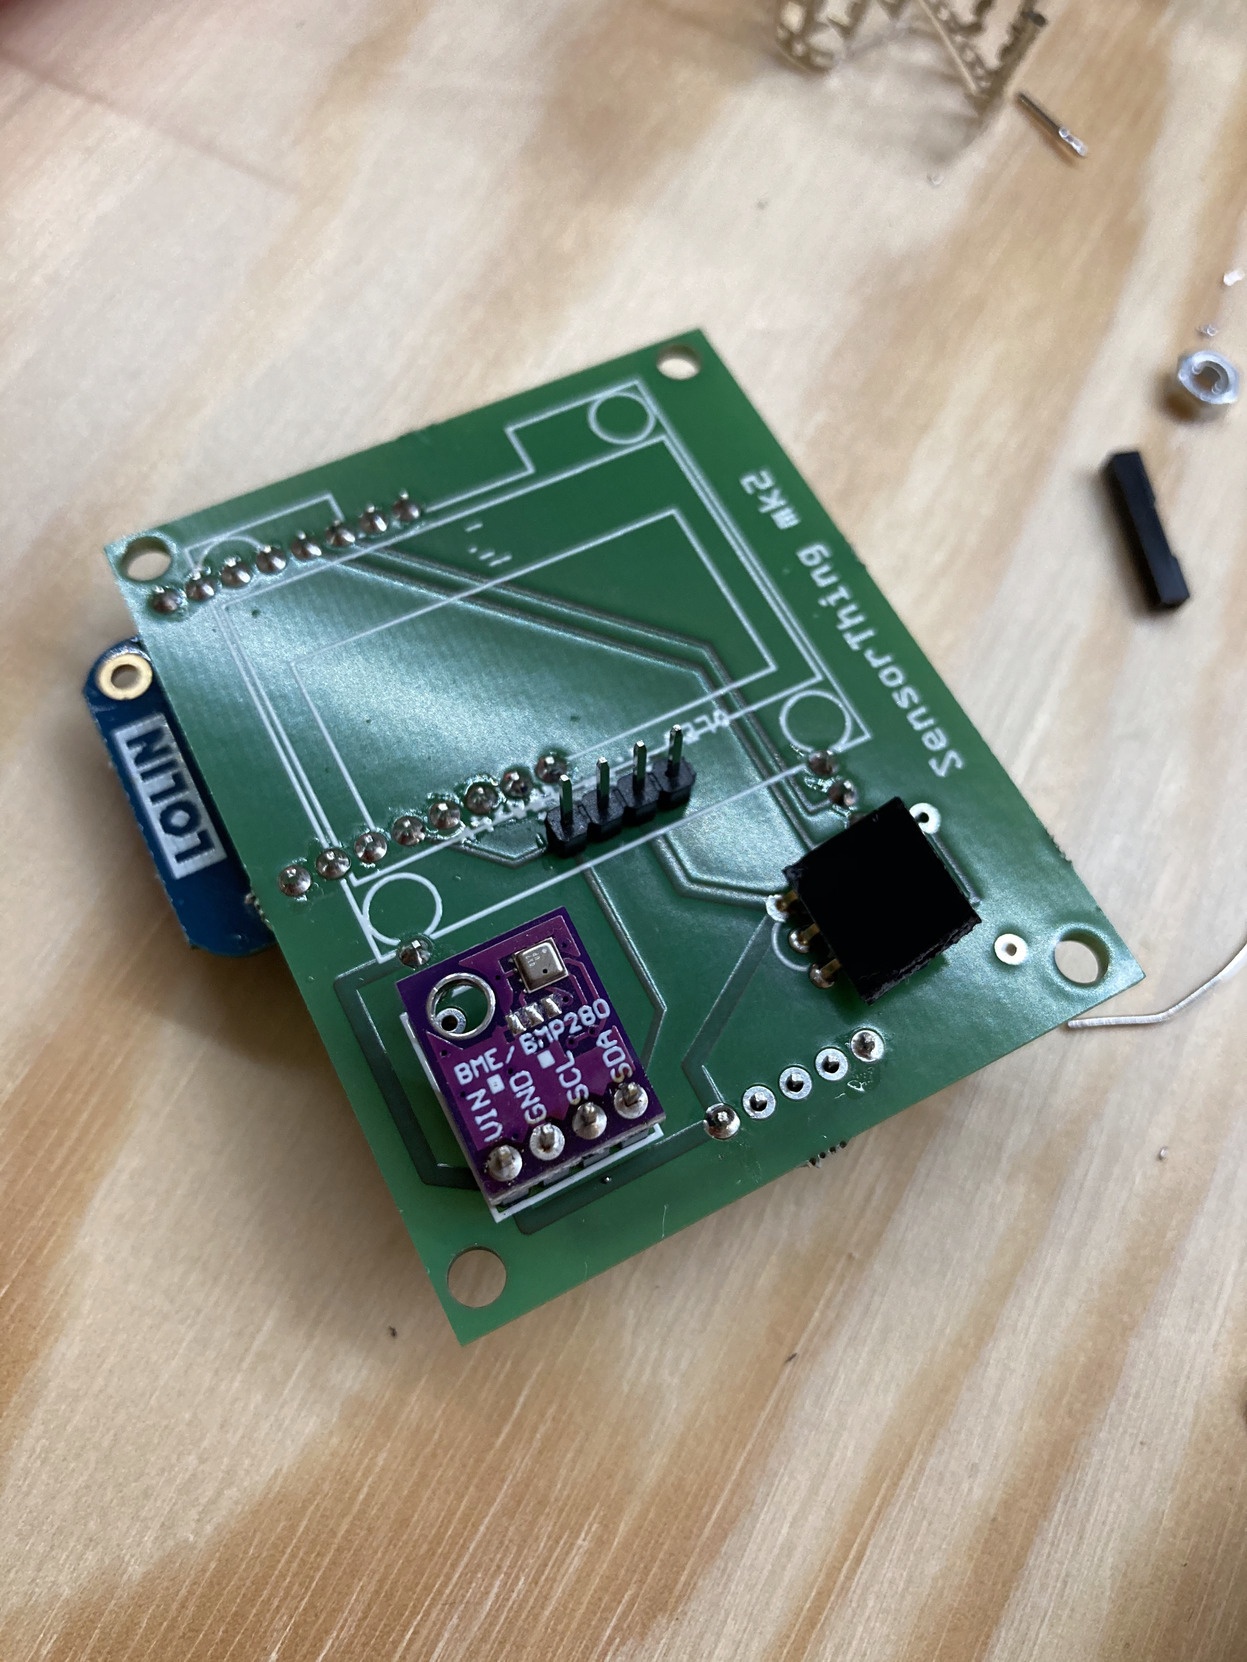
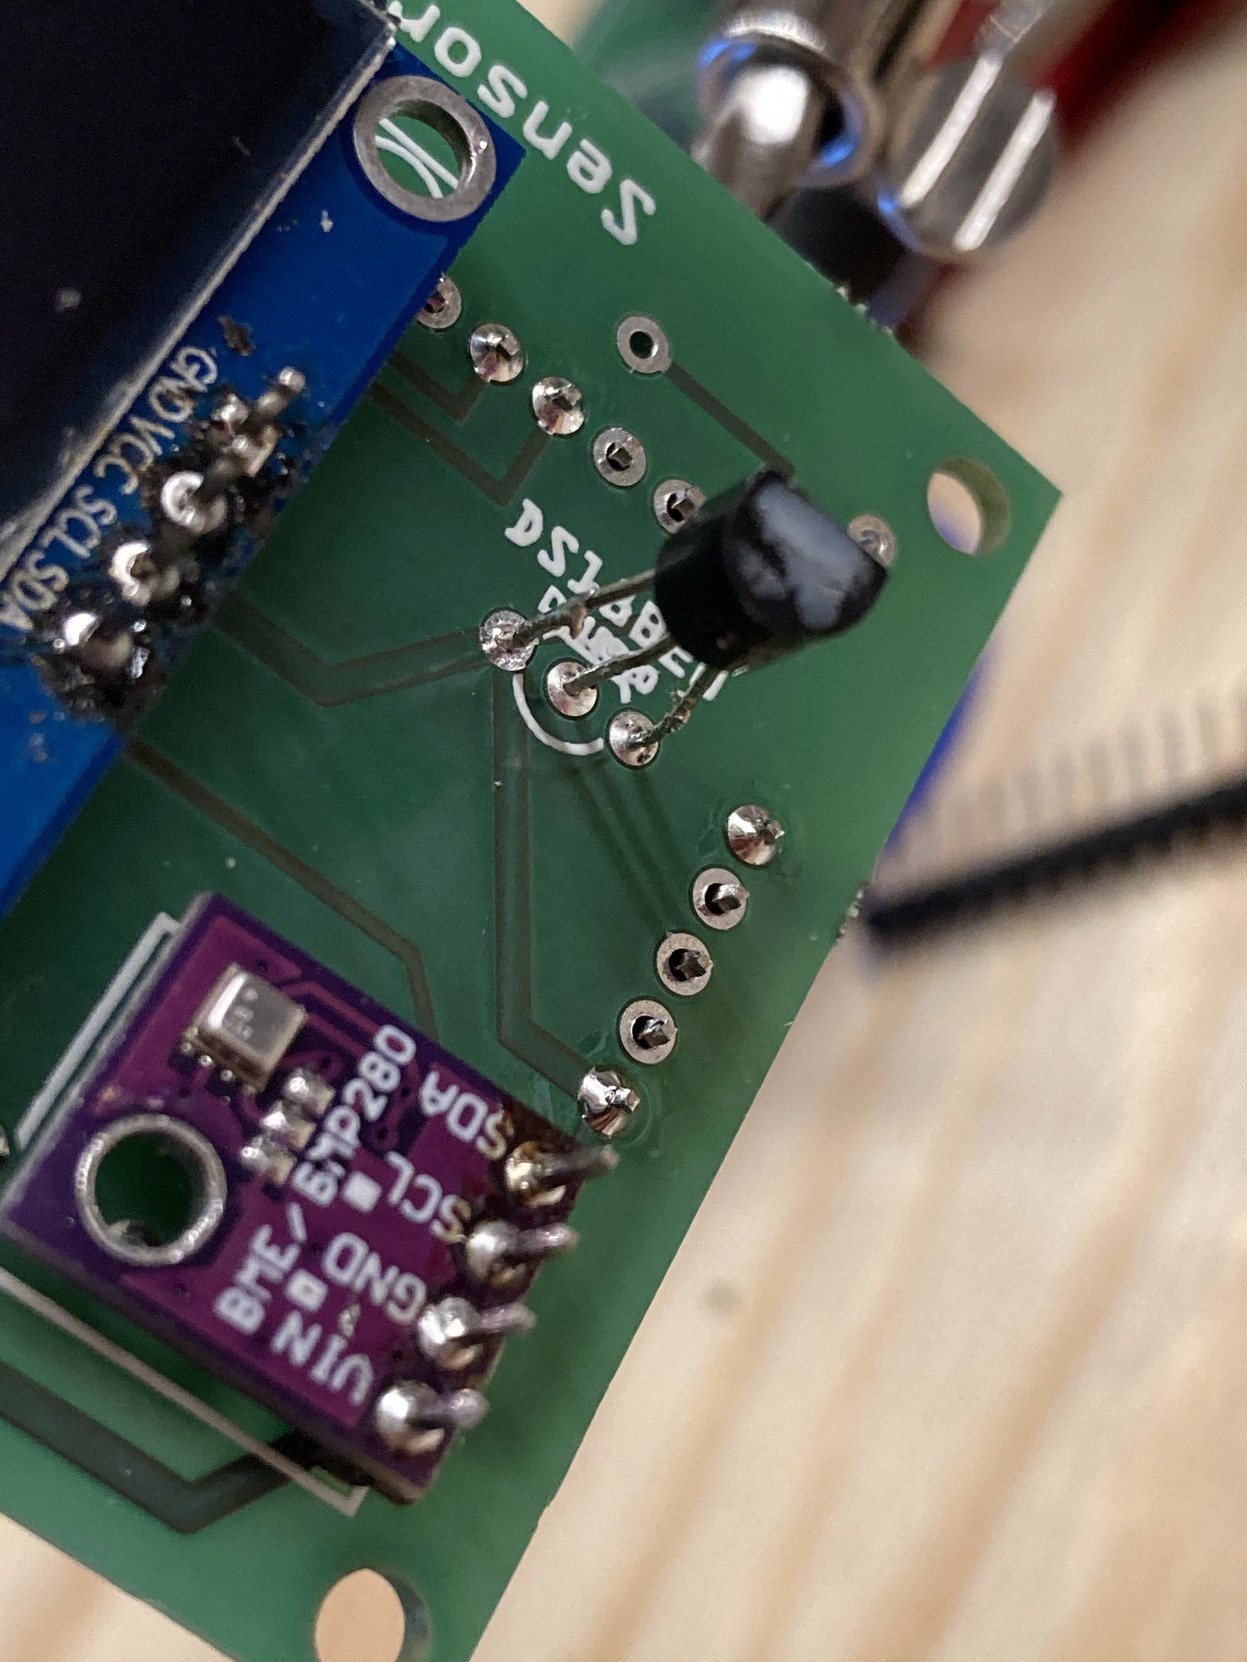
Solder male header pins onto PCB (1) for D1 mini (2), MH-Z19B (3), and OLED (4). For the MH-Z19B you can save a few headers by only connecting the necessary VCC, GND, RX and TX pins. (You could also only solder used pins for the D1 mini but I chose to connect all so I can optionally connect additional stuff via jumper wires).
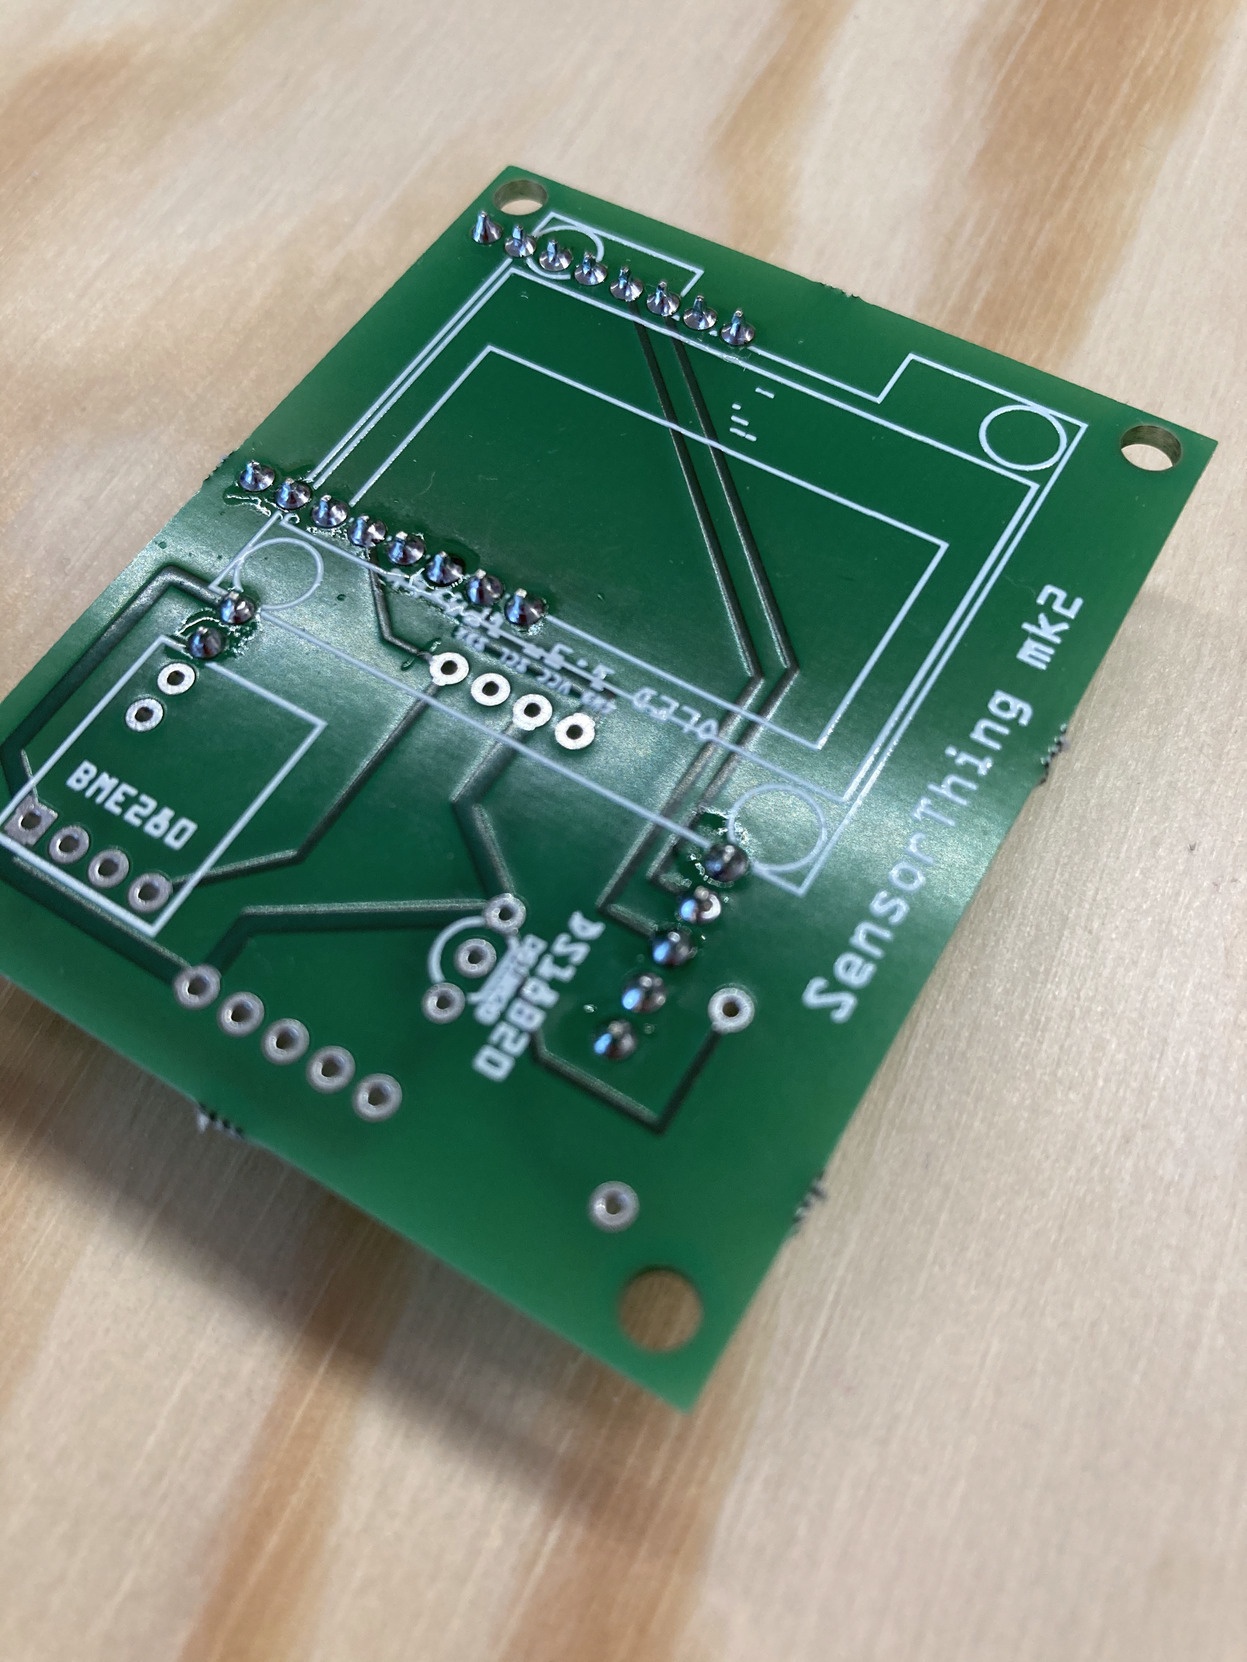
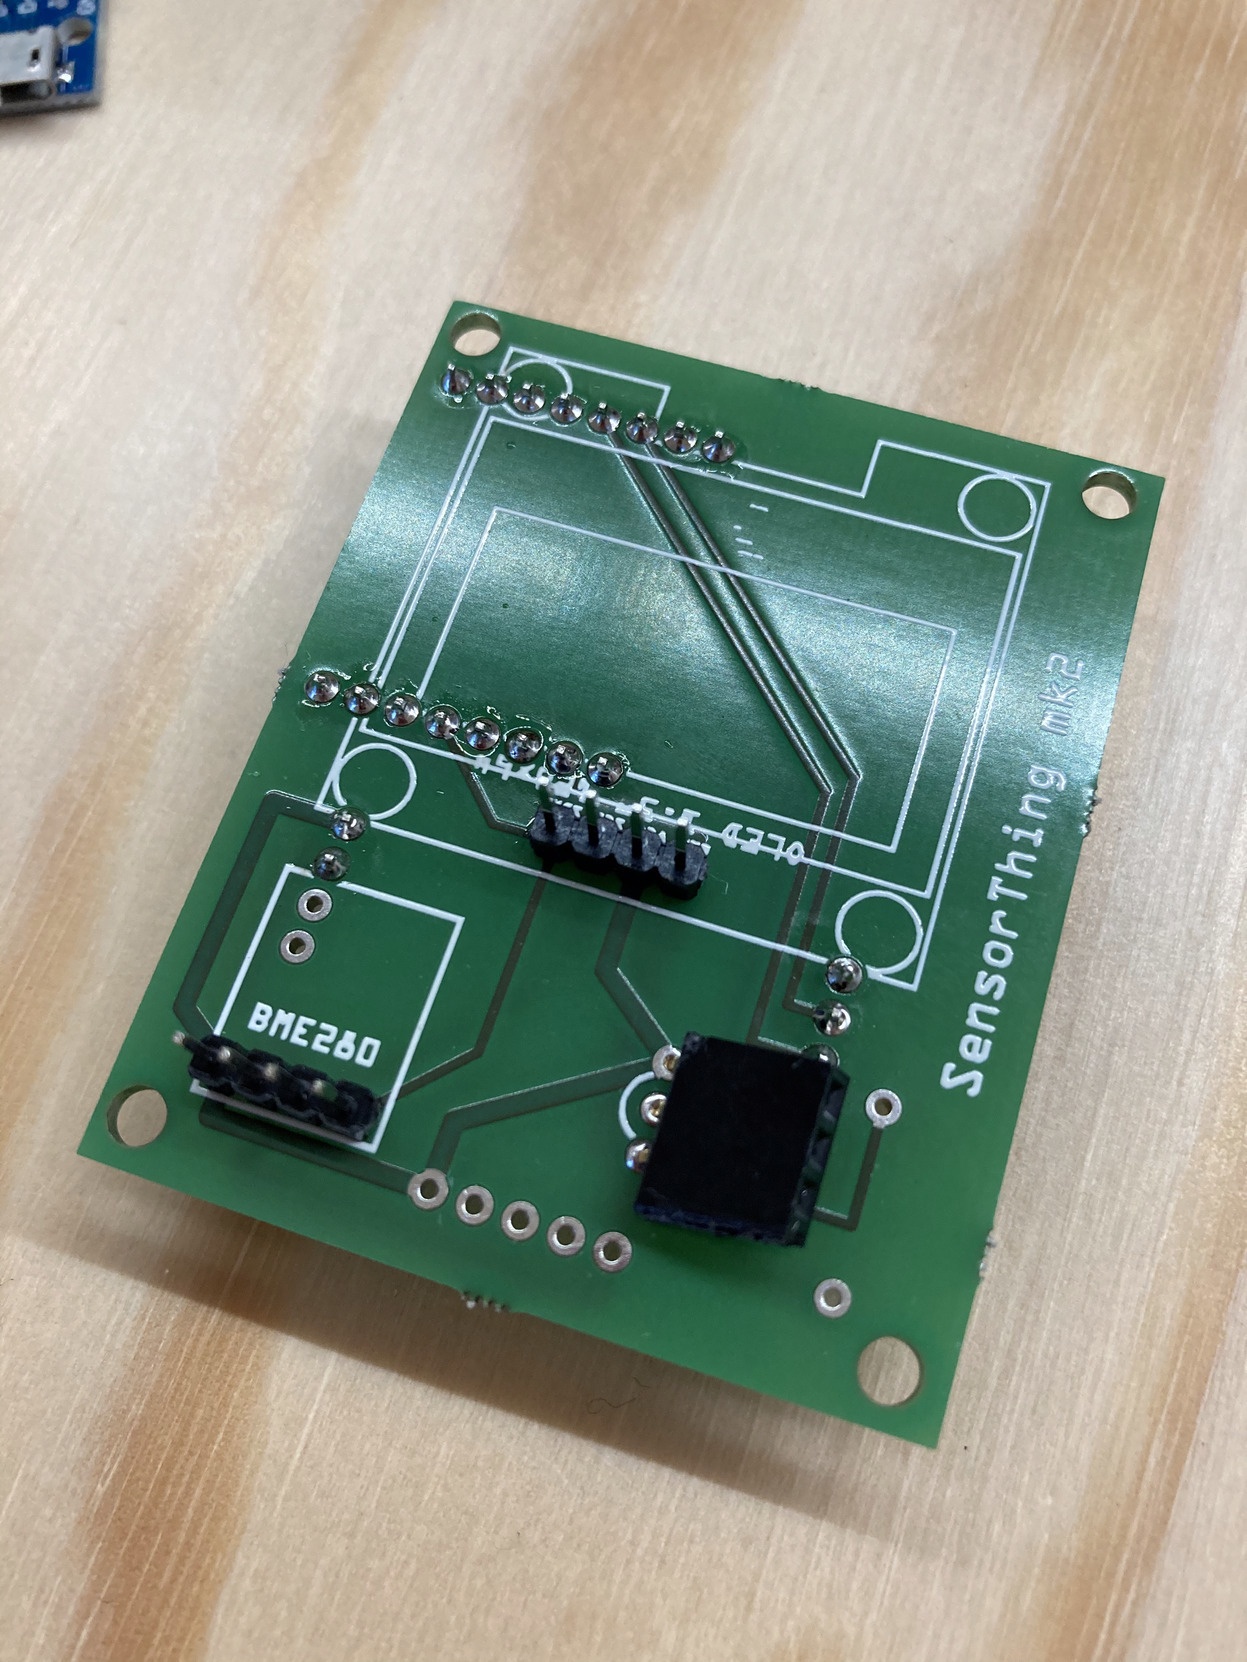
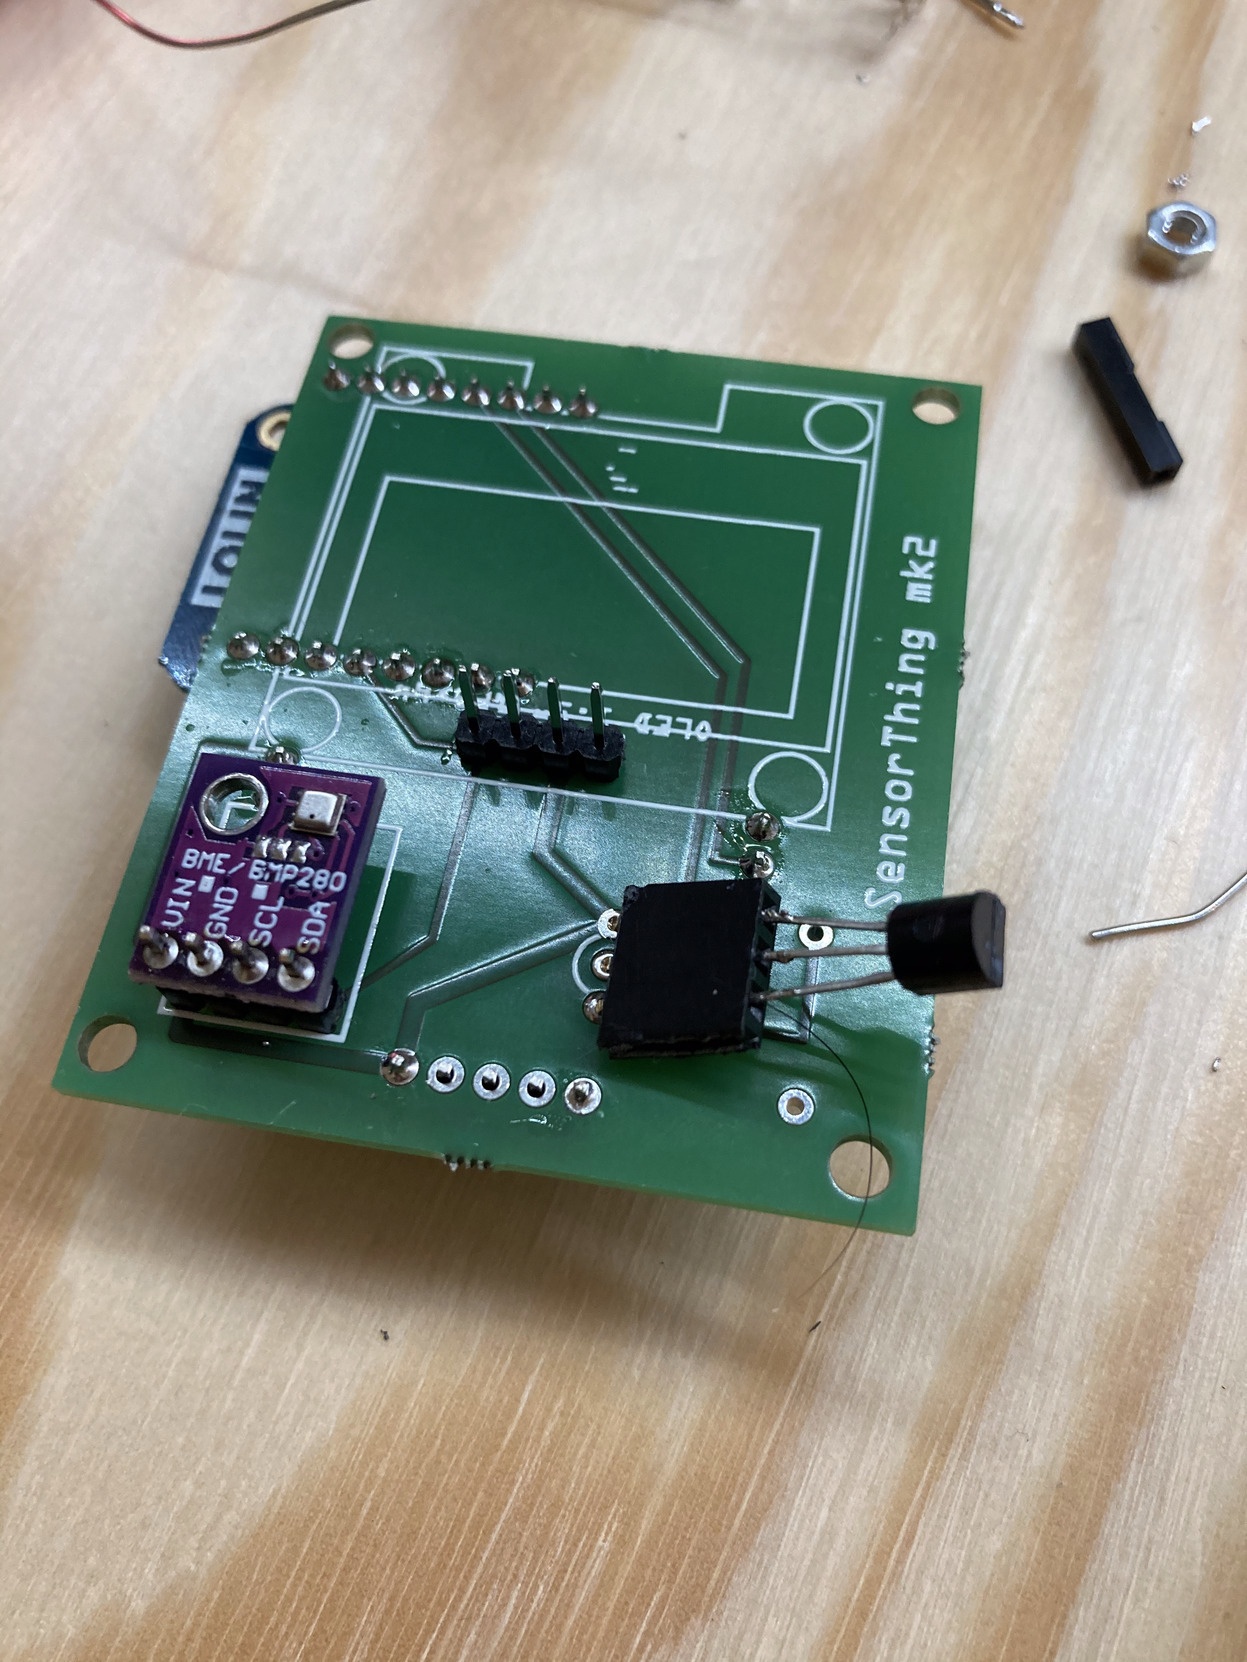
For the temperature sensors BME280 (5) and DS18B20 (6), decide what mounting option you want (see above), and either connect male header pins or female header pins to the PCB. In this example I connected BME280 using male pin headers, and the DS18B20 using female pin headers.
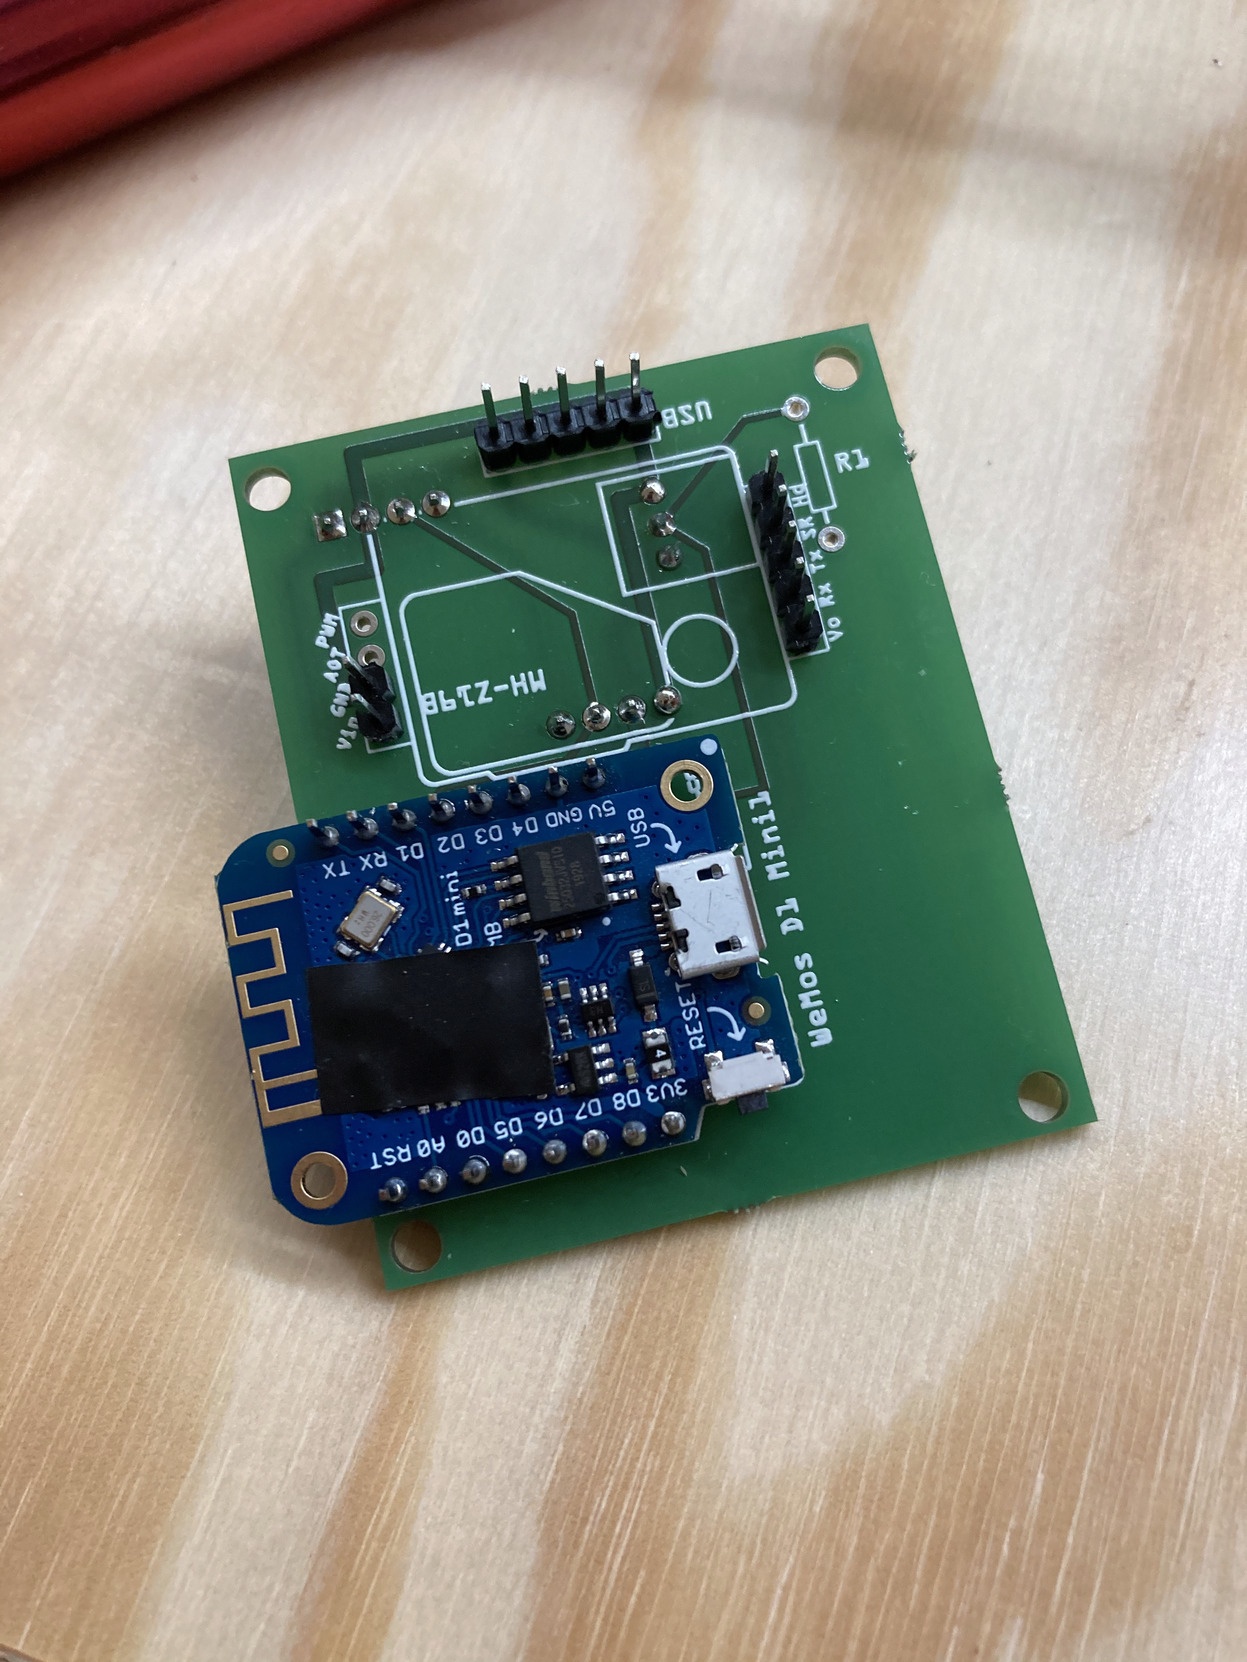
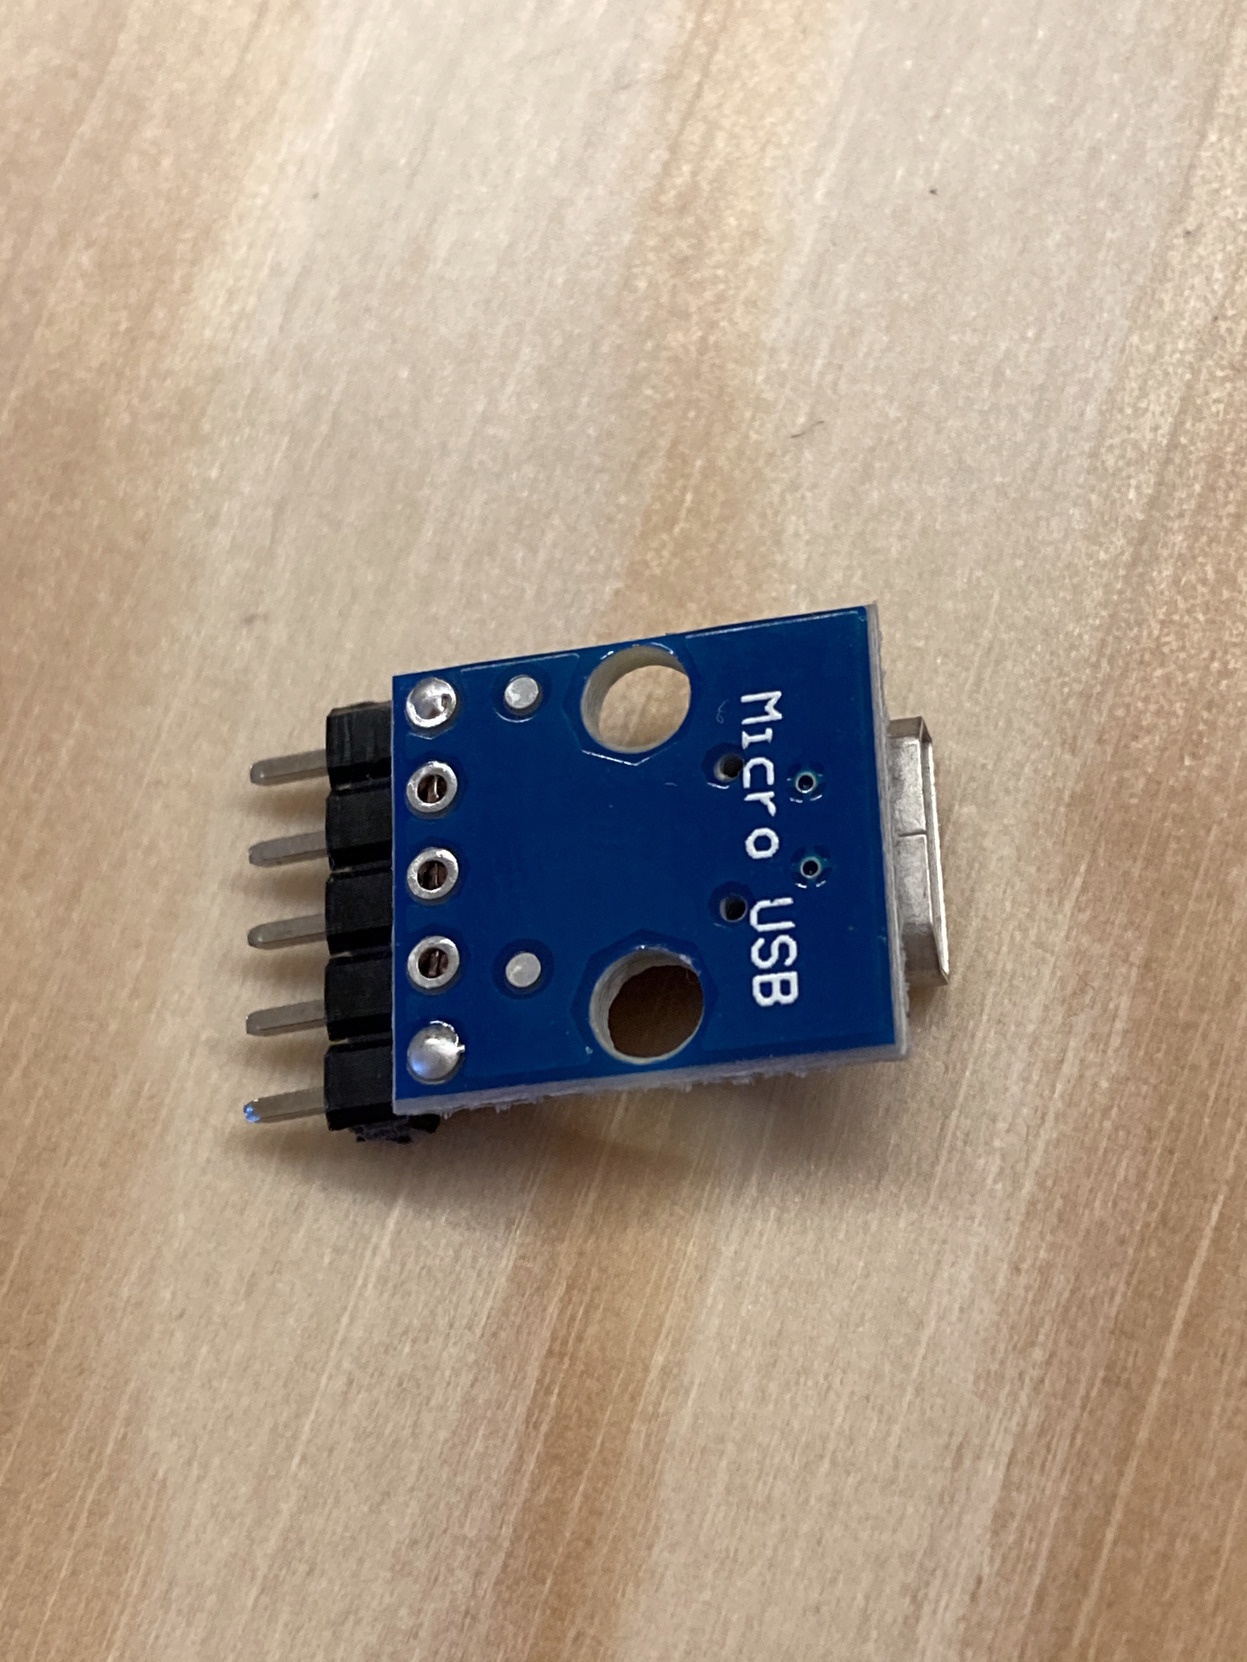
To power the board, you can either A] solder male headers in the USB pins, and connect them with jumper wires directly, or B] solder the micro-USB dip connector to the PCB.
For A], simply solder extra male header pins which you can connect jumper wires to later. N.B. GND is left and VCC is the right pin. (B] continues below):
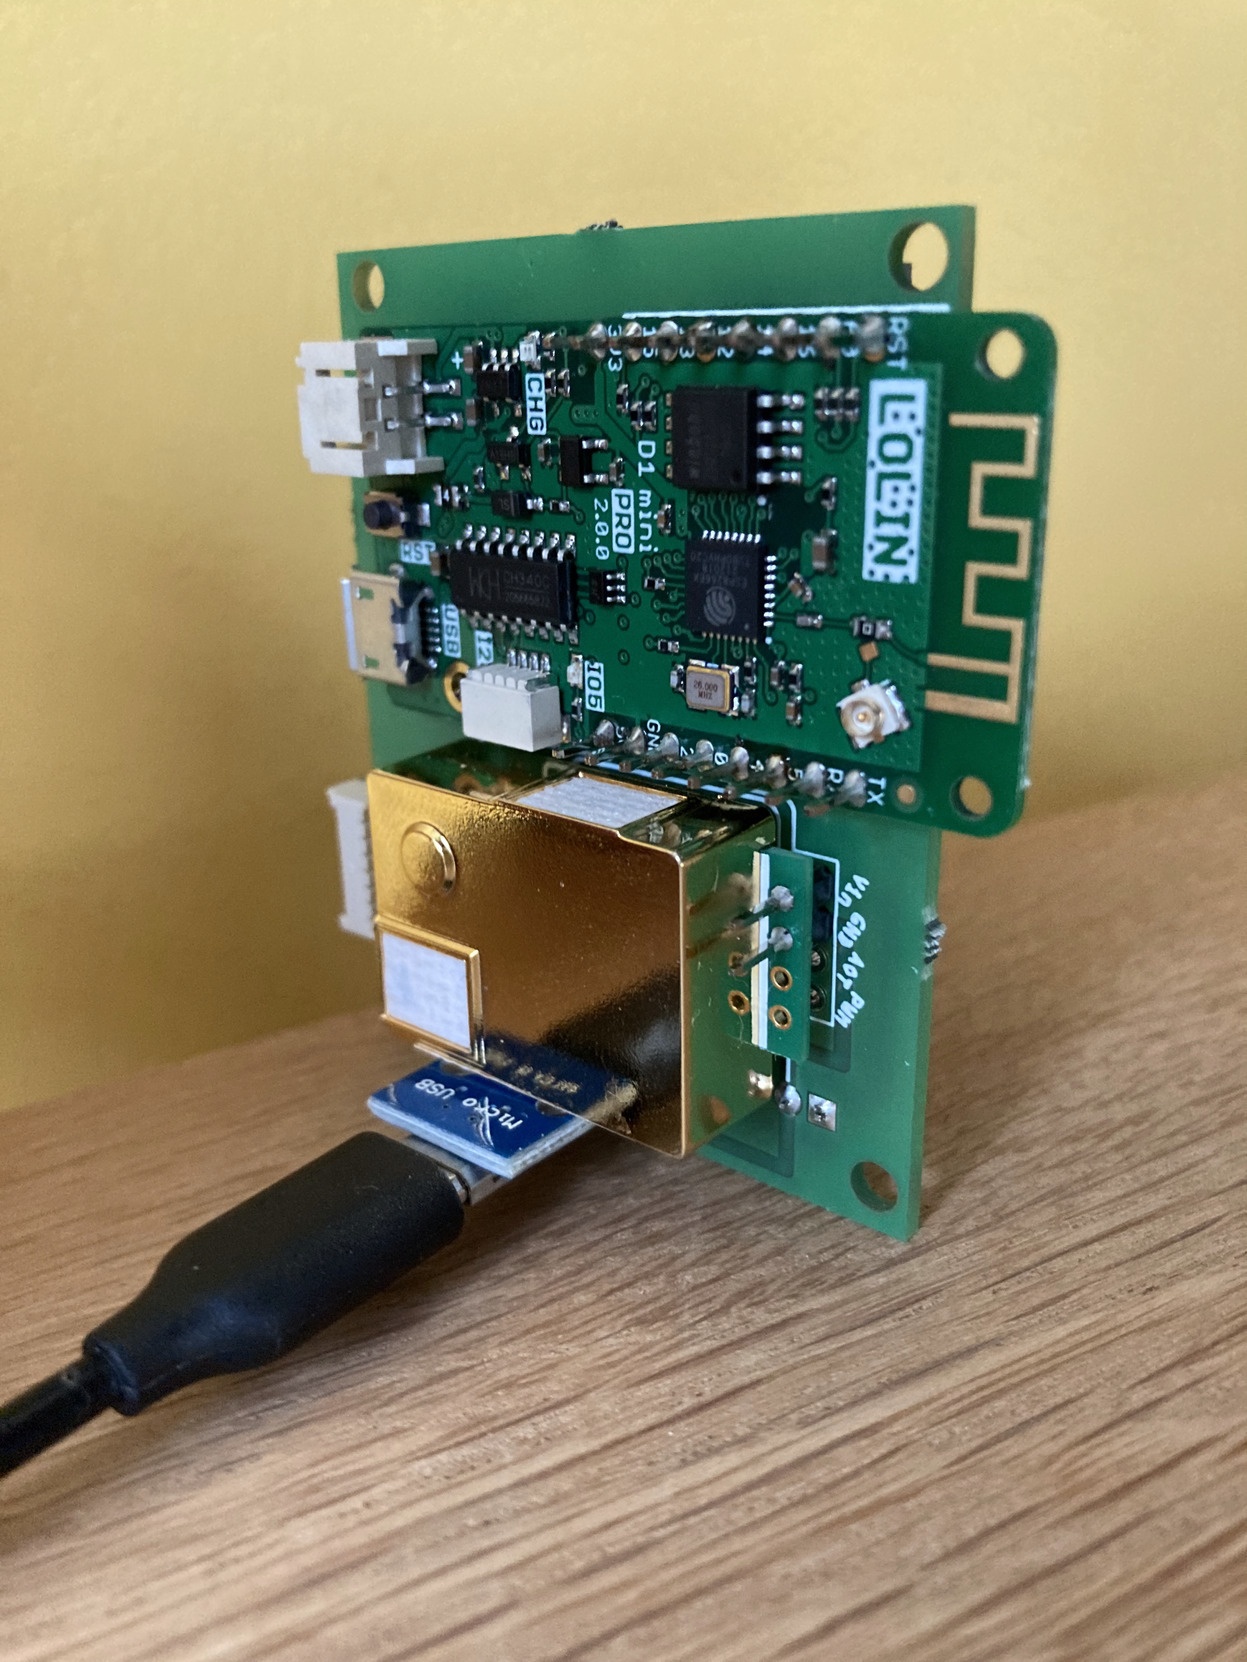
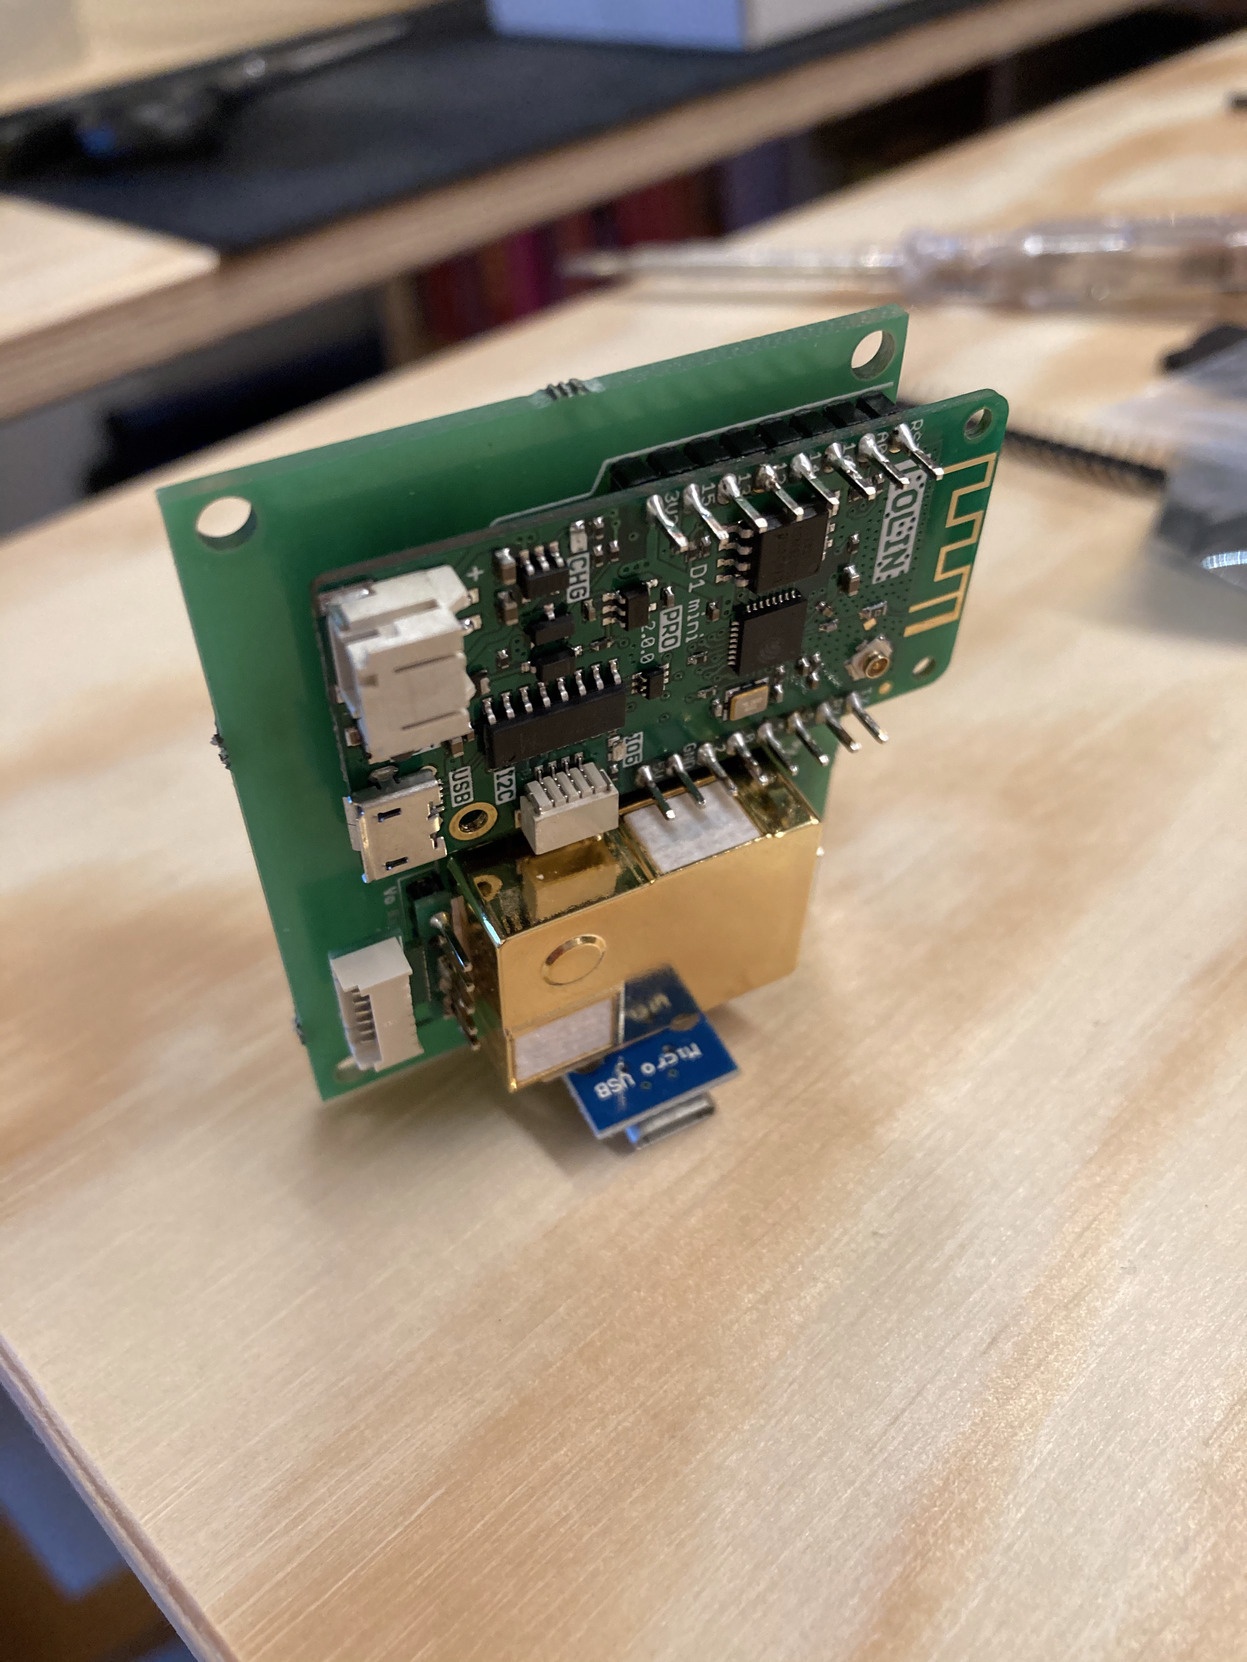
Next, connect the modules (note in these pictures I chose for powering via male header pins, i.e. A])
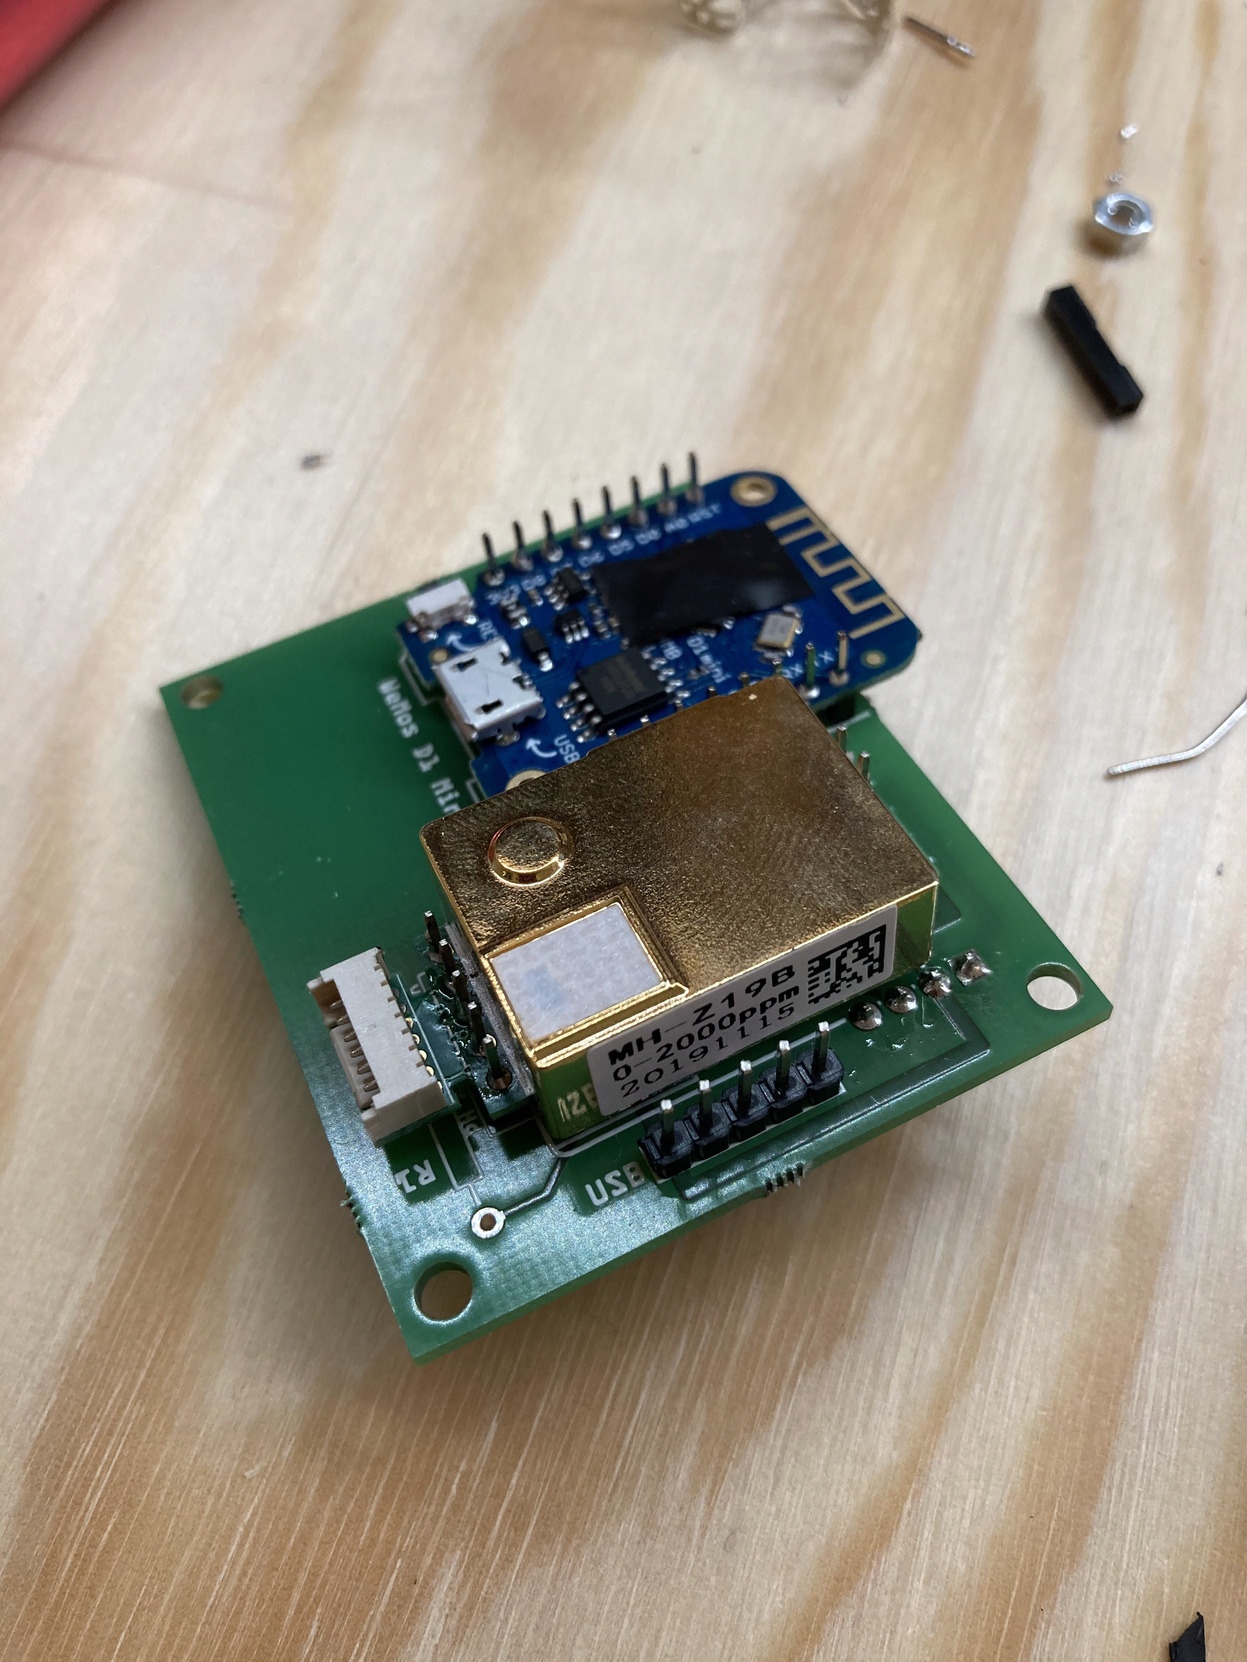

For B], solder 90 degree headers onto USB micro dip. Ensure that the pins do not protrude through the module pcb, else they might touch the MH-Z19B module. Only the outer pins (VCC and GND) matter.
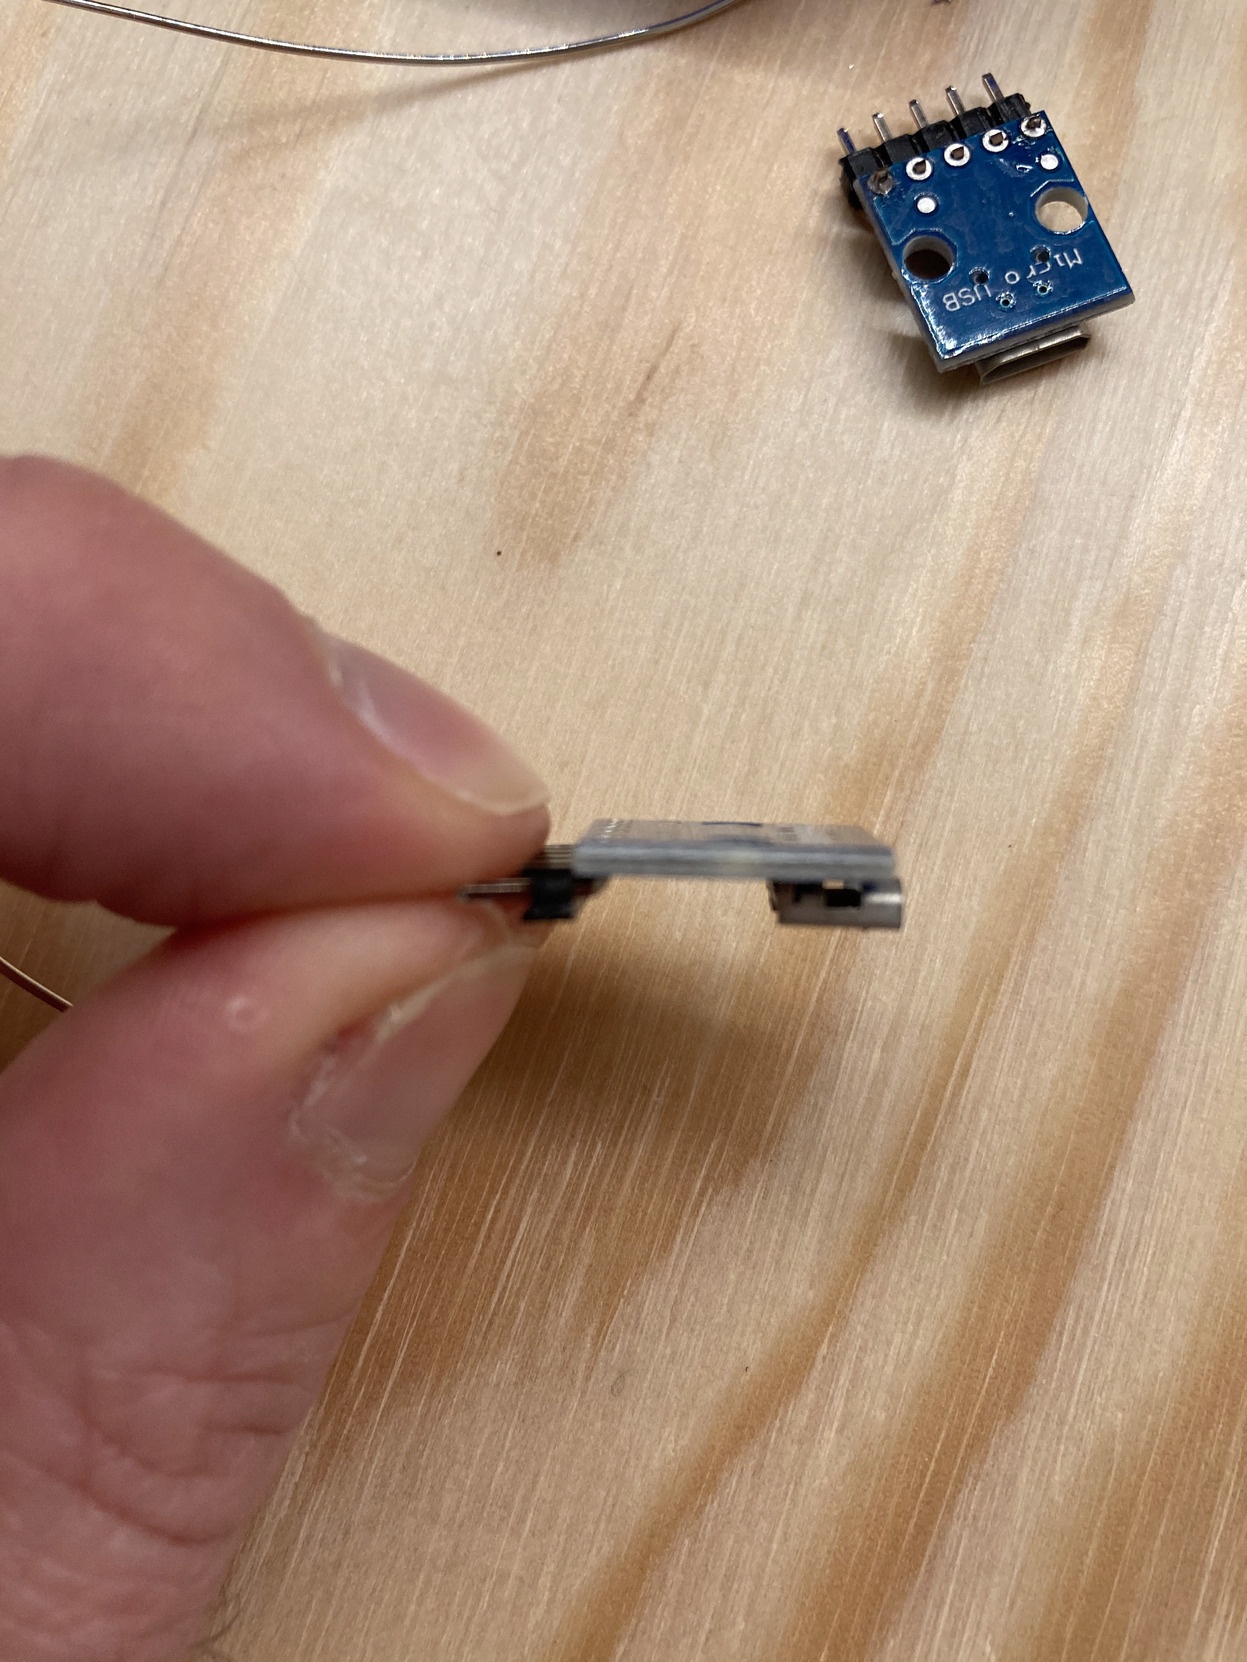
Then solder the Micro USB dip module onto PCB, which doubles as a stand.
Software configuration 
This esphome configuration is very similar to my previous project (vanwerkhoven.org), with some tweaks:
- Added Dallas DS18B20 sensor code
- Re-enable home assistant api for logging over wifi
- Disable web server to reduce resource usage and since it’s not necessary
- Optionally use deep sleep loop
esphome:
name: esp_test_board
platform: ESP8266
board: d1_mini_pro
wifi:
ssid: "your wifi SSID"
password: "your wifi password"
#fast_connect: True # Required to connect to hidden SSIDs and only with one network
domain: ".lan"
# Enable fallback hotspot (captive portal) in case wifi connection fails
ap:
ssid: "Esp Living Fallback Hotspot"
password: "your fallback password"
captive_portal:
# Enable logging
logger:
# Disable UART Logging to fix MHZ-19B preamble issue when using hardware UART, see https://github.com/esphome/issues/issues/488
# Not strictly necessary anymore with 1.14.0 https://github.com/esphome/esphome/releases/tag/v1.14.0
# baud_rate: 0
# Enable Home Assistant API for logging over wifi.
# Disable reboot loop by setting reboot_timeout to 0s!
# See warning on https://esphome.io/components/mqtt.html
api:
reboot_timeout: 0s
# Disable webserver, since we push data over mqtt. Can be useful for
# diagnostics, but takes up quite some memory
# web_server:
# port: 80
# Optionally use deep sleep loop to reduce power consumption/self-heating.
# deep_sleep:
# run_duration: 30s
# sleep_duration: 150s
# Allow OTA updates
ota:
# For MH-Z19B CO2 via software serial
uart:
- id: myuart1
rx_pin: GPIO12
tx_pin: GPIO13
baud_rate: 9600
# For BME280
i2c:
sda: GPIO4
scl: GPIO5
scan: True
# For Dallas temp sensors connected to pin GPIO0 = D3, enable internal pull-up
# resistor
dallas:
id: ds18b20_temp_sensor
pin:
number: GPIO0
# inverted: True
mode: INPUT_PULLUP
update_interval: 30s
# Ensure you get *ttf files from somewhere
font:
- file: "slkscr.ttf"
id: my_font1
size: 8
- file: "slkscr.ttf"
id: my_font2
size: 16
- file: "Arial.ttf"
id: my_font3
size: 16
mqtt:
# For mobile = WAN : use FQDN, for local (IoT network - no WAN), use home IP.
broker: "192.168.0.1"
#broker: home.yourhostname.org
port: 1883
username: "esp_board_client"
password: "AQFCg72z5MqFihspHGbkqOj9"
sensor:
- platform: wifi_signal
name: "WiFi Signal"
update_interval: 10s
id: mywifi1
- platform: wifi_signal
name: "WiFi Signal2"
update_interval: 10s
filters:
- exponential_moving_average:
alpha: 0.001 # We want ~6 hour averaging, at 10s update, that's 6*3600/10 = 2160 points, thus alpha should be 2/2160 ~ 0.001
send_every: 1
id: mywifi2
- platform: dallas
index: 0
name: "DS18B20 Temperature"
state_topic: influx/environv3/quantity/T/source/dallas1/board/esp_test_board/location/home/room/living/value/state
id: ds18b20_temp
- platform: mhz19
co2:
name: "MH-Z19 CO2"
state_topic: influx/environv3/quantity/CO2/source/mhz19b/board/esp_test_board/location/home/room/living/value/state
id: mhz_19_co2
temperature:
name: "MH-Z19 Temperature"
state_topic: influx/environv3/quantity/T/source/mhz19b/board/esp_test_board/location/home/room/living/value/state
id: mhz_19_T
update_interval: 20s
uart_id: myuart1
- platform: mhz19
co2:
name: "MH-Z19 CO2"
id: mhz_19_co2_ema
filters:
- exponential_moving_average:
alpha: 0.001 # We want ~12 hour averaging, at 20s update, that's 12*3600/20 = 2160 points, thus alpha should be 2/2160 ~ 0.001
send_every: 1
temperature:
name: "MH-Z19 Temperature"
id: mhz_19_T_ema
filters:
- exponential_moving_average:
alpha: 0.001 # We want ~12 hour averaging, at 20s update, that's 12*3600/20 = 2160 points, thus alpha should be 2/2160 ~ 0.001
send_every: 1
update_interval: 20s # if changed also update alpha
uart_id: myuart1
- platform: bme280
temperature:
name: "BME280 Temperature"
oversampling: 16x
id: bme_280_temp
state_topic: influx/environv3/quantity/T/source/bme280/board/esp_test_board/location/home/room/living/value/state
pressure:
name: "BME280 Pressure"
id: bme_280_press
state_topic: influx/environv3/quantity/P/source/bme280/board/esp_test_board/location/home/room/living/value/state
humidity:
name: "BME280 Humidity"
id: bme_280_rh
state_topic: influx/environv3/quantity/RH/source/bme280/board/esp_test_board/location/home/room/living/value/state
address: 0x76
update_interval: 30s
- platform: bme280
temperature:
name: "BME280 Temperature"
oversampling: 16x
id: bme_280_temp_ema
filters:
- exponential_moving_average:
alpha: 0.001 # We want ~12 hour averaging, at 20s update, that's 12*3600/20 = 2160 points, thus alpha should be 2/2160 ~ 0.001
send_every: 1
pressure:
name: "BME280 Pressure"
id: bme_280_press_ema
filters:
- exponential_moving_average:
alpha: 0.0002 # We want ~48 hour averaging, at 20s update, that's 48*3600/20 = 8640 points, thus alpha should be 2/8640 ~ 0.0002
send_every: 1
humidity:
name: "BME280 Humidity"
id: bme_280_rh_ema
filters:
- exponential_moving_average:
alpha: 0.001 # We want ~12 hour averaging, at 20s update, that's 12*3600/20 = 2160 points, thus alpha should be 2/2160 ~ 0.001
send_every: 1
address: 0x76
update_interval: 20s # if you change this don't forget to update alpha
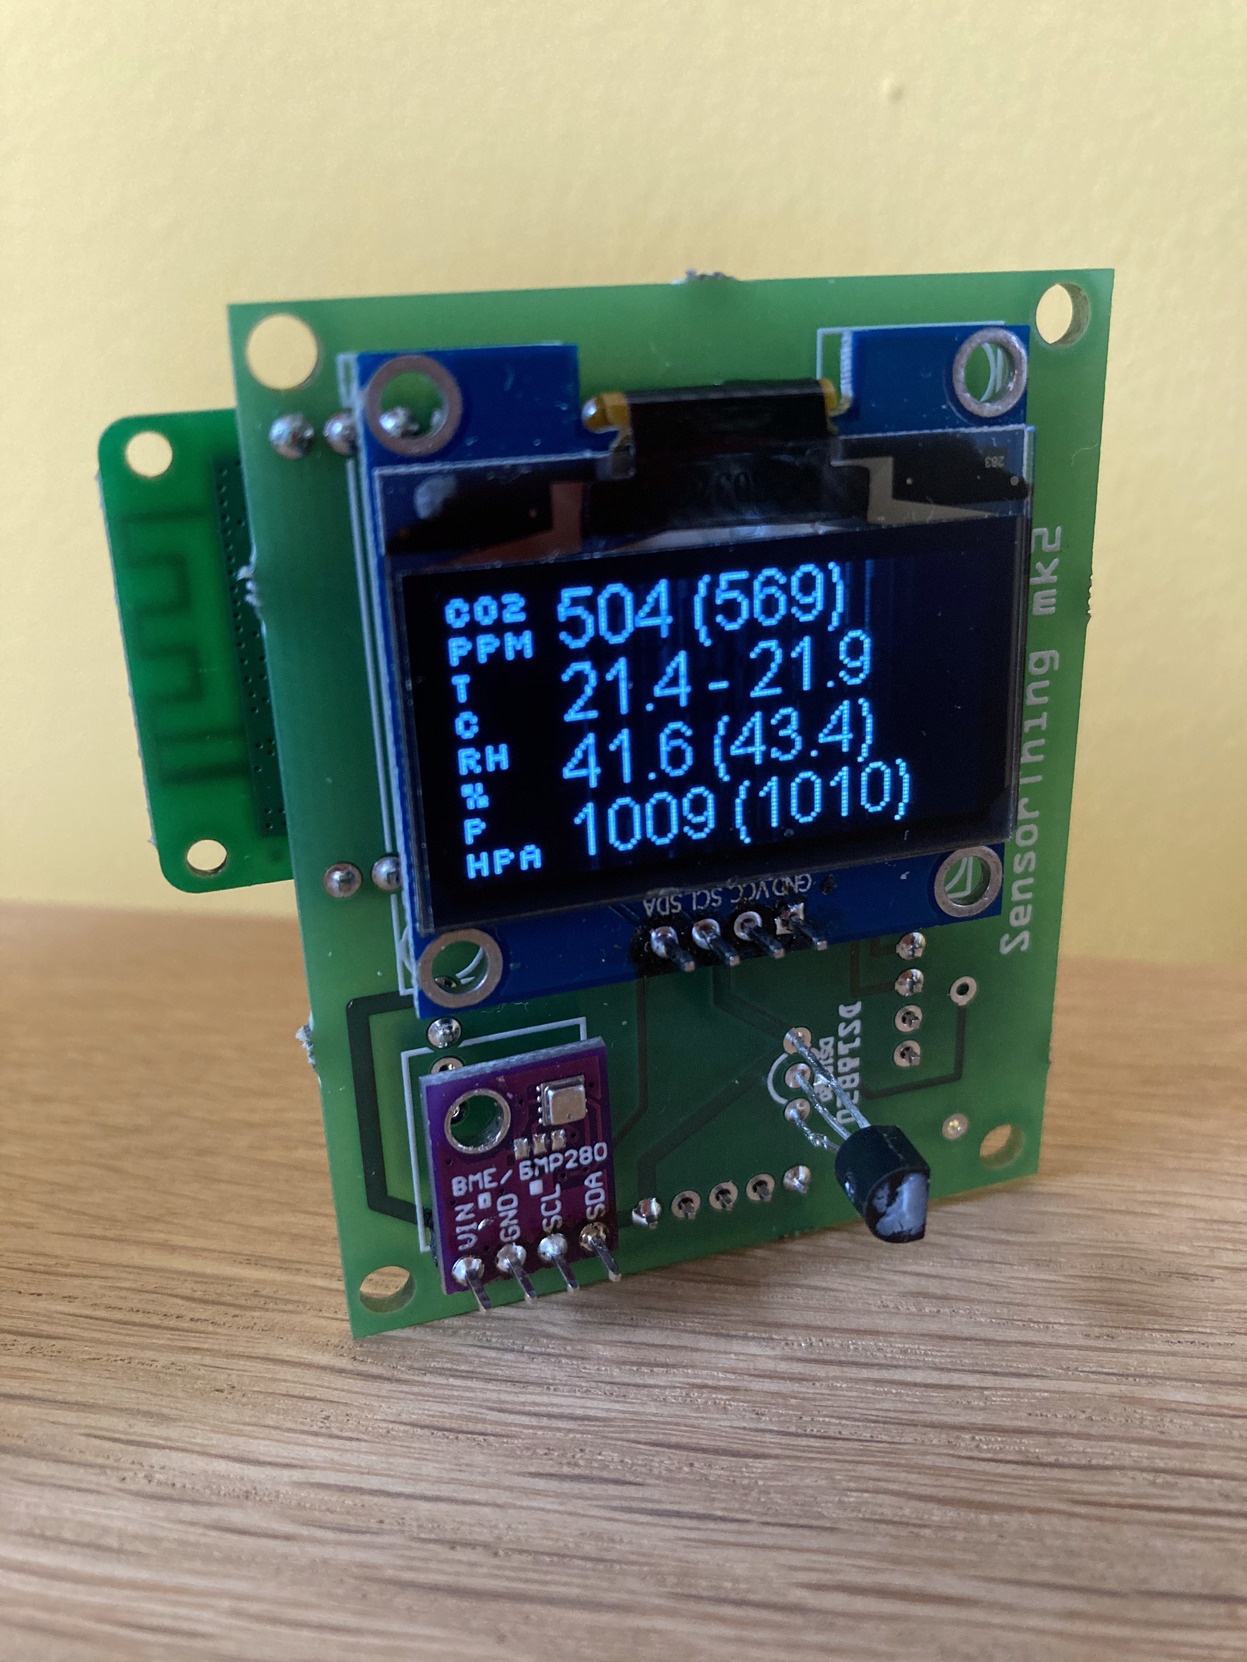
display:
- platform: ssd1306_i2c
model: "SH1106 128x64"
address: 0x3C
lambda: |-
it.printf(0, 2, id(my_font1), "CO2");
it.printf(0, 10, id(my_font1), "PPM");
it.printf(24, 6, id(my_font3), "%d (%d)", int(id(mhz_19_co2).state), int(id(mhz_19_co2_ema).state));
it.printf(0, 18, id(my_font1), "T");
it.printf(0, 26, id(my_font1), "C");
it.printf(24, 22, id(my_font3), "%.1f (%.1f)", id(bme_280_temp).state, id(bme_280_temp_ema).state);
it.printf(0, 34, id(my_font1), "RH");
it.printf(0, 42, id(my_font1), "%%");
it.printf(24, 38, id(my_font3), "%.1f (%.1f)", (id(bme_280_rh).state), (id(bme_280_rh_ema).state));
it.printf(0, 50, id(my_font1), "P");
it.printf(0, 58, id(my_font1), "HPa");
it.printf(24, 54, id(my_font3), "%d (%d)", int(id(bme_280_press).state), int(id(bme_280_press_ema).state));
Temperature calibration 
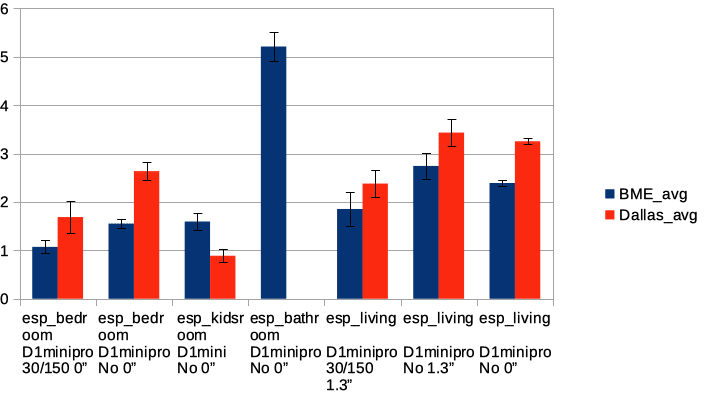
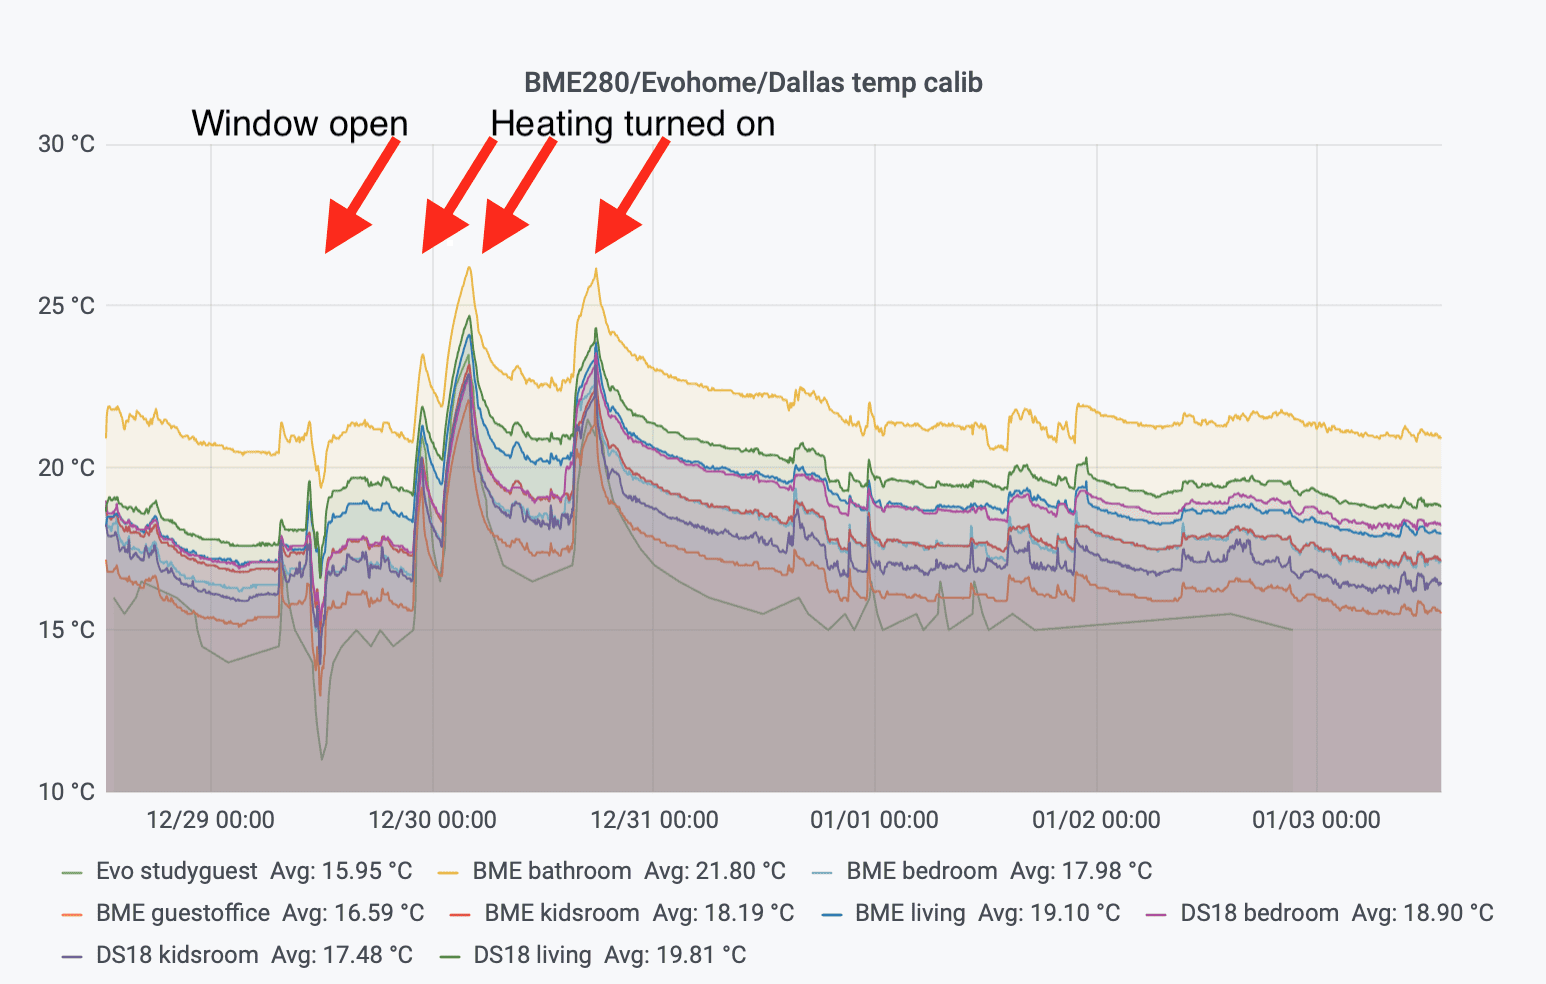
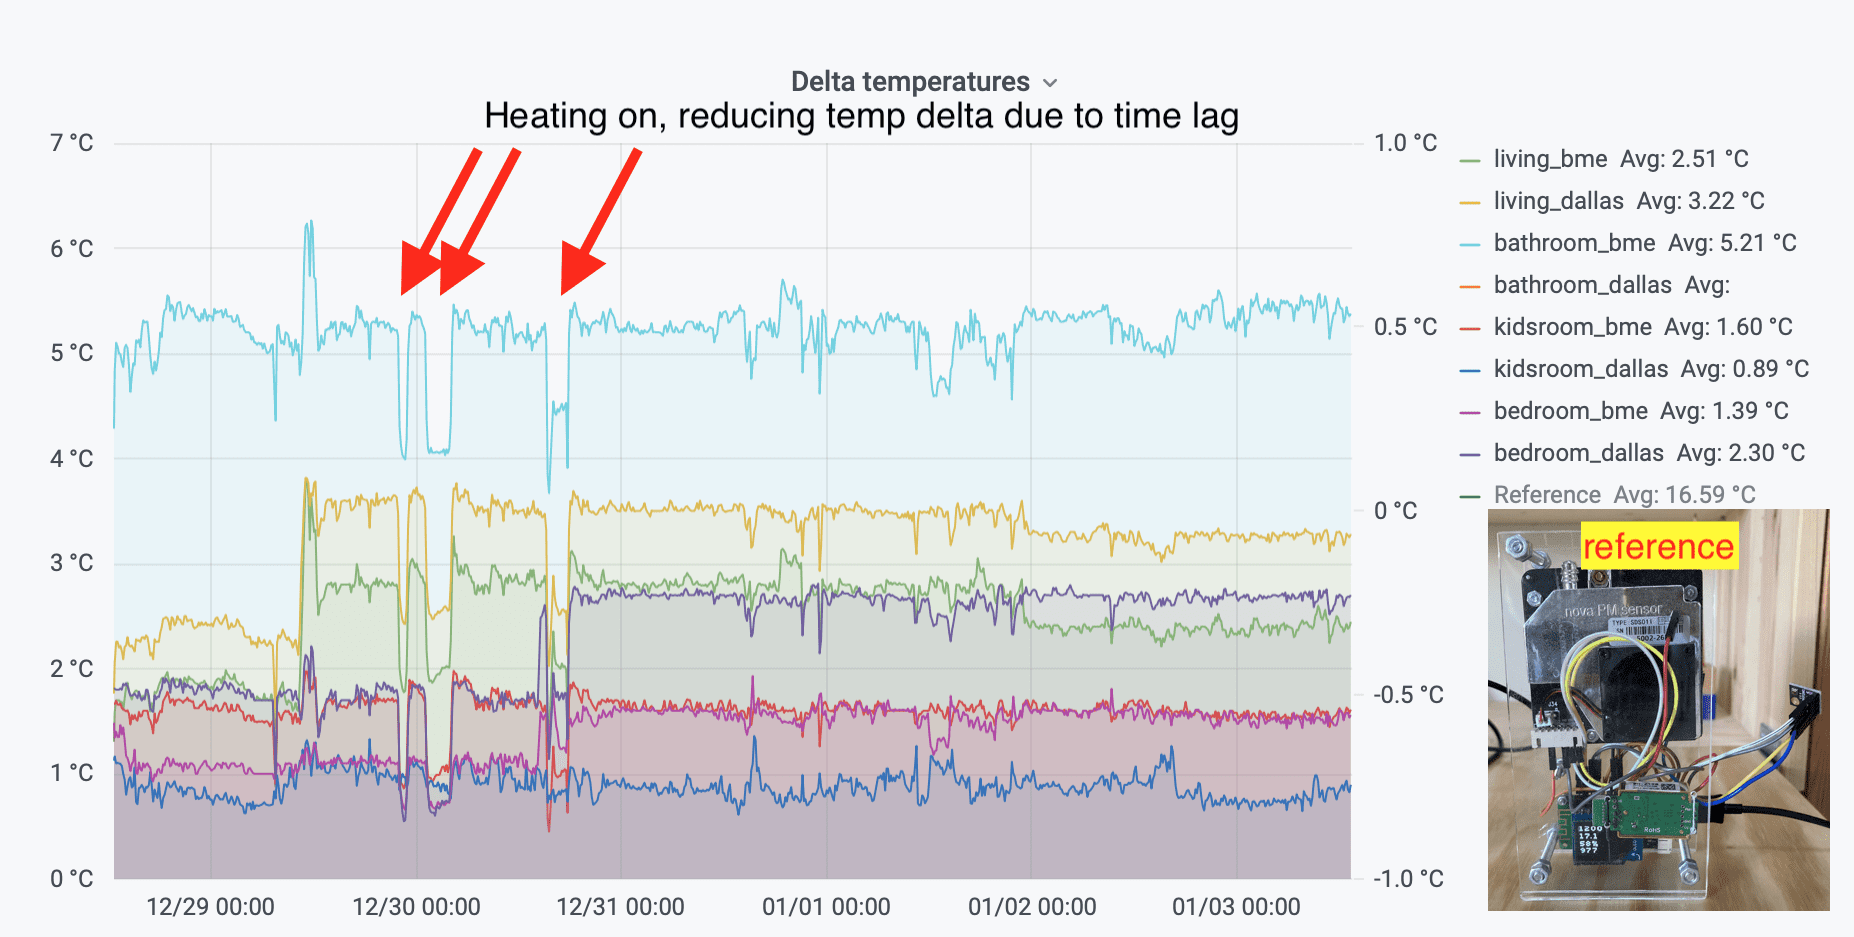
The ‘closed’ box of the previous design (vanwerkhoven.org) reported higher temperatures than the room really was, and it appeared I underestimated the heat generation of the ESP8266 SoC. To solve this, I compared self-heating in different design (variations).
Preliminary conclusions: The PCB design without OLED and the D1 mini (non-pro), (which I called ’esp_kidsroom’) seems to give the best results. The ‘closed’ box (’esp_bathroom’) gives the worst results. Adding (arguably) ugly wires to increase distance always helps. Deep sleep helps. Turning off the OLED helps a little bit. The Wemos D1 mini seems cooler than the D1 mini pro.

Looking at each design in detail:
esp_bathroom: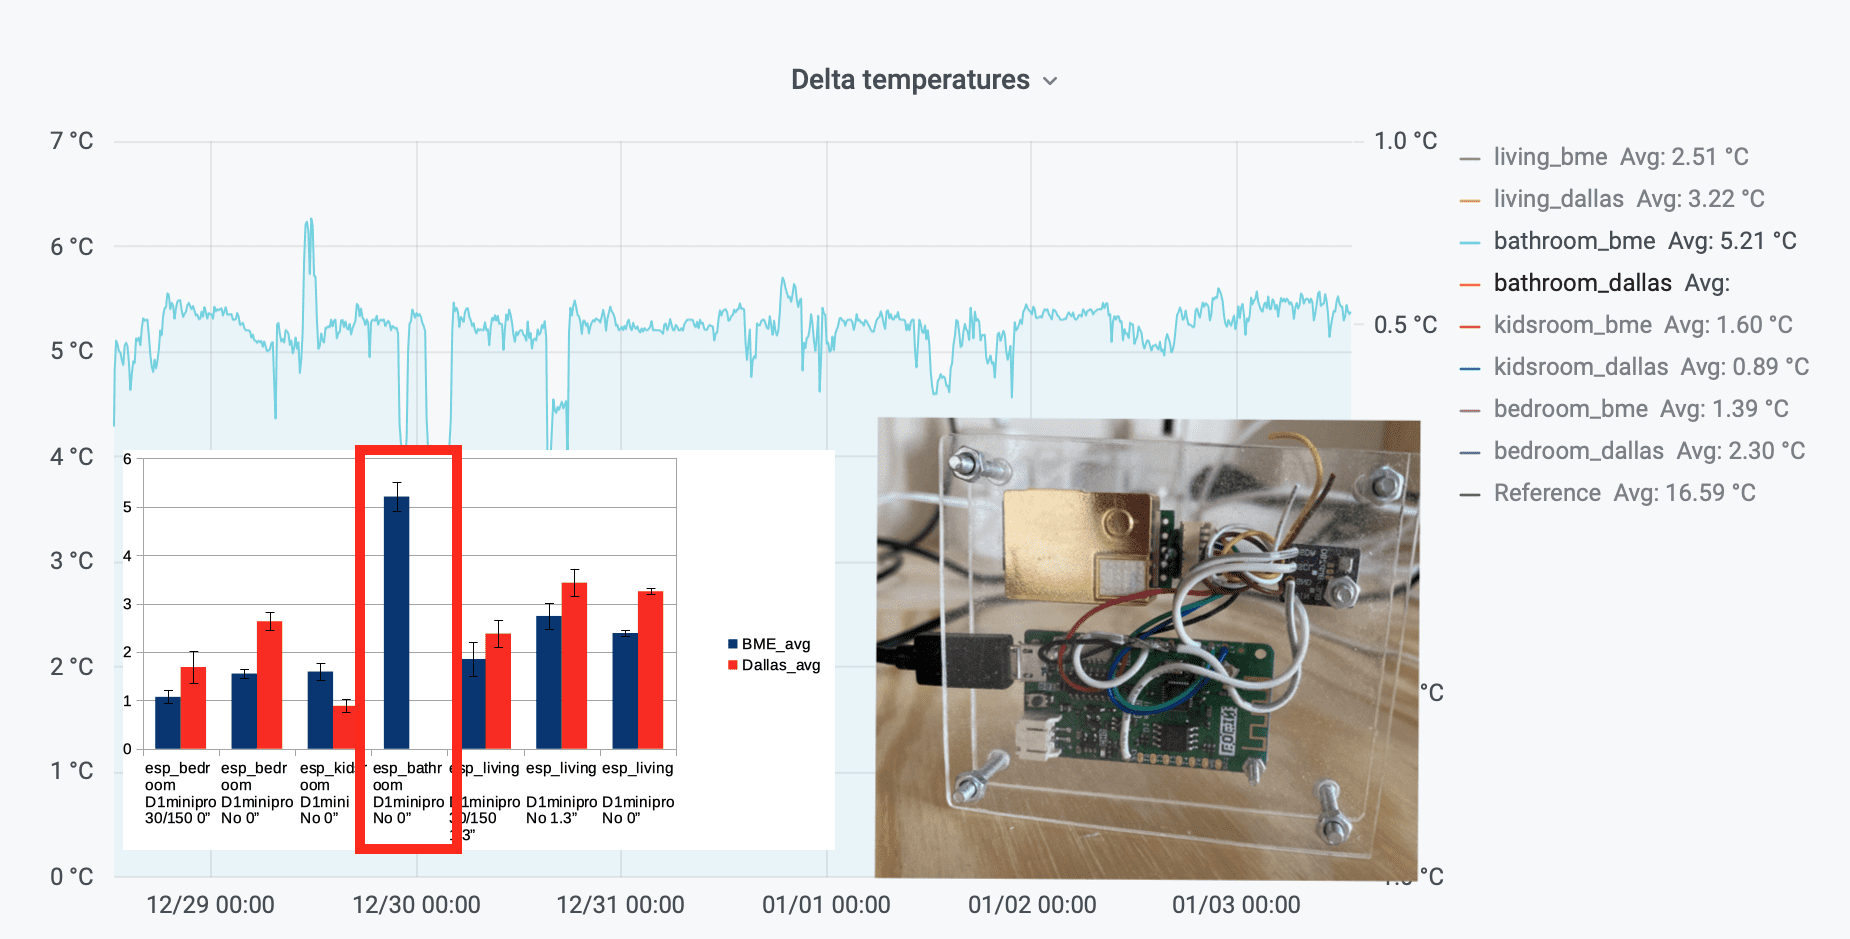
esp_bedroom: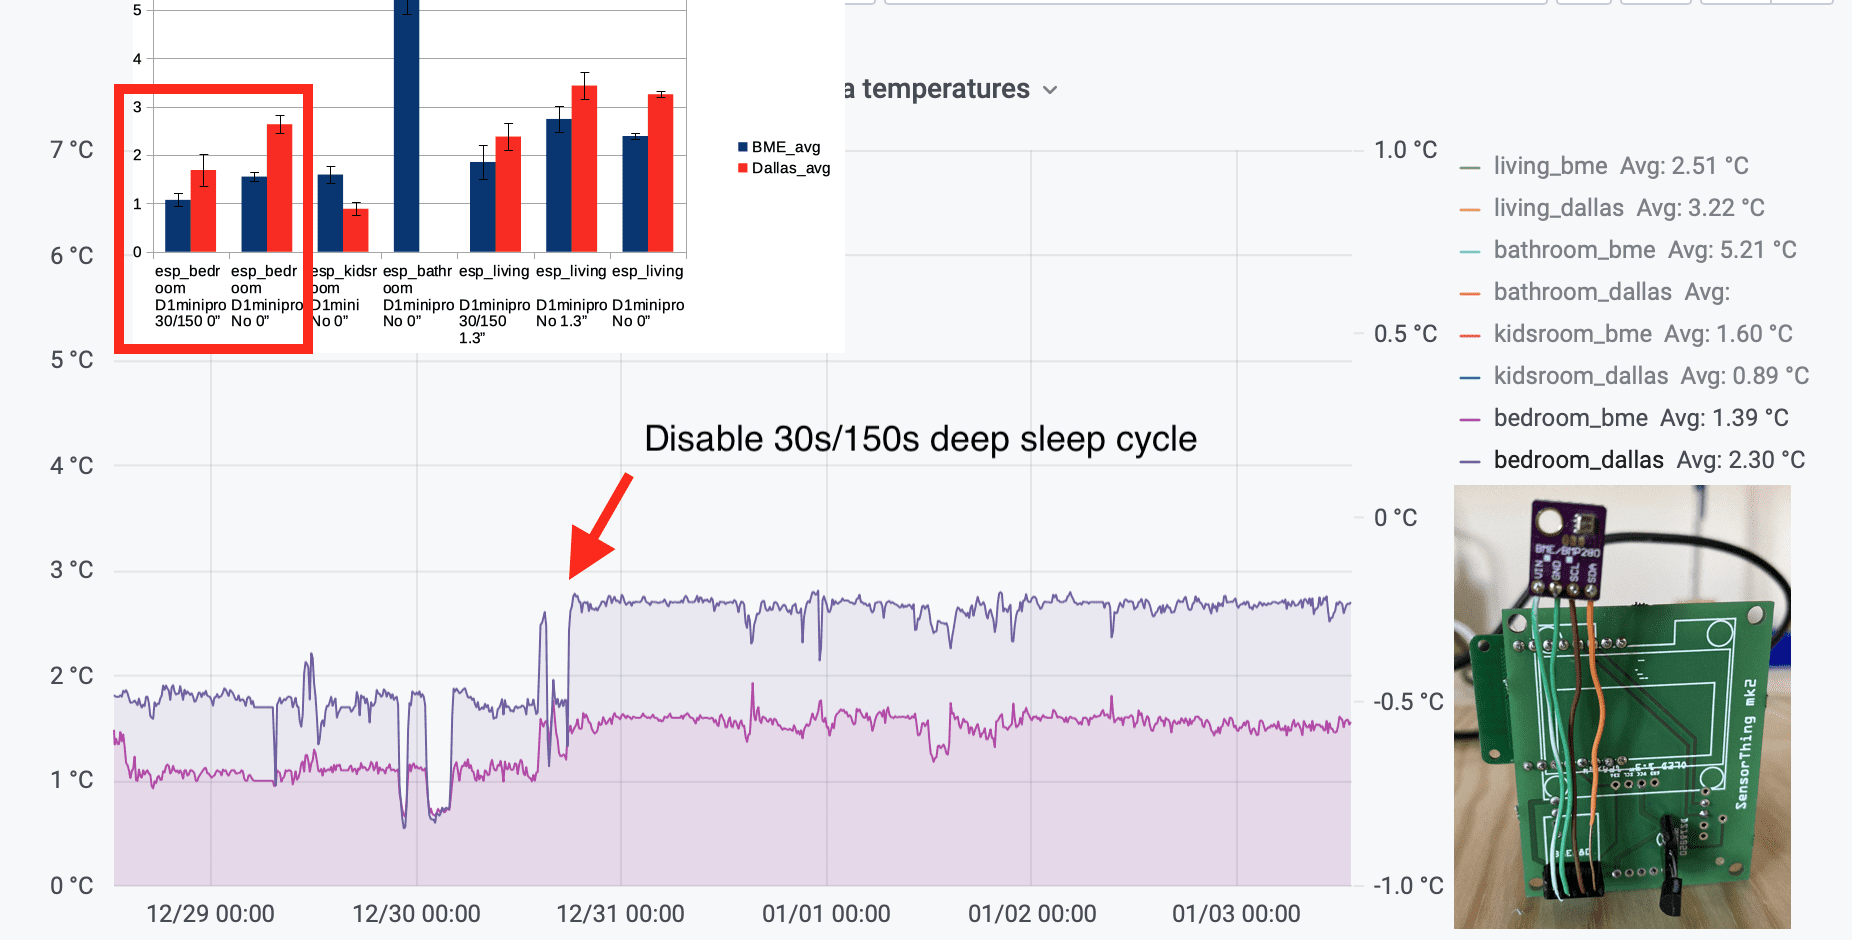
esp_kidsroom: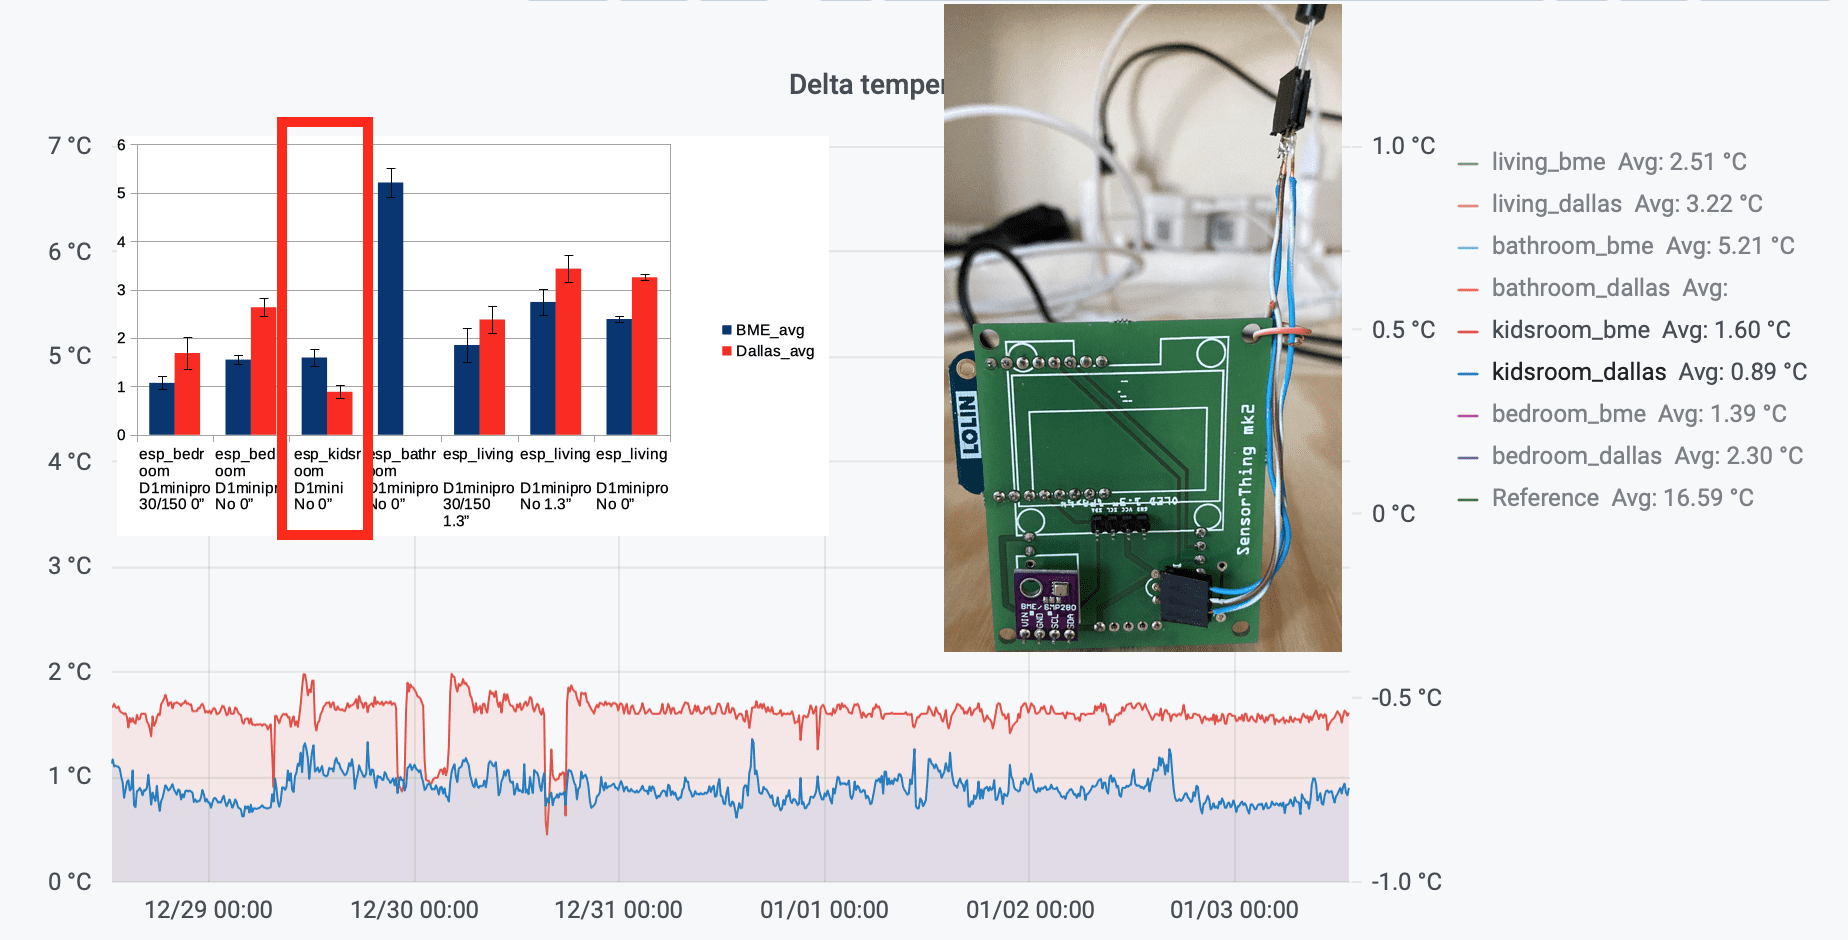
esp_living: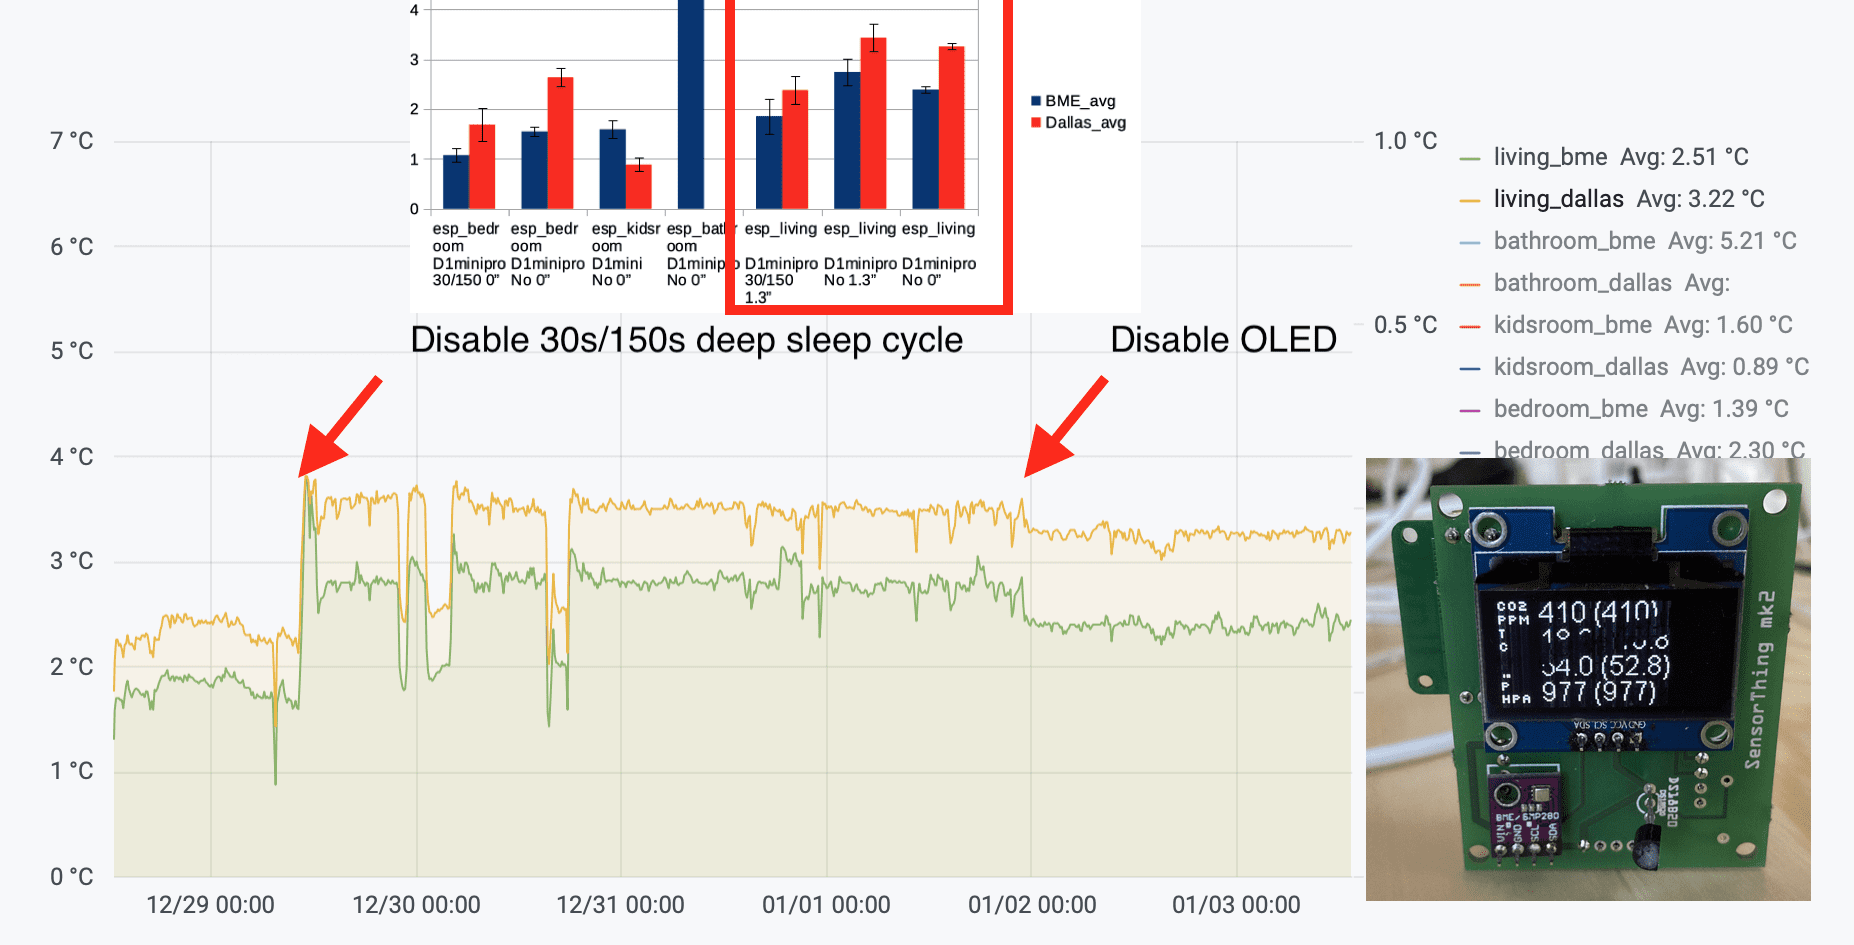
I will expand this section once I have more time for analysis/digestion of results.
Future work 
- Try to measure, model, and calibrate self-heating
- Use direct ESP8266 chips instead of modules for more compact design.
- Perhaps just give up and buy 10 euro wireless temperature sensors 😬