ESP8266 sensing CO2 + Temp + RH + Pressure
(Updated: )
I’ve progressed somewhat in home-integrated sensors, and I’ve established a baseline for a connected home-environment sensor, which I document here.
Update : This design appears to cause some self-heating of the bme280 sensor, leading to a temperature of 2-3 degrees too high. Perhaps mounting it outside the ‘case’ solves this.
Update : I’ve updated the design of this board (vanwerkhoven.org)
Goal 
For this sensor, my goals are:
- Measure indoor air quality: achieved with range CO2, temperature, relative humidity, and pressure sensors
- Small formfactor: achieved with small Arduino clone
- Extensible: achieved with ESPHome / flexible hardware
- Versatile data collection: achieved with ESPHome
- Non-cloud: achieved with ESPHome combined with RPi running Influxdb/Mosquitto broker
Options and considerations 
I use the following hardware and software, alternatives are also included for comparison
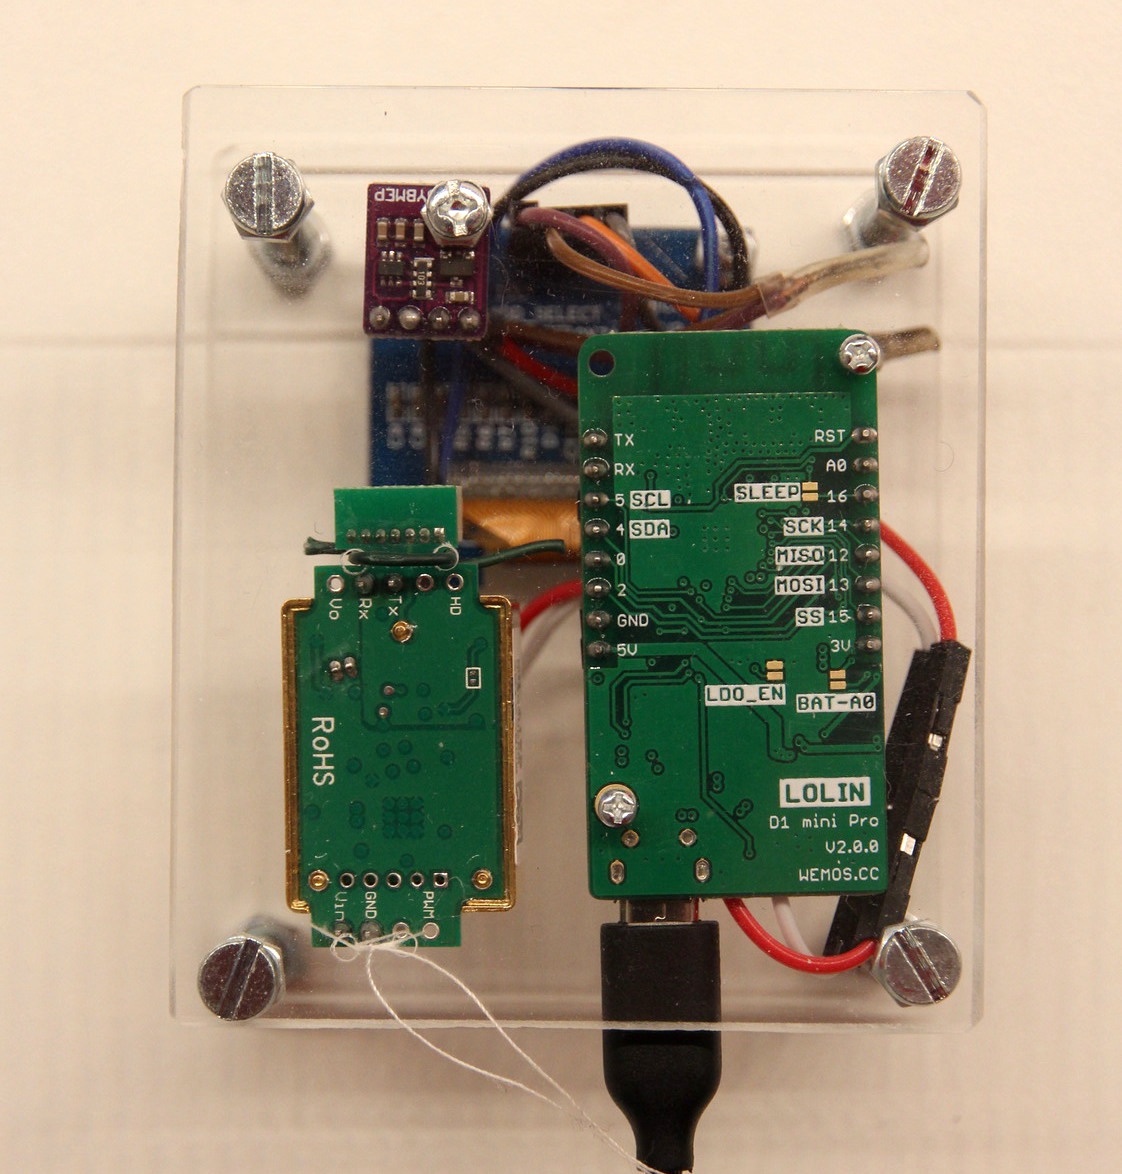
- Board: ESP8266 Lolin D1 Mini Pro (wemos.cc): because it’s cheap, compact, enough CPU power, sufficient IO. See also my previous post (vanwerkhoven.org)
- CO2: Winsen MH-Z19b (winsen-sensor.com), reasonable price/quality ratio, measures direct CO2 (vs equivalent CO2 like AMS CSS811 (ams.com)), see also in my previous post (vanwerkhoven.org)
- T/RH/P: Bosch BME280 (bosch-sensortec.com): very good price/quality ratio, see also this definitive guide (kandrsmith.org)
- Screen: 1.3" I2C 128x64 pixel OLED display (tinytronics.nl), reasonable size and price, I2C is easy to work with.
- OS: ESPHome (esphome.io), similar to ESPEasy but I like it a bit better because it builds on existing platformio backbone. See also this comparison (github.io)
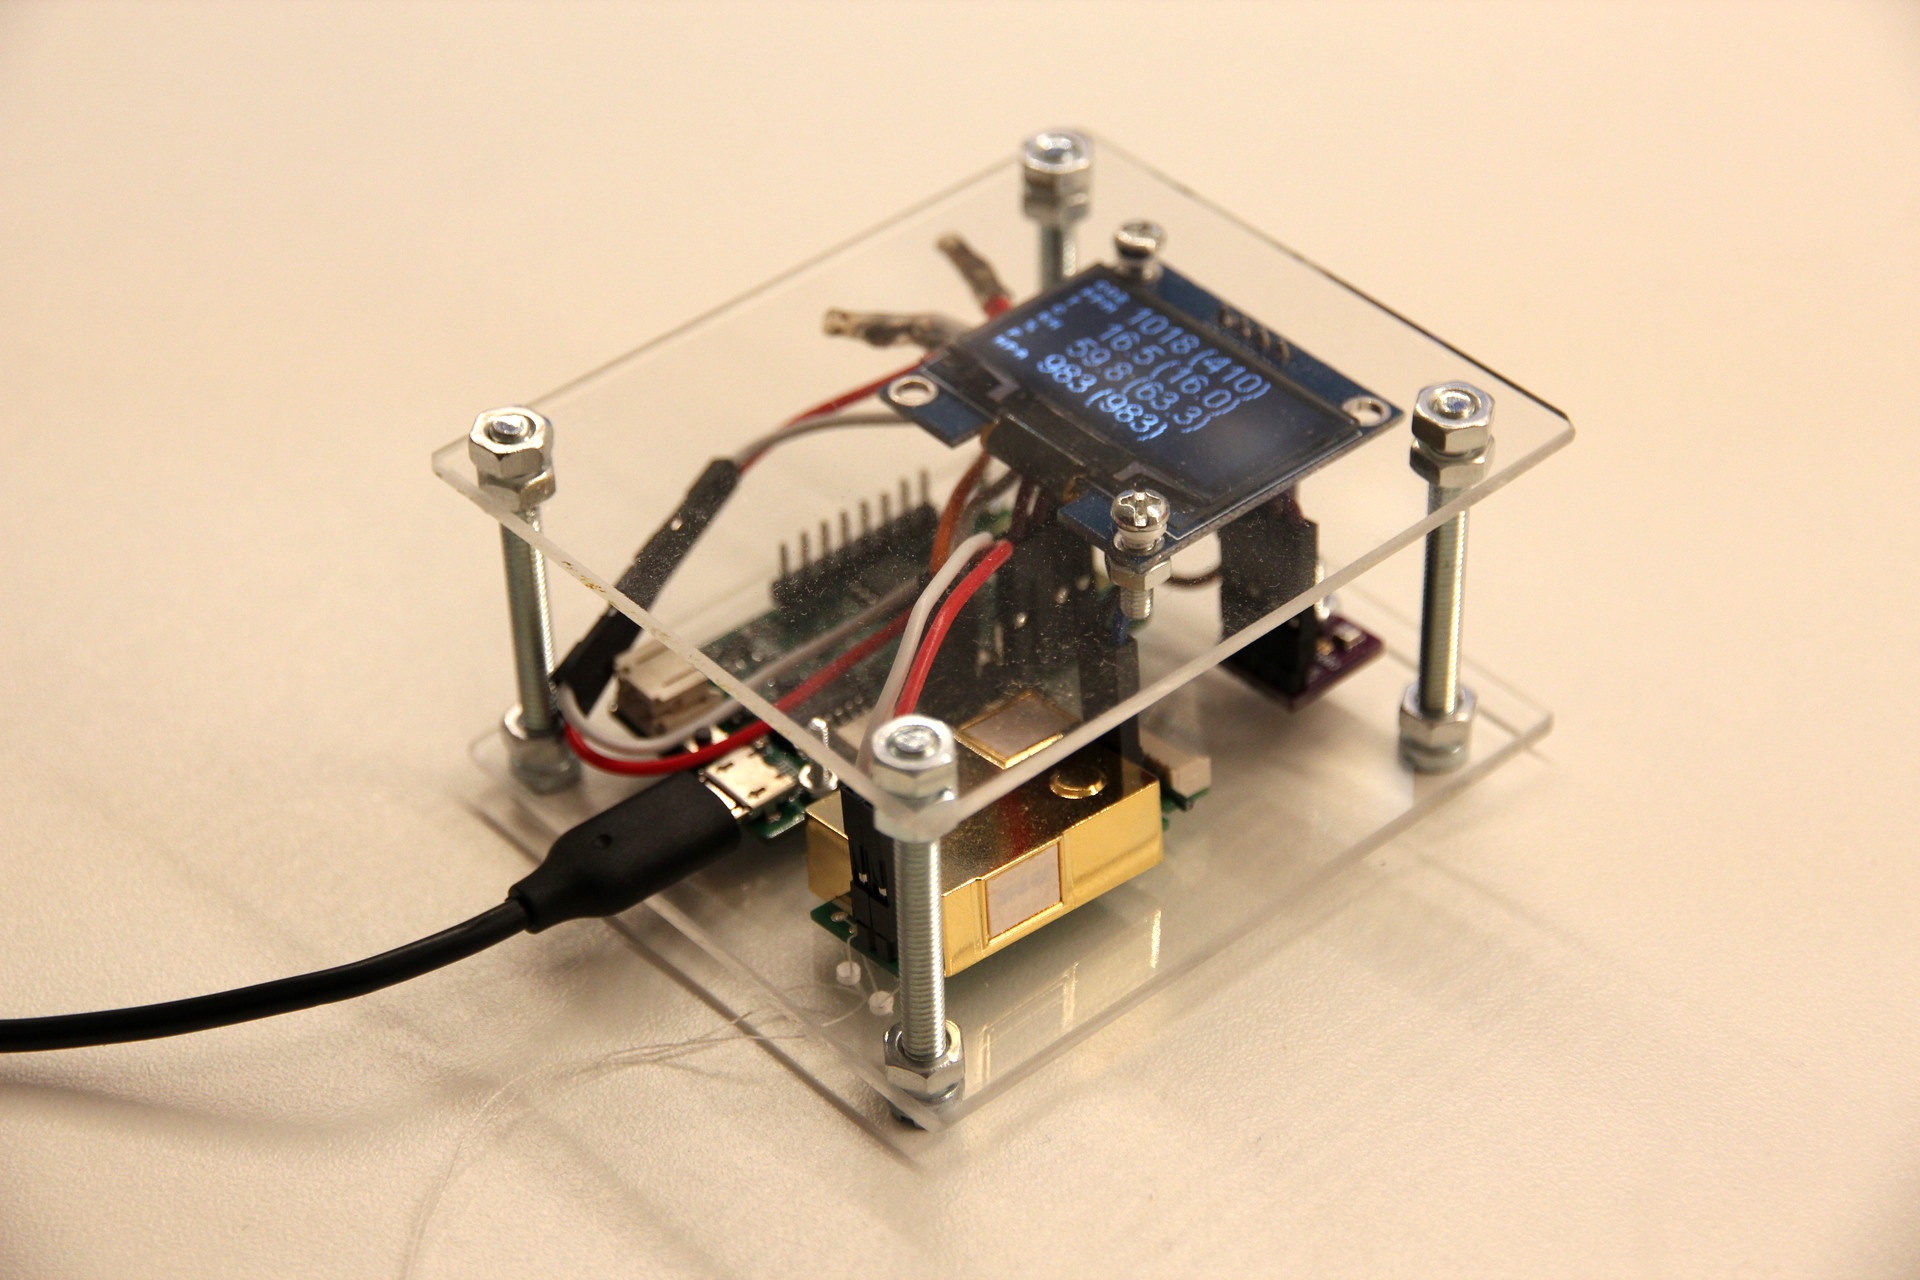
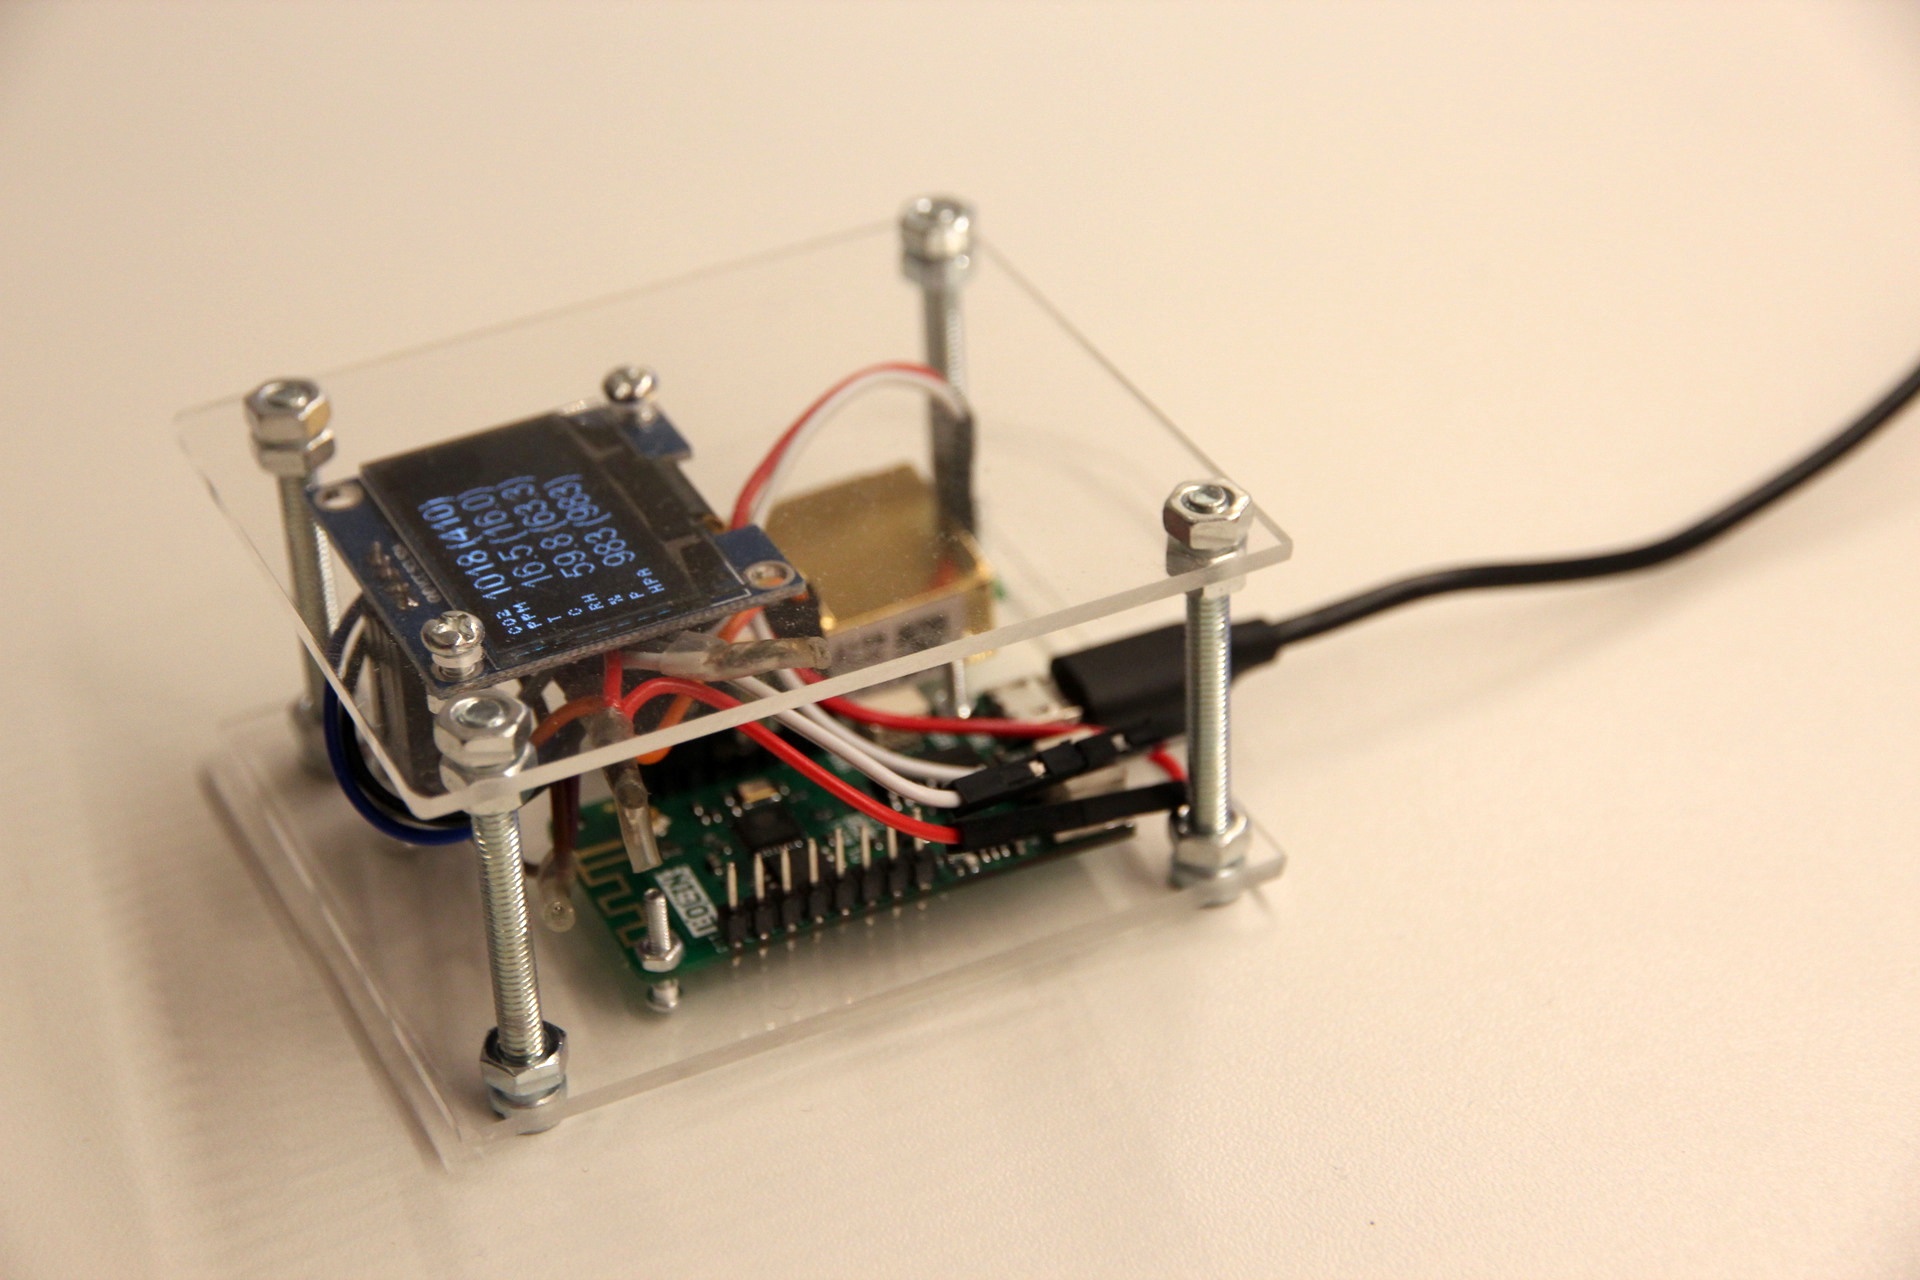
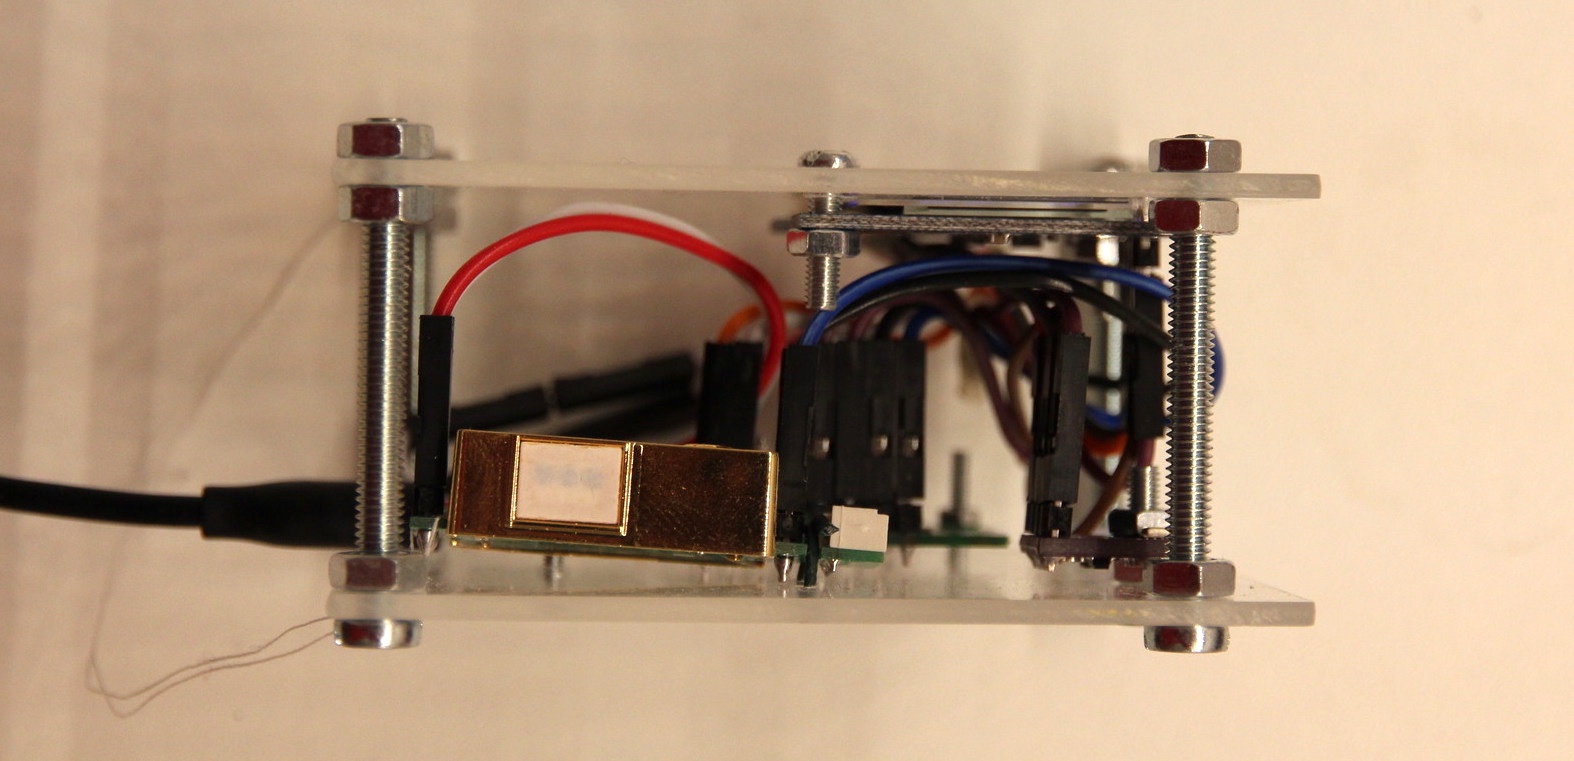
- Mounting: perspex with m2/m3/m4 bolts
Integration 
Optional: get familiar with ESP8266 
If you’ve never done anything with ESP8266 yet, I recommend running the fade.ino routine on your board. See my previous post until ’test program’ (vanwerkhoven.org) for instructions.
Install ESPHome 
First install ESPHome. This allows us to update the board later.
- Get ESPHome on your computer (esphome.io)
- Start ESPHome dashboard (esphome.io)
- Optional: install serial port driver, e.g. for the Winchiphead CH340 (CH340C/CH340G): check instructions for your OS (outside scope of this article)
- Create new configuration in ESPHome dashboard (see here for instructions for Adafruit version (adafruit.com))
- Upload basic config, example below
- You can now access (and change) your board over WiFi!
esphome:
  name: esp_test_board
  platform: ESP8266
  board: d1_mini_pro

wifi:
  ssid: "your wifi SSID"
  password: "your wifi password"
  #fast_connect: True # Required to connect to hidden SSIDs and only with one network

  # Enable fallback hotspot (captive portal) in case wifi connection fails
  ap:
    ssid: "Esp Living Fallback Hotspot"
    password: "your fallback password"

captive_portal:

# Enable logging
logger:
  # Disable UART Logging to fix MHZ-19B preamble issue when using hardware UART, see https://github.com/esphome/issues/issues/488
  # Not strictly necessary anymore with 1.14.0 https://github.com/esphome/esphome/releases/tag/v1.14.0
  # baud_rate: 0

# Disable Home Assistant API
# api:

web_server:
  port: 80

ota:
Assemble hardware 
Once you have all parts, connect as below. Either using headers (tinytronics.nl) and jump wires (wikipedia.org) like these (tinytronics.nl) (easier), or direct wire soldering (more compact).
The ESP8266 has one hardware serial (UART) port (wikipedia.org), marked RX and TX on the board, which is also used for logging and uploading firmware over USB.
Alternatively, ESPHome supports software serial (esphome.io) where the CPU simulates a UART port on any GPIO pin. This can cause glitches, but at the low baud rates (wikipedia.org) (<100k) our sensors need this is likely OK. The advantage is that you keep logging and uploading firmware over the serial (USB) port.
When connecting the serial MH-Z19B sensor to the ESP8266 board, you have two choices:
- Recommended: use software serial port (any pins, e.g. 12 and 13), lower baud rate, and keep logging
- Use hardware UART (pins RX and TX) and disable logging, see also this issue (github.com)
- Unfortunately it took me a while to figure out SW serial works, so several of my first boards (like the one below) use the hardware serial. In both cases, ‘RX’ and ‘TX’ pins are always with respect to the component, i.e. TX pin on the MH-Z19B should be connected to a RX pin on the board (the sensor sends data, the board receives).
Wiring using software UART 
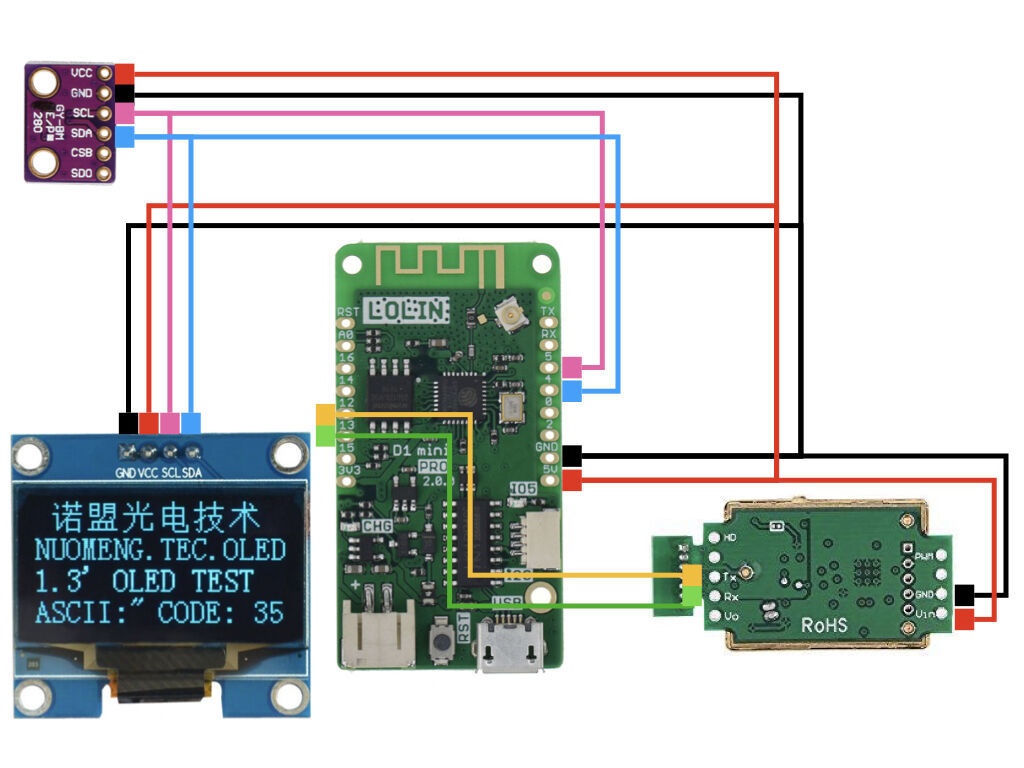
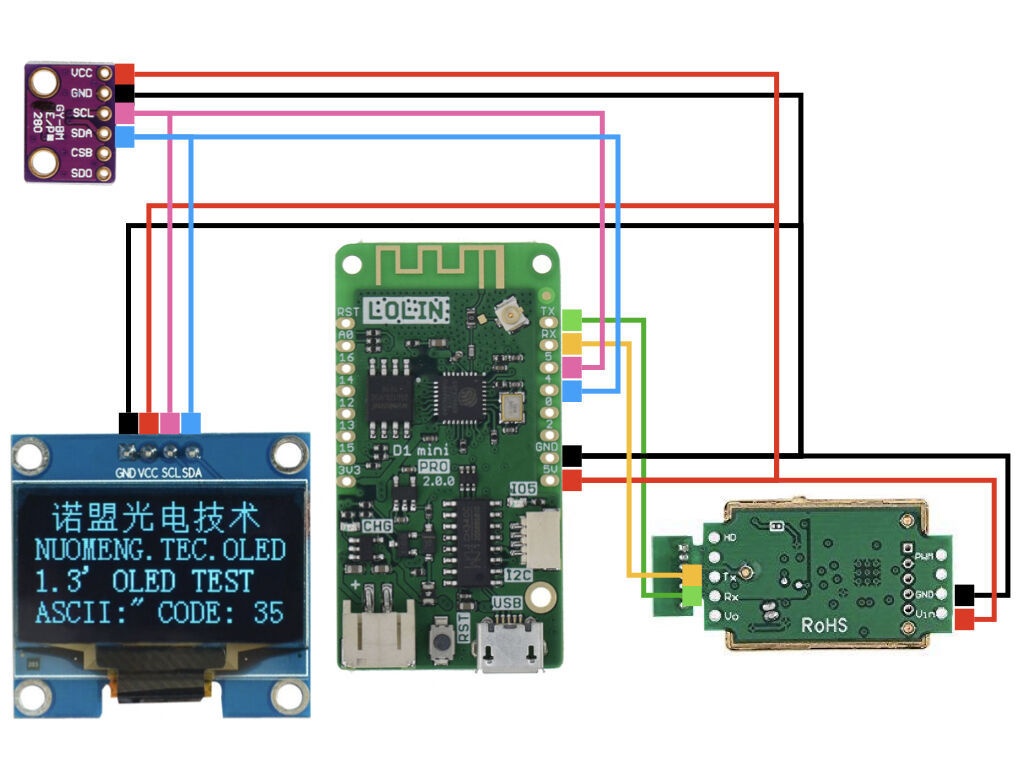
Wiring using hardware UART 
This is not recommended as it breaks uploading firmware via serial port until you disconnect the MH-Z19B sensor.
Wire example 

Configure software 
Once hardware is connected, configure the sensors as you see fit. See the extensive documentation at ESPHome.io (esphome.io). My example is shown below.
esphome:
  name: esp_test_board
  platform: ESP8266
  board: d1_mini_pro

wifi:
  ssid: "your wifi SSID"
  password: "your wifi password"
  #fast_connect: True # Required to connect to hidden SSIDs and only with one network

  # Enable fallback hotspot (captive portal) in case wifi connection fails
  ap:
    ssid: "Esp Living Fallback Hotspot"
    password: "your fallback password"

captive_portal:

# Enable logging
logger:
  # Disable UART Logging to fix MHZ-19B preamble issue when using hardware UART, see https://github.com/esphome/issues/issues/488
  # Not strictly necessary anymore with 1.14.0 https://github.com/esphome/esphome/releases/tag/v1.14.0
  # baud_rate: 0

# Disable Home Assistant API
# api:

web_server:
  port: 80

ota:

uart:
  # For hardware serial:
  rx_pin: GPIO3 # GPIO3 = RX hardware
  tx_pin: GPIO1 # GPIO1 = TX hardware
  # For software serial:
  rx_pin: GPIO12
  tx_pin: GPIO13
  baud_rate: 9600
  id: myuart1

i2c:
  sda: 4
  scl: 5
  scan: True

# Ensure you get *ttf files from somewhere
font:
  - file: "slkscr.ttf"
    id: my_font1
    size: 8
  - file: "slkscr.ttf"
    id: my_font2
    size: 16
  - file: "Arial.ttf"
    id: my_font3
    size: 16

mqtt:
  # For mobile = WAN : use FQDN, for local (IoT network - no WAN), use home IP.
  broker: "192.168.0.1"
  #broker: home.yourhostname.org
  port: 1883
  username: "esp_board_client"
  password: "AQFCg72z5MqFihspHGbkqOj9"

sensor:
  - platform: wifi_signal
    name: "WiFi Signal"
    update_interval: 10s
    id: mywifi1
  - platform: wifi_signal
    name: "WiFi Signal2"
    update_interval: 10s
    filters:
    - exponential_moving_average:
        alpha: 0.001 # We want ~6 hour averaging, at 10s update, that's 6*3600/10 = 2160 points, thus alpha should be 2/2160 ~ 0.001
        send_every: 1
    id: mywifi2
  - platform: mhz19
    co2:
      name: "MH-Z19 CO2"
      state_topic: influx/environv3/quantity/CO2/source/mhz19b/board/esp_living/location/mobile/room/car2/value/state
      id: mhz_19_co2
    temperature:
      name: "MH-Z19 Temperature"
      #state_topic: influx/environv3/quantity/T/source/mhz19b/board/esp_testing/location/home/room/bathroom/value/state
      state_topic: influx/environv3/quantity/T/source/mhz19b/board/esp_living/location/mobile/room/car2/value/state
      id: mhz_19_T
    update_interval: 20s
    uart_id: myuart1
  - platform: mhz19
    co2:
      name: "MH-Z19 CO2"
      #state_topic: influx/environv3/quantity/CO2/source/mhz19b/location/testing/value/state
      id: mhz_19_co2_ema
      filters:
      - exponential_moving_average:
          alpha: 0.001 # We want ~12 hour averaging, at 20s update, that's 12*3600/20 = 2160 points, thus alpha should be 2/2160 ~ 0.001
          send_every: 1
    temperature:
      name: "MH-Z19 Temperature"
      #state_topic: influx/environv3/quantity/T/source/mhz19b/location/testing/value/state
      id: mhz_19_T_ema
      filters:
      - exponential_moving_average:
          alpha: 0.001 # We want ~12 hour averaging, at 20s update, that's 12*3600/20 = 2160 points, thus alpha should be 2/2160 ~ 0.001
          send_every: 1
    update_interval: 20s # if changed also update alpha
    uart_id: myuart1
  - platform: bme280
    temperature:
      name: "BME280 Temperature"
      oversampling: 16x
      id: bme_280_temp
      #state_topic: influx/environv3/quantity/T/source/bme280/board/esp_mobile/location/mobile/room/car/value/state
      #state_topic: influx/environv3/quantity/T/source/bme280/board/esp_mobile/location/home/room/living/value/state
      state_topic: influx/environv3/quantity/T/source/bme280/board/esp_living/location/mobile/room/car2/value/state
    pressure:
      name: "BME280 Pressure"
      id: bme_280_press
      #state_topic: influx/environv3/quantity/P/source/bme280/board/esp_mobile/location/mobile/room/car/value/state
      #state_topic: influx/environv3/quantity/P/source/bme280/board/esp_mobile/location/home/room/living/value/state
      state_topic: influx/environv3/quantity/P/source/bme280/board/esp_living/location/mobile/room/car2/value/state
    humidity:
      name: "BME280 Humidity"
      id: bme_280_rh
      # state_topic: influx/environv3/quantity/RH/source/bme280/board/esp_mobile/location/mobile/room/car/value/state
      #state_topic: influx/environv3/quantity/RH/source/bme280/board/esp_mobile/location/home/room/living/value/state
      state_topic: influx/environv3/quantity/RH/source/bme280/board/esp_living/location/mobile/room/car2/value/state
    address: 0x76
    update_interval: 30s
  - platform: bme280
    temperature:
      name: "BME280 Temperature"
      oversampling: 16x
      id: bme_280_temp_ema
      filters:
      - exponential_moving_average:
          alpha: 0.001 # We want ~12 hour averaging, at 20s update, that's 12*3600/20 = 2160 points, thus alpha should be 2/2160 ~ 0.001
          send_every: 1
      # state_topic: influx/environv3/quantity/T/source/bme280/location/mobile/value/state
    pressure:
      name: "BME280 Pressure"
      id: bme_280_press_ema
      filters:
      - exponential_moving_average:
          alpha: 0.0002 # We want ~48 hour averaging, at 20s update, that's 48*3600/20 = 8640 points, thus alpha should be 2/8640 ~ 0.0002
          send_every: 1
      # state_topic: influx/environv3/quantity/P/source/bme280/location/mobile/value/state
    humidity:
      name: "BME280 Humidity"
      id: bme_280_rh_ema
      filters:
      - exponential_moving_average:
          alpha: 0.001 # We want ~12 hour averaging, at 20s update, that's 12*3600/20 = 2160 points, thus alpha should be 2/2160 ~ 0.001
          send_every: 1
      # state_topic: influx/environv3/quantity/RH/source/bme280/location/mobile/value/state
    address: 0x76
    update_interval: 20s # if you change this don't forget to update alpha

display:
  - platform: ssd1306_i2c
    model: "SH1106 128x64"
    address: 0x3C
    lambda: |-
      it.printf(0,  2, id(my_font1), "CO2");
      it.printf(0,  10, id(my_font1), "PPM");
      it.printf(24, 6, id(my_font3), "%d (%d)", int(id(mhz_19_co2).state), int(id(mhz_19_co2_ema).state));

      it.printf(0, 18, id(my_font1), "T");
      it.printf(0,  26, id(my_font1), "C");
      it.printf(24, 22, id(my_font3), "%.1f (%.1f)", id(bme_280_temp).state, id(bme_280_temp_ema).state);

      it.printf(0, 34, id(my_font1), "RH");
      it.printf(0,  42, id(my_font1), "%%");
      it.printf(24, 38, id(my_font3), "%.1f (%.1f)", (id(bme_280_rh).state), (id(bme_280_rh_ema).state));

      it.printf(0, 50, id(my_font1), "P");
      it.printf(0, 58, id(my_font1), "HPa");
      it.printf(24, 54, id(my_font3), "%d (%d)", int(id(bme_280_press).state), int(id(bme_280_press_ema).state));
Future work 
- Document fine dust measurements with SDS-011
- Get AMS CCS811 sensor working
- Improve housing options –> now available using PCB design! (vanwerkhoven.org)
References 
- Getting started with LOLIN D1 mini/DHT22 on Mac (vanwerkhoven.org)
- Measuring CO2 using MH-Z19B and D1 mini pro (vanwerkhoven.org)
- Testing the MH-Z19 Infrared CO2 Sensor Module (circuits.dk)
- Wide range of Hygrometers: DHT22, AM2302, AM2320, AM2321, SHT71, HTU21D, Si7021, BME280 (kandrsmith.org)
- UPDATED: Which TVOC sensor is the Best for Air Quality? Lets’s compare: BME680 vs CCS811 vs SGP30 (jaredwolff.com)
- Measuring air quality using Bosch BME680 and AMS CCS811 – IAQ, TVOC, eCO2 (jokielowie.com)