Getting started with LOLIN D1 mini/DHT22 on Mac
(Updated: )
To augment my smarthome hub and feed it with more data, I’m experimenting with LOLIN (aliexpress.com) ESP8266 boards (wikipedia.org) from WeMos (wemos.cc). Specifically, I have the LOLIN D1 mini Pro v2.0.0 (wemos.cc). In this post I document how I overcame some hurdles in getting this to work. See also this WeMos tutorial (wemos.cc).
Choosing the right board 
There is a wide range of ESP8266 boards available, I choose the WeMos D1 mini pro v2.0.0. Note that the versions are relevant, as there are subtle improvements between them. Alternatively to WeMos, there is also the Adafruit Feather Huzzah (hobbyelectronica.nl).
Setting up environment 
Enable VCP (Virtual COM Port) 
To connect to the D1 mini pro on a Mac (and possibly other systems), one needs a Virtual COM Port to facilitate host communication. There appear to be two versions (mine had a CH340C):
- Winchiphead CH340 (CH340C/CH340G): Get winchiphead 340c drivers for Mac here (sengotta.net).
- Winchiphead CP2104: Get drivers from Silicon Labs (silabs.com).
Install drivers 
Update 20191225: there is a very good Sparkfun guide (sparkfun.com) on getting this to work. For both drivers mentioned above, installation is similar:
Ensure the kext is installed:
ls /Library/Extensions/ | grep -i silab
If not, manually approve loading of the module (apple.com), optionally copy the file manually.
Ensure the driver is loaded (note: this kext will load dynamically, and might not show up if the ESP8266 board is not connected):
kextstat | grep -i silab
If not, load manually to debug for errors:
sudo kextutil /Library/Extensions/SiLabsUSBDriver.kext
Ensure the serial port is created:
ls /dev/cu.*
If not, ensure you are using a micro usb cable supporting data (i.e. not power only).
If this does not work, see this reddit comment for help (reddit.com) or this GitHub driver page (github.com)
Arduino IDE 
I use the Arduino IDE (arduino.cc) to develop on the ESP8266 board. For this you need an additional esp8266 board manager:
- Install board manager.
- Start Arduino and open Preferences window.
- Enter http://arduino.esp8266.co…age_esp8266com_index.json (esp8266.com) into Additional Board Manager URLs field. You can add multiple URLs, separating them with commas.
- Open Boards Manager from Tools > Board menu and install “esp8266" platform.
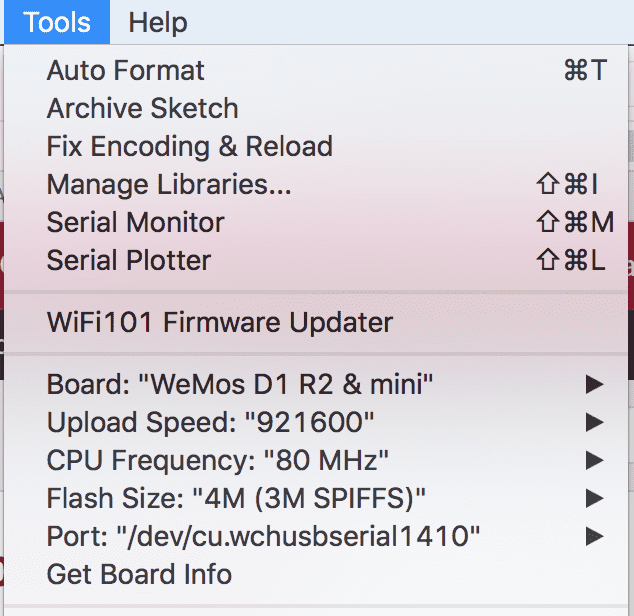
- Select Board “WeMos D1 R2 & mini”
- Select port /dev/cu.wchusbserial14140 (depending on USB to serial chip, i.e. board version) I have these settings for connecting to the Lolin board:
Run test program 
Once the hardware/software infrastructure is set up, it’s time to run the first program.
Download D1 mini examples 
There is a GitHub repo with D1 min examples (github.com). Install this in your Arduino folder:
cd ~/Documents/Arduino
git clone https://github.com/wemos/D1_mini_Examples.git
Open the Arduino IDE, the examples should show up under File -> Sketchbook -> D1_mini_examples.
Run the fade program 
A simple example program drives the LED on and off in a fading manner. Because all the hardware is already connected, you can’t do anything wrong with pins yet.
- Load the examples from File -> Sketchbook -> D1_mini_examples -> 01.Basics -> Fade.
- Upload the example program to the D1 mini: click the arrow or press Apple-U.
- The D1 mini should now start fading the led in and out (±2 sec/cycle) If this doesn’t work, ensure all the USB/VCP settings are correct as explained above.
Fun fact: the intensity is fading linearly while your eyes have a logarithmic response, which explains why the apparent ‘speed’ of the fading is not linear. Challenge: improve the example such that the apparent fading is linear across the intensity range.
Reading out DHT22 temperature/humidity sensor 
The DHT22 sensor is a combined temperature and humidity sensor. I have one with a pull-down resistor pre-soldered onto a PCB (hackerstore.nl), such that I have three pins: DAT, VCC, GND.
Connecting the DHT22 
It seems each pin on the D1 mini (escapequotes.net) has a hundred names, which utterly confused me at first. It works as follows.
- Connect DAT to port 4 = SDA on the D1 mini, which is D2 in the Arduino IDE.
- Connect VCC to 3.3V
- Connect GND to Ground
Reading out temperature 
Fortunately, there are many example programs which you can get directly from the Arduino IDE under “Tools -> Manage Libraries…”. Search for DHT and install one you like. I used the ‘DHT Sensor library’ (github.com) v1.3.0 by Adafruit and ‘DHT sensor library for ESPx’ (github.com) v1.0.9 by beegee_tokyo.
- Open a DHT example program (from File -> Examples -> ), DHT_Unified_Sensor (github.com) from Adafruit or DHT_ESP8266 (github.com) from beegee_tokyo.
- In either example, ensure you set the connected pin to D2 or 4 (these are identical).
- In the Arduino IDE, open the serial monitor and ensure the baud rate setting (bottom of the window) is the same as the baud rate in the example.
- Finally, upload the program as before, and the serial monitor should show the temperature and relative humidity. Hooray!